Chapter 11 - Glossaries
Part of becoming an expert in any field is learning the vocabulary used by practitioners. Experts in an area of study develop new language and word usage to communicate new ideas or subtle variations of old ones. As communities develop within a field and experts communicate with each other over time, new languages emerge. Many experts find it increasingly difficult to communicate with novices as they become more immersed in the language of their field.
Fortunately, Moodle has a tool to help you and your students develop glossaries of terms and embed them in your course. On the surface, the glossary module doesn’t seem to be more than a fancy word list. In practice, however, it’s a powerful tool for learning. The glossary module has a number of features that make it easy for you and your class to develop shared vocabulary lists, add comments to definitions, and even link every appearance of a word in a course to its glossary entry.
The glossary activity module allows participants to create and maintain a list of definitions, like a dictionary.
Glossary can be used in many ways. The entries can be searched or browsed in different formats and definitions can ‘pop up’ over instances of the word whenever the term appears in the module. A glossary can be a collaborative activity or be restricted to entries made by the teacher. Entries can be put in categories. The auto-linking feature will highlight any word in the course which is located in the glossary.
The glossary also allows teachers to export entries from one glossary to another (the main one) within the same module. Student entries can be set to be approved by a tutor before they are made available and students can also comment on entries.
Creative Glossary Uses
- Favorite Websites collection: You can setup the glossary to create a collection of the favorite websites that students find appropriate for the class.
- Annotated book reports: Students can submit their response to the glossary with concept being their name and title of book; teacher allows rating (by teacher) and comments (by all) so that it is easy for both the instructor to grade the original work (indexed by student name) AND students can share their work for peer review/comments prior to instructor grading.
- FAQs for the course compiled by the instructor from feedback from students in prior term courses.
- Biographies of people in the field
- Collaborative Encyclopedia - Have students create an encyclopedia of what they are learning about a person, or a people, a concept, a place, an event, a thing etc.
- Student of the Week - With glossary, you can add a photo of each student without identification. The random glossary block shows the photo of that student as student of the week; every student gets displayed.
- Another great idea is to use the random glossary entry block to do quotes of the day or vocab word of the day.
Creating Glossaries
Each Moodle course has its own set of glossaries. Only teachers can edit the main glossary. Secondary glossaries may be configured to allow student entries and comments.
Your Moodle course may contain one main glossary and as many secondary glossaries as you want. You can export entries from any secondary glossary into the main glossary.
To create a glossary:
- With the editing turned on, in the section you wish to add your glossary, click the “Add an activity or resource” link and choose Glossary.
- In the General Section:
- Name: Give your new glossary a descriptive name.
- Description: Describe the purpose of the glossary and provide instructions or background information, links etc.
- Display description on course page: If this box is ticked, the description will appear on the course page just below the name of the glossary.
- Glossary type: Here you can decide whether the glossary will be main or secondary. The glossary system allows you to export entries from any secondary glossary to the main one of the course. In order to do this, you should specify which glossary is the main one. You can only have one main glossary per course.
- In the Entries Section:
- Approved by default: If set to “yes” then new entries appear automatically. If not, then the teacher must approve each one first.
- Always allow editing: If set to “yes”, students can edit their entries at any time. If not, then they can only edit for a certain period.
- Duplicate entries allowed: This allows the entry of more than one definition for a given word.
- Allow comments on entries: Students and teachers can leave comments on glossary definitions. The comments are available through a link at the bottom of the definition.
- Automatically link glossary entries: If the Glossary auto-linking filter is enabled by an administrator, then turning this on allows individual entries in this glossary to be automatically linked whenever the concept words and phrases appear throughout the rest of the same course. This includes forum postings, internal resources, and week summaries and so on.
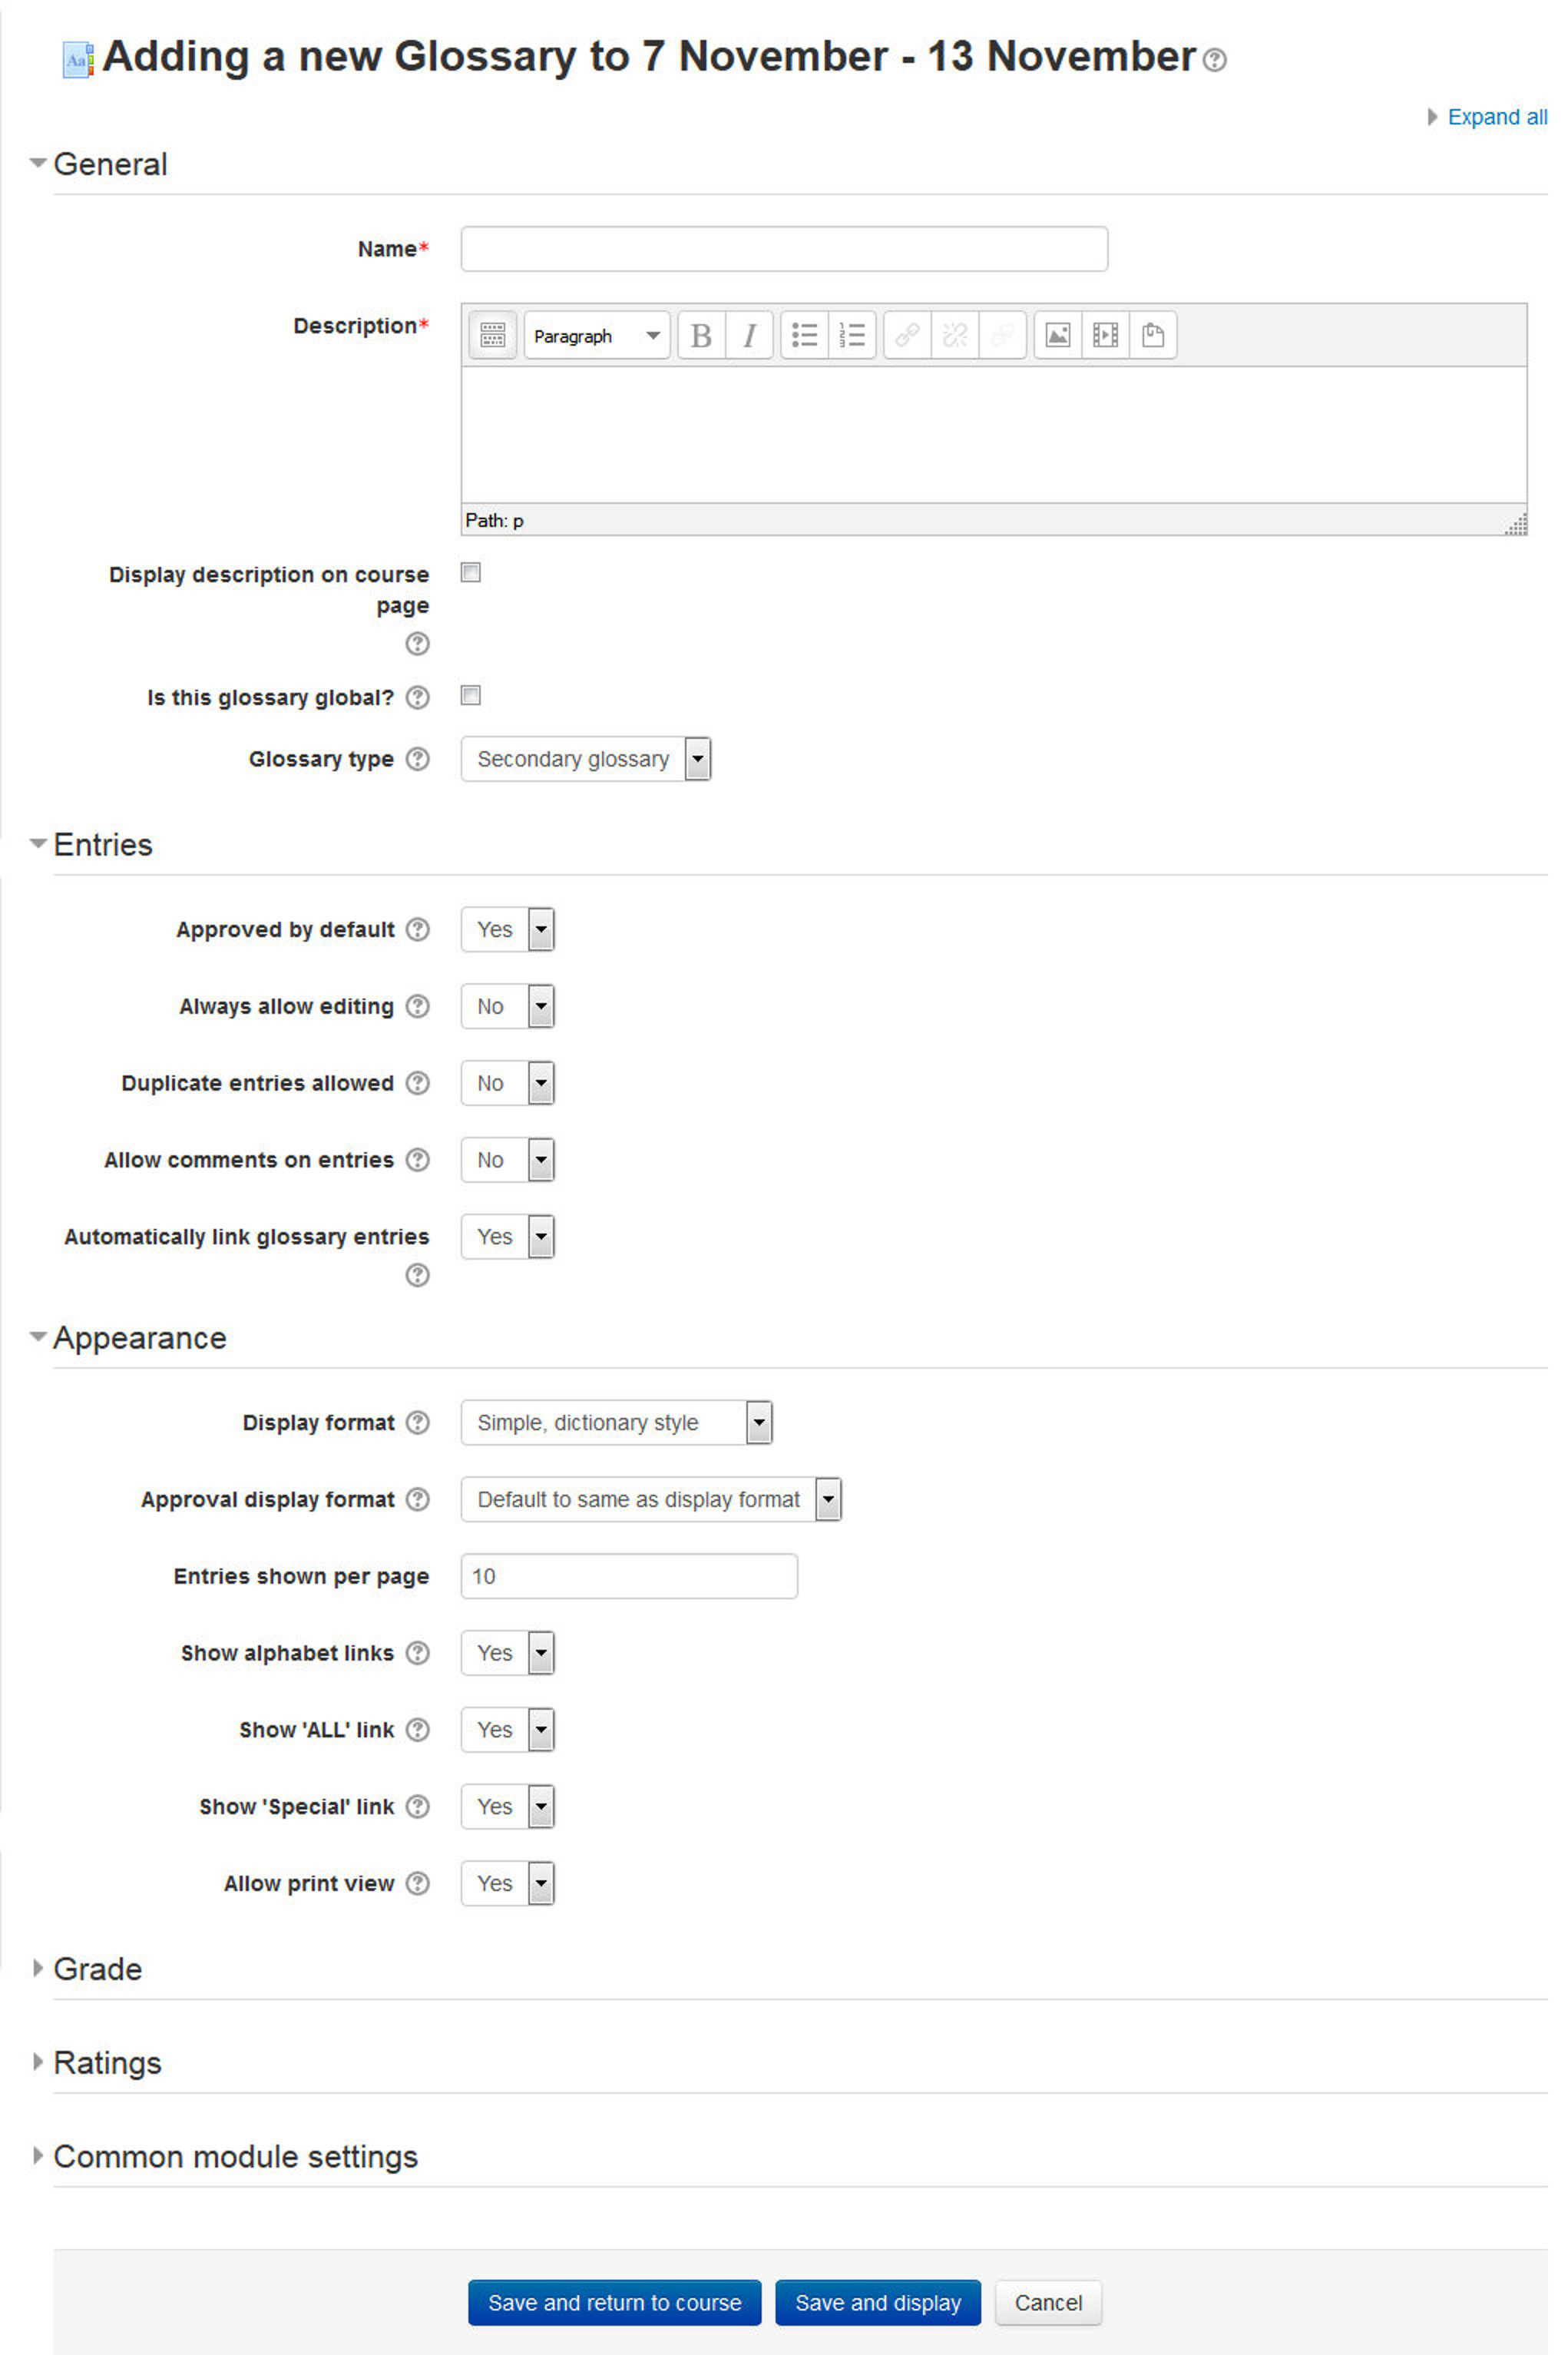
- In the Appearance Section:
- Display format: This specifies the way that each entry will be shown within the glossary. The default formats are:
- Simple, dictionary style - This looks like a conventional dictionary with separate entries. No authors are displayed and attachments are shown as links.
- Continuous without author - Like the simple style. Shows the entries one after other without any kind of separation but the editing icons, but only if your theme supports it, you usually have to modify the theme if you want an alternative appearance to the simple setting.
- Full with author - A forum-like display format showing author’s data. Attachments are shown as links.
- Full without author - A forum-like display format that does not show author’s data. Attachments are shown as links.
- Encyclopedia - Like ‘Full with author’ but attached images are shown inline.
- Entry list - This lists the concepts as links.
- FAQ - Useful for displaying lists of frequently asked questions. It automatically appends the words QUESTION and ANSWER in the concept and definition respectively.
- Approval display format: It is possible to set an alternative display format for when entries are approved that can differ from the display format on the course page. This could be useful for instance if a tutor wants to see who made a particular glossary entry before approving it but doesn’t want the students’ name to be displayed for others on the course page.
- Entries shown per page: Decide here how many entries to show per page.
- Show alphabet links: If set to “yes”, users can browse the glossary by letters of the alphabet.
- Show ‘ALL’ link: If set to “yes”, users can browse all the entries at once.
- Show ‘Special’ link: If set to “yes”, users can browse the glossary by special characters, such as @ and #.
- Allow print view: This provides a printer-friendly version link for students.
- Display format: This specifies the way that each entry will be shown within the glossary. The default formats are:
- In the Ratings Section:
- Roles with permissions to rate: Glossary entries can be rated using a scale. By default, only teachers can rate glossary entries, though students can be given permission to do so if desired from Administration>Glossary administration. This is a useful tool for giving students participation grades. Any ratings given are recorded in the gradebook.
- Aggregate type: The aggregate type defines how ratings are combined to form the final grade in the gradebook.
- Average of ratings - The mean of all ratings
- Count of ratings - The number of rated items becomes the final grade. Note that the total cannot exceed the maximum grade for the activity.
- Maximum - The highest rating becomes the final grade
- Minimum - The smallest rating becomes the final grade
- Sum - All ratings are added together. Note that the total cannot exceed the maximum grade for the activity.
- If “No ratings” is selected, then the activity will not appear in the gradebook.
- Scale: Select the type of grading used for the glossary. If “scale” is chosen, you can then choose the scale from the “scale” dropdown. If using “point” grading, you can then enter the maximum grade available for this activity.
- Restrict ratings to items with dates in this range: You can set the time range to restrict the ratings within the time range.
- Click “Save and Display” to display your newly created glossary activity.
Using Glossary
Once you’ve created your glossary, it’s a good idea to seed it with a couple of entries so students have a model to work from. When you click the “Save and Display” button then it will automatically take you to the view glossary page where you can add entries to glossary, search entries, print and approve the entries within the glossary.
The main view of the glossary can be a bit confusing at first, as you can see from Figure 11-2. Under the main Moodle navigation bar, you’ll find the glossary description. Directly below the glossary description, you’ll see the search bar. Checking the “Search full text” box allows searching for a given word in any position in the text.
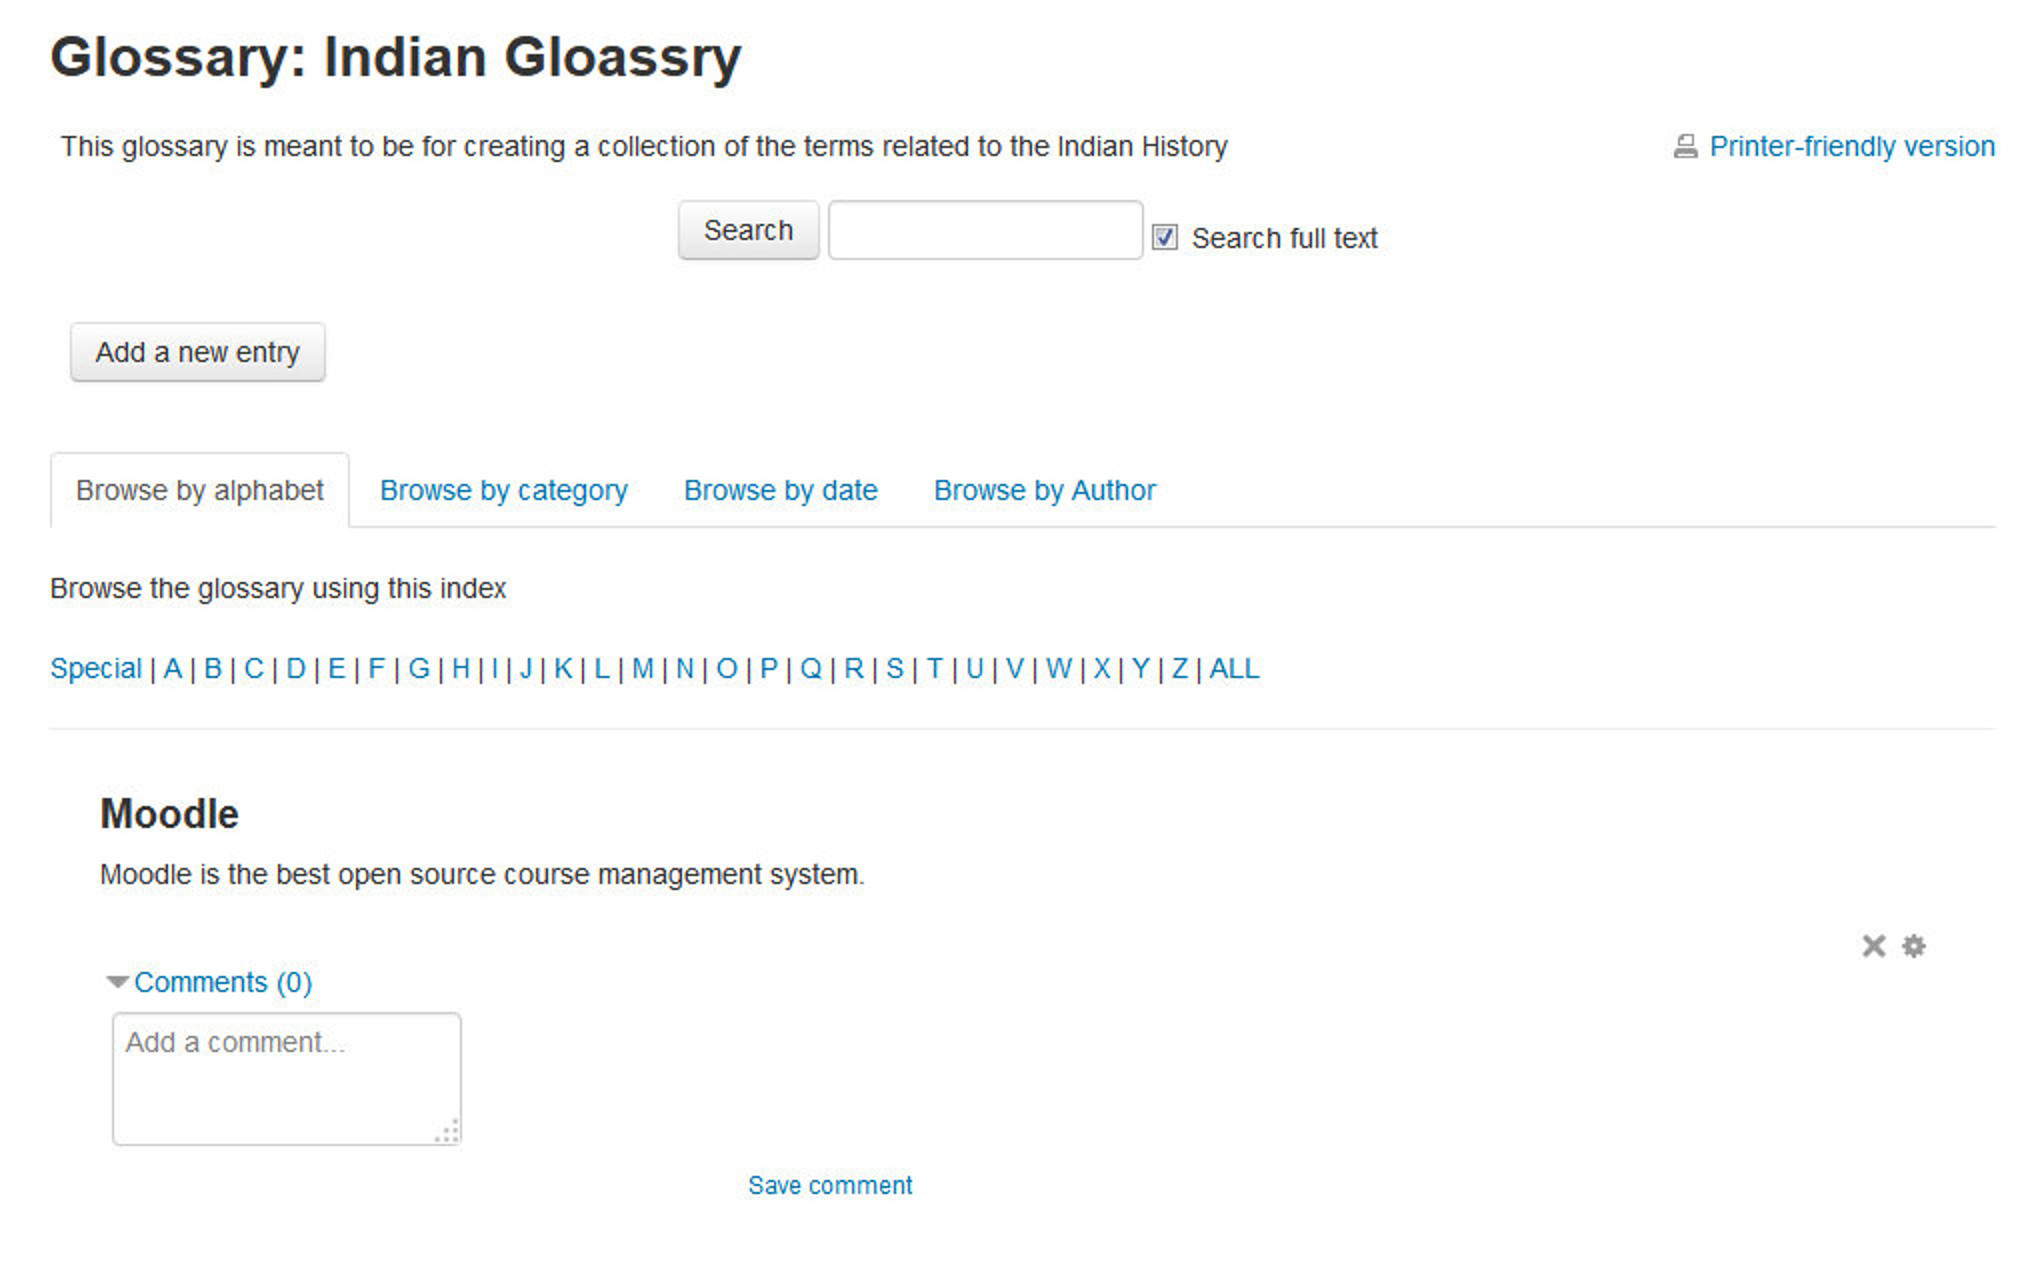
Below the search bar is the “Add a new entry” button, then four browse tabs:
- Browse by alphabet - Students can look for glossary entries by the first letter of a word when they select this tab.
- Browse by category - You can create word categories and make them available for students to use when they are searching the glossary.
- Browse by date - You can view entries based on the date they were last edited.
- Browse by Author - If you want students to add entries, this is a useful way to keep track of who has entered what.
Adding Entries
Clicking the “Add a new entry” button gives you access to the definition entry page.
To Add a glossary entry:
- From the Glossary page, click the “Add a new entry” button.
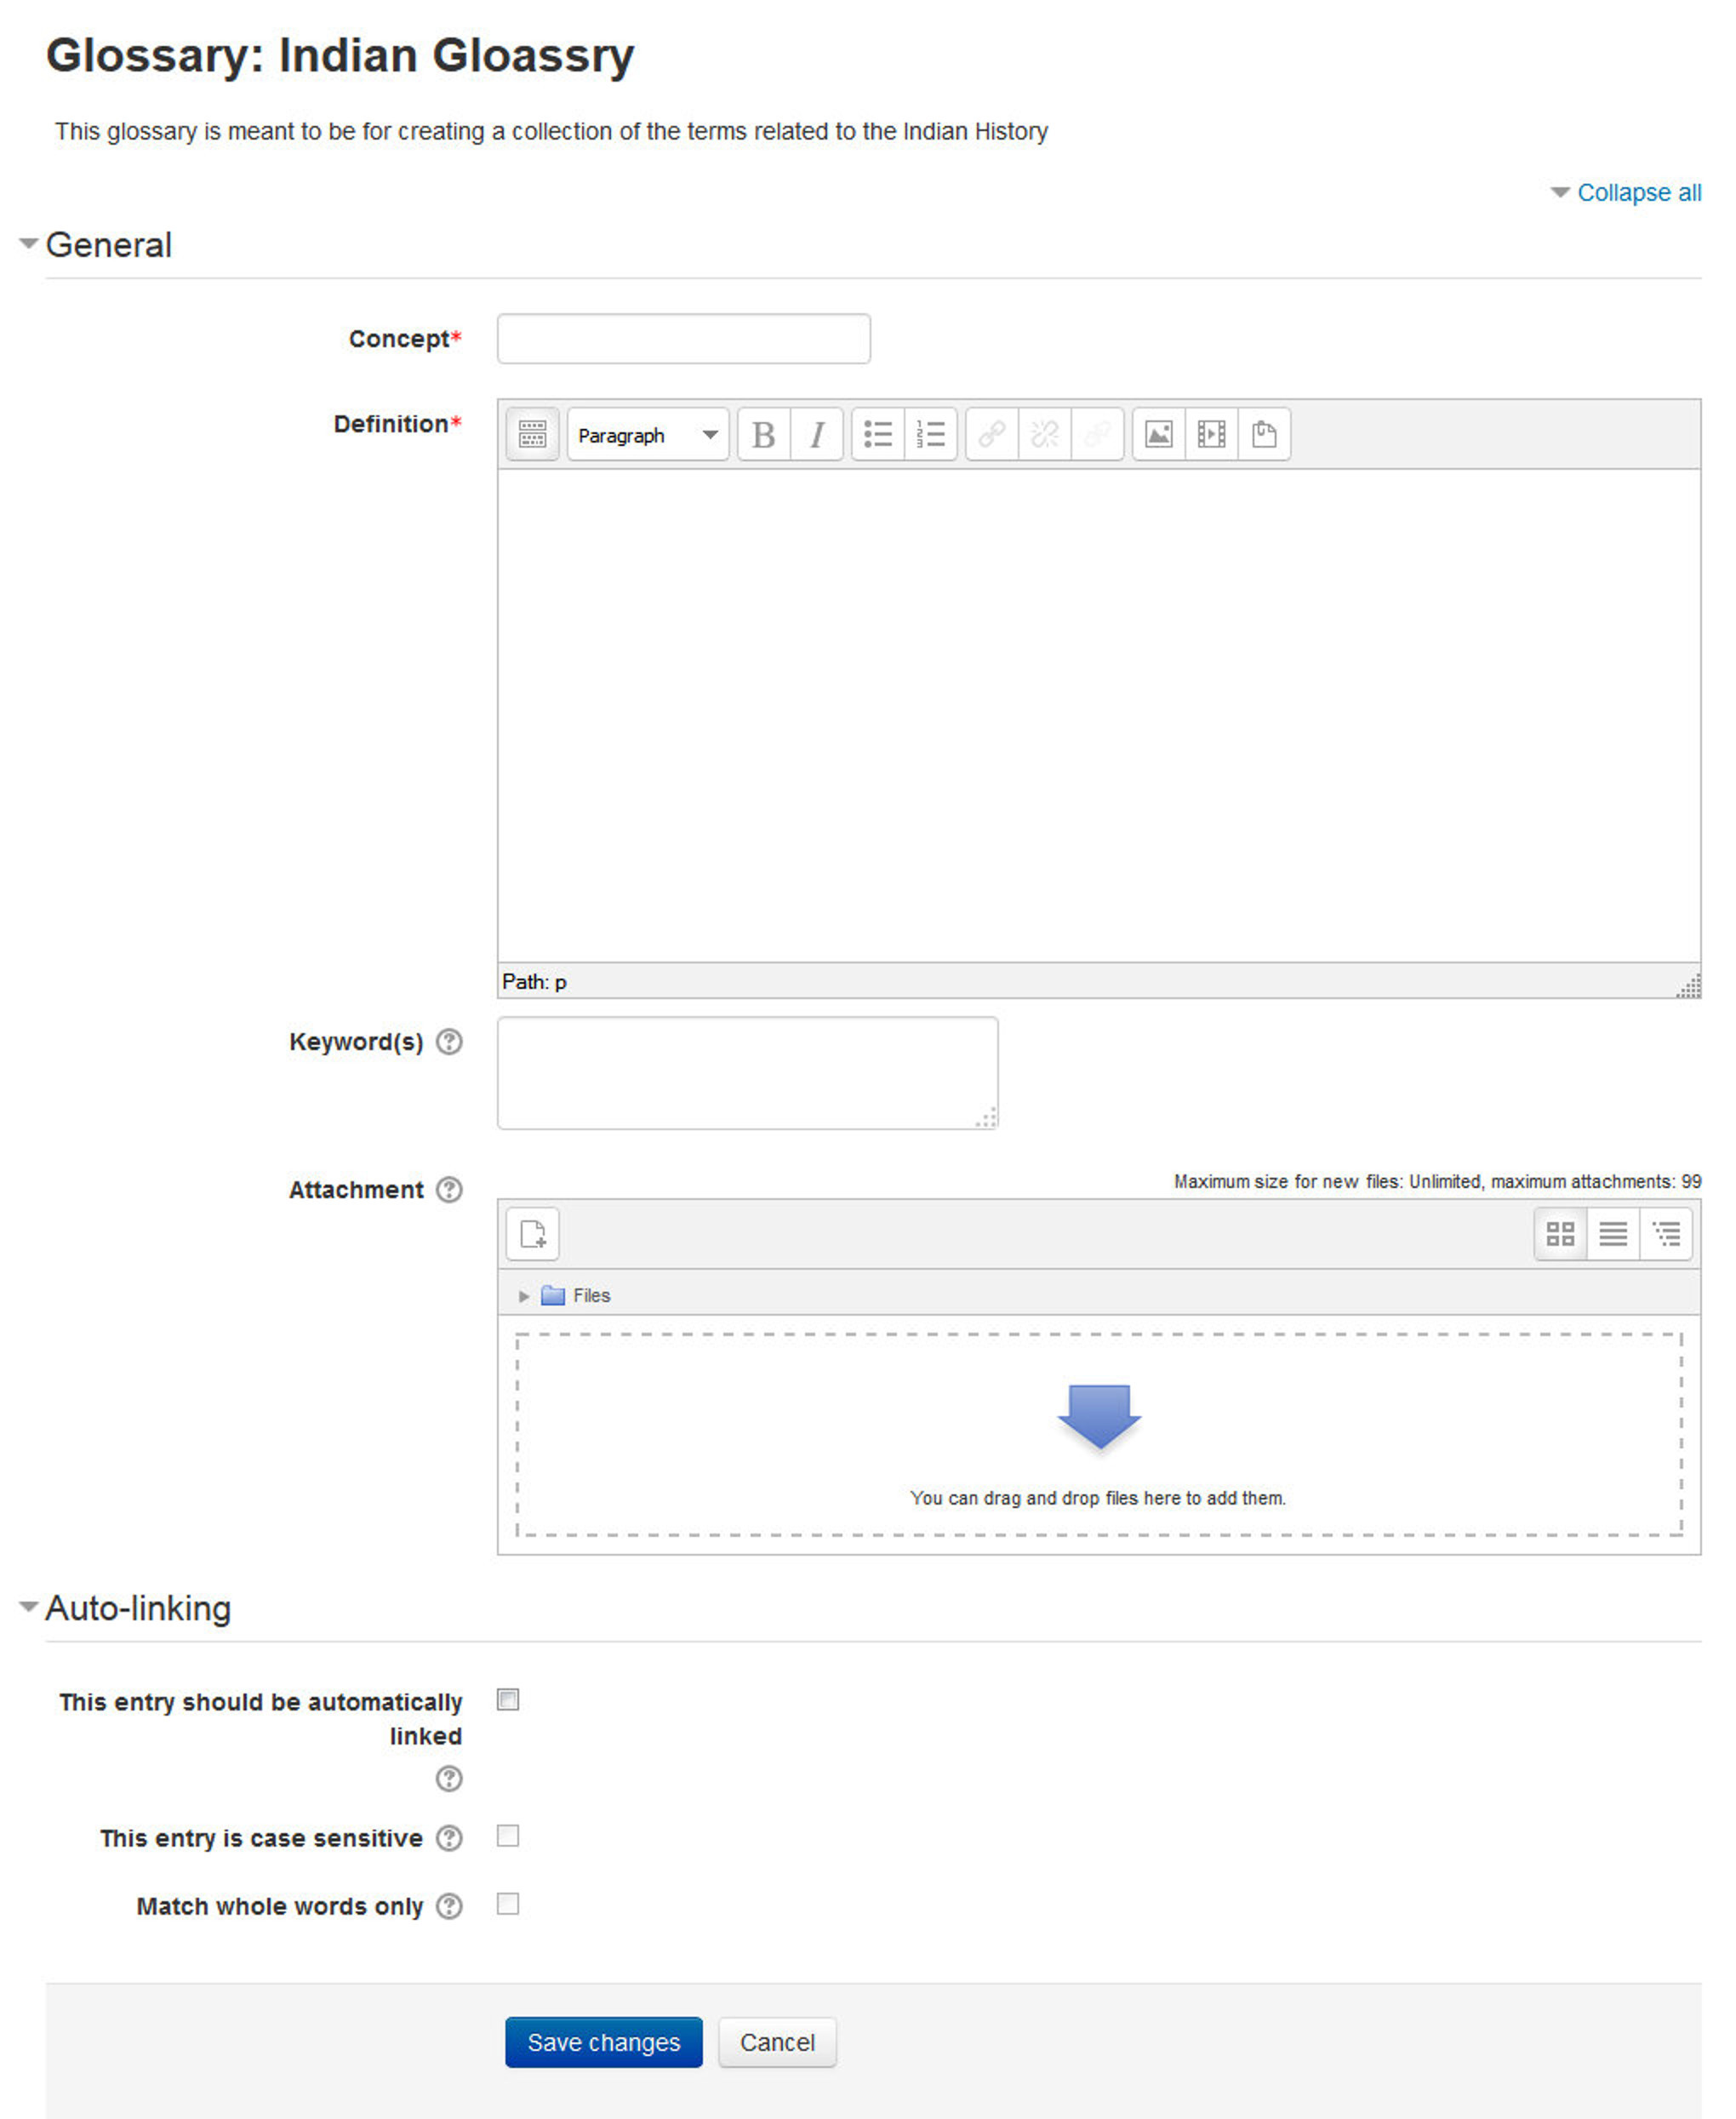
- In the General Section:
- Enter the word you want to define in the Concept text field, as shown in Figure 11-3
- Add the definition of the word or concept.
- If there are synonyms you want to include with the entry, add them to the Keyword(s) text area. Make sure to Enter one word per line only.
- If you want to add an attachment, such as a picture or an article, you can either drag/drop it or click the “Add” button to upload via the File picker.
- In the Auto-linking Section:
- This entry should be automatically linked: If site-wide glossary auto-linking has been enabled by an administrator and this is set to “yes”, the entry will be automatically linked wherever it appears.
- This entry is case sensitive: This setting specifies whether matching exact upper and lower case is necessary when performing automatic linking to these entries. For example, if this is turned on, then a word like “html” in a forum posting will NOT be linked to a glossary entry called “HTML”.
- Match whole words only: If automatic linking is enabled, then turning this setting on will force only whole words to be linked. For example, a glossary entry named “construct” will not create a link inside the word “constructivism”.
- Click the “Save changes” button to add your word to the glossary.
Search options
You can also search for a given word using the Search field. Checking the ‘Search full text’ option (on the right side of the Search box) allows searching for a given word in any position in the text. This can take longer and return more entries than you might wish, but it is thorough. If you do not check the “Search full text” box, the search only looks for the term names. The index below lets you browse the glossary according to a given letter.
Glossary Categories
Categories can help organize your glossary entries. If you’ve enabled autolinking, the category names can be linked along with individual entries.
To create a glossary category:
- Click the “Browse by category” tab in the main page of the glossary.
- Click the “Edit categories” button on the left side of the page.
- Click the “Add category” button on the resulting Categories page.
- Give the category a name.
- Choose whether you want the category name autolinked as well.
- Click the “Save changes” button.
If you autolinked the category name, any occurrence of those words will be linked. When a student clicks on the link, he will be taken to the “Browse by category” page of the glossary.
Autolinking
Once you’ve added an entry to the glossary and enabled autolinking, any instance of a glossary term anywhere in Moodle will have a link to its definition. For example, if you create an entry for the word “Moodle” in the glossary, whenever someone uses the word in a forum, assignment, HTML or text page, or even in a description field, it will be clickable, as shown in Figure 11-4. Once you click on the word, a new window with the glossary entry will pop up.

Importing and Exporting
As you build your glossaries, you may want to share them between classes or with other instructors. Fortunately, there’s a way to export and import glossary entries without needing to share your entire course structure.
To export glossary entries:
- In Settings > Glossary administration > Export entries click the “Export entries to file” button.
- Save the automatically generated XML file on your computer.
To import glossary entries via an XML file:
- Go to Settings > Glossary administration > Import entries
- Click the “Choose a file” button and browse for the exported entries XML file on your computer.
- Select the destination for the new entries: either the current glossary or a new one
- If you want to import category information, click the checkbox.
- Click the “Submit” button.
You’ll then see a report of the entries and categories added to the glossary. If you enabled duplicate entries when you created the glossary, the import process will add all of the new definitions. Otherwise, it will not allow you to import any duplicate entries.
T> When the entries are imported into another glossary, the user performing the import will be listed as author of all the entries.
Commenting on Entries
If you enabled comments on the glossary entries, users can annotate the definitions in the word list. When you look at a word in the glossary list, you’ll see a blue “Comments” link in the lower left-hand corner.
When you click the link, a comments box opens up. Add your comment then click the “Save changes” button.
Once you’ve saved your comment, Moodle will display all of the comments for the entry. When you return to the main glossary page, you’ll see a new message next to the speech balloon telling you how many comments there are for the entry.
Printing a glossary
At the top right of the main glossary page, you’ll see a little printer icon. If you click the icon, Moodle will open a new browser window and present all the words and definitions in a printer-friendly format.
To print the glossary:
- Click the printer friendly version icon at the top of the main glossary page.
- From the newly opened window, click in the top right side of the page.
T> Teachers are always provided with a printer-friendly format link. To enable students to print a glossary, set “Allow print view” to Yes on the edit glossary page.
Glossary Capabilities
The glossary module has a number of capabilities available to create roles. With capability overrides, you can enable your students to have a high degree of control over their glossaries.
Glossary capabilities are:
- Approve and undo approved entries: This allows a user to approve and undo the approval of glossary entries. This capability is allowed for the default roles of manager, teacher and non-editing teacher
- Create comments: This allows a user to add a comment to glossary entries. This capability is allowed for the default roles of manager, teacher, non-editing teacher and student
- Export entries: This allows a user to export glossary entries to another glossary. This capability is allowed for the default roles of manager, teacher and non-editing teacher
- Export single entry: This allows a user to export single glossary entries to a portfolio. This capability is allowed for the default roles of manager, teacher and non-editing teacher
- Export single entry of yours: This allows a user to export their own glossary entries to a portfolio. This capability is allowed for the default roles of manager, teacher, non-editing teacher and student
- Import entries: This allows a user to import glossary entries via XML file. This capability is allowed for the default roles of manager, teacher and non-editing teacher
- Manage categories: This allows a user to categories for glossary entries. This capability is allowed for the default roles of manager, teacher and non-editing teacher.
- Manage comments: This allows a user to delete comments to glossary entries. This capability is allowed for the default roles of manager, teacher and non-editing teacher.
- Manage entries: This allows a user to add, edit and delete glossary entries. This capability is allowed for the default roles of manager, teacher and non-editing teacher.
- Rate entries: This allows a user to rate glossary entries. This capability is allowed for the default roles of manager, teacher and non-editing teacher
- View glossary: This allows a user to view glossary entries within a glossary and also in the recent activity block, random glossary entry block, RSS feed for the glossary and any auto-linking glossary keywords. This capability is allowed for the default roles of manager, teacher, non-editing teacher and student.
- View all raw ratings given by individuals: This allows a user to view all rating given to glossary entries. This capability is allowed for the default roles of manager, teacher and non-editing teacher
- View total ratings that anyone received: This allows a user to view the total rating that anyone received for their glossary entries. This capability is allowed for the default roles of manager, teacher and non-editing teacher
- View the total rating you received: This allows a user to view the total rating which they received for their glossary entries. This capability is allowed for the default roles of manager, teacher and non-editing teacher.
- Create new entries: This allows a user to add glossary entries. This capability is allowed for the default roles of manager, teacher, non-editing teacher and student.
Effective Glossary Practices
A glossary can be an important part of your course. As we discussed earlier, acquiring vocabulary in a new field can be one of the biggest challenges to new learners. As an expert in your field, you are comfortable using the important terms and concepts in your area of expertise. Your students, however, are not experts. They may be just starting to learn new words representing new ideas and concepts. More advanced students will need to refine their learned definitions with subtle improvements to make the definitions more useful.
###Glossary Basics At its most basic, Moodle’s glossary can be used like a regular word list for a class. You can develop a list of terms you know students find difficult or confusing and make the list and definitions available for your class.
If you want to get more in-depth, we recommend creating either a weekly or chapter based word list. Students can use it as they do weekly readings and assignments. A weekly glossary can make it easier for students to organize their learning process.
Creative Glossary Strategies
While a basic glossary is important, creatively applying the glossary can really make an impact on your class. Autolinking is very useful for integrating glossaries with other course activities. In addition, you may want to make use of the Random Glossary Entry block to display glossary entries on your course page. With the introduction of the database module, many activities can now be either glossary or database activities. Glossary has two advantages over the database at this point. First, many instructors find using the Random Glossary Entry block motivates students to submit high-quality entries, because they know the entries will be shared with the class on the front page of the course. The automatic term-linking is also useful to integrate the glossaries with other activities in the course.
Collaborative glossaries
Instead of creating a glossary on your own, why not have the students create it as they encounter unfamiliar terms? A collaborative glossary can serve as a focal point for collaboration in a course. Each member of the class could be assigned to contribute a term, a definition, or comments on submitted definitions. Multiple definitions can be rated by you and by the students, with the highest-rated definitions accepted for the final class glossary.
When students are responsible for creating the definitions, they are much more likely to remember the word and the correct definition. Engaging in the process of learning, debating, and refining a glossary can go a long way toward helping students begin using new terms. Moodle community member Leslie Smith has created a glossary for students to submit entries that contain the definition, part of speech, an original sentence using the word correctly, and some type of mnemonic or visual device to help classmates remember the word’s meaning. The visual devices the students use are quite creative and definitely help with memorization.
You can also structure multiple glossaries over the course of a semester. Break them up by unit, chapter, week, or any other organizational structure. If you have a large class, assign student teams to come up with definitions and answers. One strategy for managing large courses is to make each team responsible for one week’s worth of definitions, while all the other teams must rate and comment. Alternatively, each team could be responsible for one definition per chapter and then rate and comment on the other teams’ work.
To set up a collaborative glossary, create a new glossary for each unit with the following options:
- Glossary type: Secondary glossary
- Duplicate entries allowed: If you want teams to be able to submit multiple definitions for rating, select Yes
- Allow comments on entries: Yes
- Approved by default: Yes
- Allow entries to be rated: Yes—by everyone
The other options are up to you. Once you’ve selected the above options, students can add their own definitions, rate each other’s, and add comments.
Mini-projects
Mini-projects are small research projects where students create small resources for each other. One high school teacher has the students do research on organs in the body, then create an encyclopedia-style entry in the glossary, including pictures and other resources.
Collaborative quiz questions
One of the most creative uses we’ve heard about is using the glossary to create collaborative quiz questions. Students are given the Moodle question formats and they create questions in the glossary matching one of the import types. The teacher has the glossary set to require approval, which hides the submitted questions from other students.
When the students have all submitted their questions, the teacher exports the glossary and then imports it into a question bank. The quiz can then be built from student submitted questions.
Credit for word use
This is a combination strategy using the forum and the autolinked feature of the glossary.
After you and your students have defined the glossary terms, it’s important for students to begin practicing using the words in realistic contexts. Students, however, are usually reluctant to experiment with new terms. With the autolinking feature, it’s easy to spot when a glossary word has been used in a forum or in a posting on the web site.
To encourage word use, assign a portion of the credit students receive for their forum postings for correct use of glossary terms. As you or other students rate posts, you can quickly scan for highlighted glossary words and award points for usage. You may even want to break the score down further. Perhaps award one point for using the word and two points for using it correctly.
Summary
At first glance, the glossary doesn’t seem to be a very interesting tool. You could simply create a word list in a word processor and upload it. The power of the glossary tool in Moodle comes from its ability to automatically create links in your course for every word in the list, and to easily build collaborative glossaries.
Use the glossary tool to help your students learn the vocabulary of your field and encourage them to experiment with new terms. Collaborative glossaries give your students even more practice using the new words and negotiating their meaning.