Chapter 19 - Moodle Administration
If you are the administrator for your Moodle site, there are a lot of options at your fingertips. Most of the time, the default settings that come with your Moodle installation will work well. But there are a lot of options for customization and performance that can make your version of Moodle work exactly as you’d like.
The number of administration settings has increased a lot in recent versions of Moodle and it can take a while to understand it all. We can only provide a brief mention of each setting in this book; however, the “Moodle Docs for this page” links at the bottom of each page in Moodle provide access to further information.
This chapter is organized into sections that are the same as the links in the Site Administration block, which you’ll find on your Moodle front page when you log in as an administrator. We’ll finish with a section on Moodle support, just in case!
T> A good way to learn about Moodle administration is to download and install a Moodle package on your own computer. Create some test user accounts and assign them the roles of student and teacher. Try logging in as a student or a teacher in a different browser from the one displaying you logged in as an administrator. You can change an administration setting, and then see how it affects students or teachers by refreshing the page (or logging out, then logging in again for role changes).
Notifications
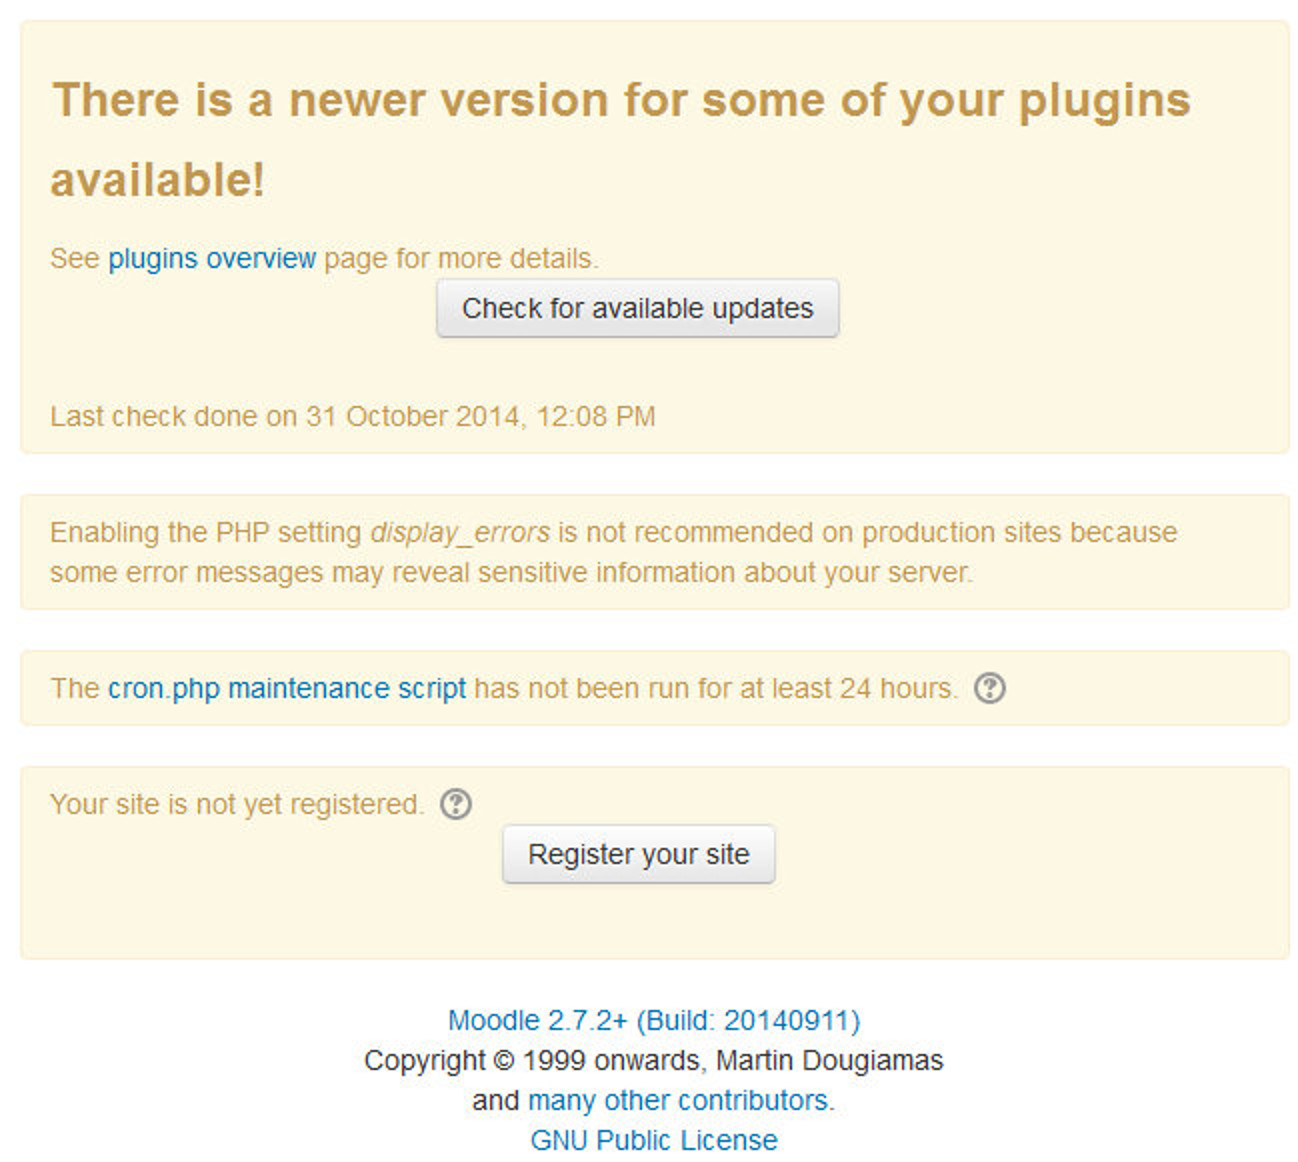
In the middle of the Notifications page you’ll find a link “Check for Available updates” clicking which will give you the updates available for your Moodle core and plugins installed on your Moodle site.
It will also warn you about your server settings which are not recommended, if any.
If you haven’t setup cron task then some of your Moodle functions may not work on scheduled basis like sending Email copies of new forum posts. The cron is a script that is run regularly and checks whether certain tasks need performing. So, it is important to setup the cron job for your site.
And, in the bottom of the page, there is a button which will show that “your site is not registered.” Registering your site with Moodle.org is recommended in order to receive security alert notifications, to contribute Moodle usage statistics (http://moodle.net/stats/) and to share your courses on Moodle.net, if you want to.
T> You can also find a lot of courses shared by the other Moodle users on Moodle.net for getting started with the courses.
Below the Moodle Registration button is your Moodle version number. If you are asking any questions on Moodle Community forums or else if you add a bug report to the Moodle tracker (http://tracker.moodle.org/), you should state your Moodle version number.
Registrations
The registrations link will take you to a form where you have to fill the details about your Moodle site and some statistics are chosen by default like Site URL, Moodle Version, Number of courses etc. You can also opt out from the list of registered sites by choosing “Please do not publish this site”.
Advanced Features
This link contains a lot of advanced features which are enabled by the Site Administrator as per the policies adopted for the institutions. It contains features like Badges, Conditional Access, and Completion Tracking etc. We will go through the links in Advanced Features page one by one:
- Enable Outcomes: Outcomes are specific descriptions of what a student has demonstrated and understood at the completion of an activity or course. Each outcome is rated by some sort of scale. Other terms for outcomes are Competencies and Goals. In simple terms outcomes are similar to sub components of a grade. A grade is an assessment of overall performance that may include tests, participation, attendance and projects. Outcomes assess specific levels of knowledge through a series of statements, which maybe coded with numbers or letters. Thus an overall grade can be given for a course, along with statements about specific competencies in the form of outcomes.
- Enable Comments: Enabling Comments enables users to add comments to glossary, database activities and blog entries. The comments interface uses AJAX so that comments are added instantly without needing a page refresh.
- Enable Tags functionality: Tags allows students and teachers to describe their interests in a way that is easy for people with similar interests to find them. The user’s profile has a place to enter interests, which will create or add the user to an existing tag. Tag pages can be viewed and blog posts can be tagged.
- Enable Notes: The Notes feature is a way to attach information about a user by another user. For example, a teacher might attach a note to a specific student about the hobbies and interests that seems to engage that student.
- Enable Portfolios: Portfolios in Moodle make it easy for a student to export their work to an external portfolio. For example, student work might include forum posts or assignment submissions that they believe demonstrates their knowledge.
- Enable Web Services: Web services enable other systems to login to Moodle and perform operations. Moodle comes with a built-in web service designed for mobile applications. It is required to run the official Mobile app. Enable it only if you want people to use the official app or if a third party app explicitly requires it.
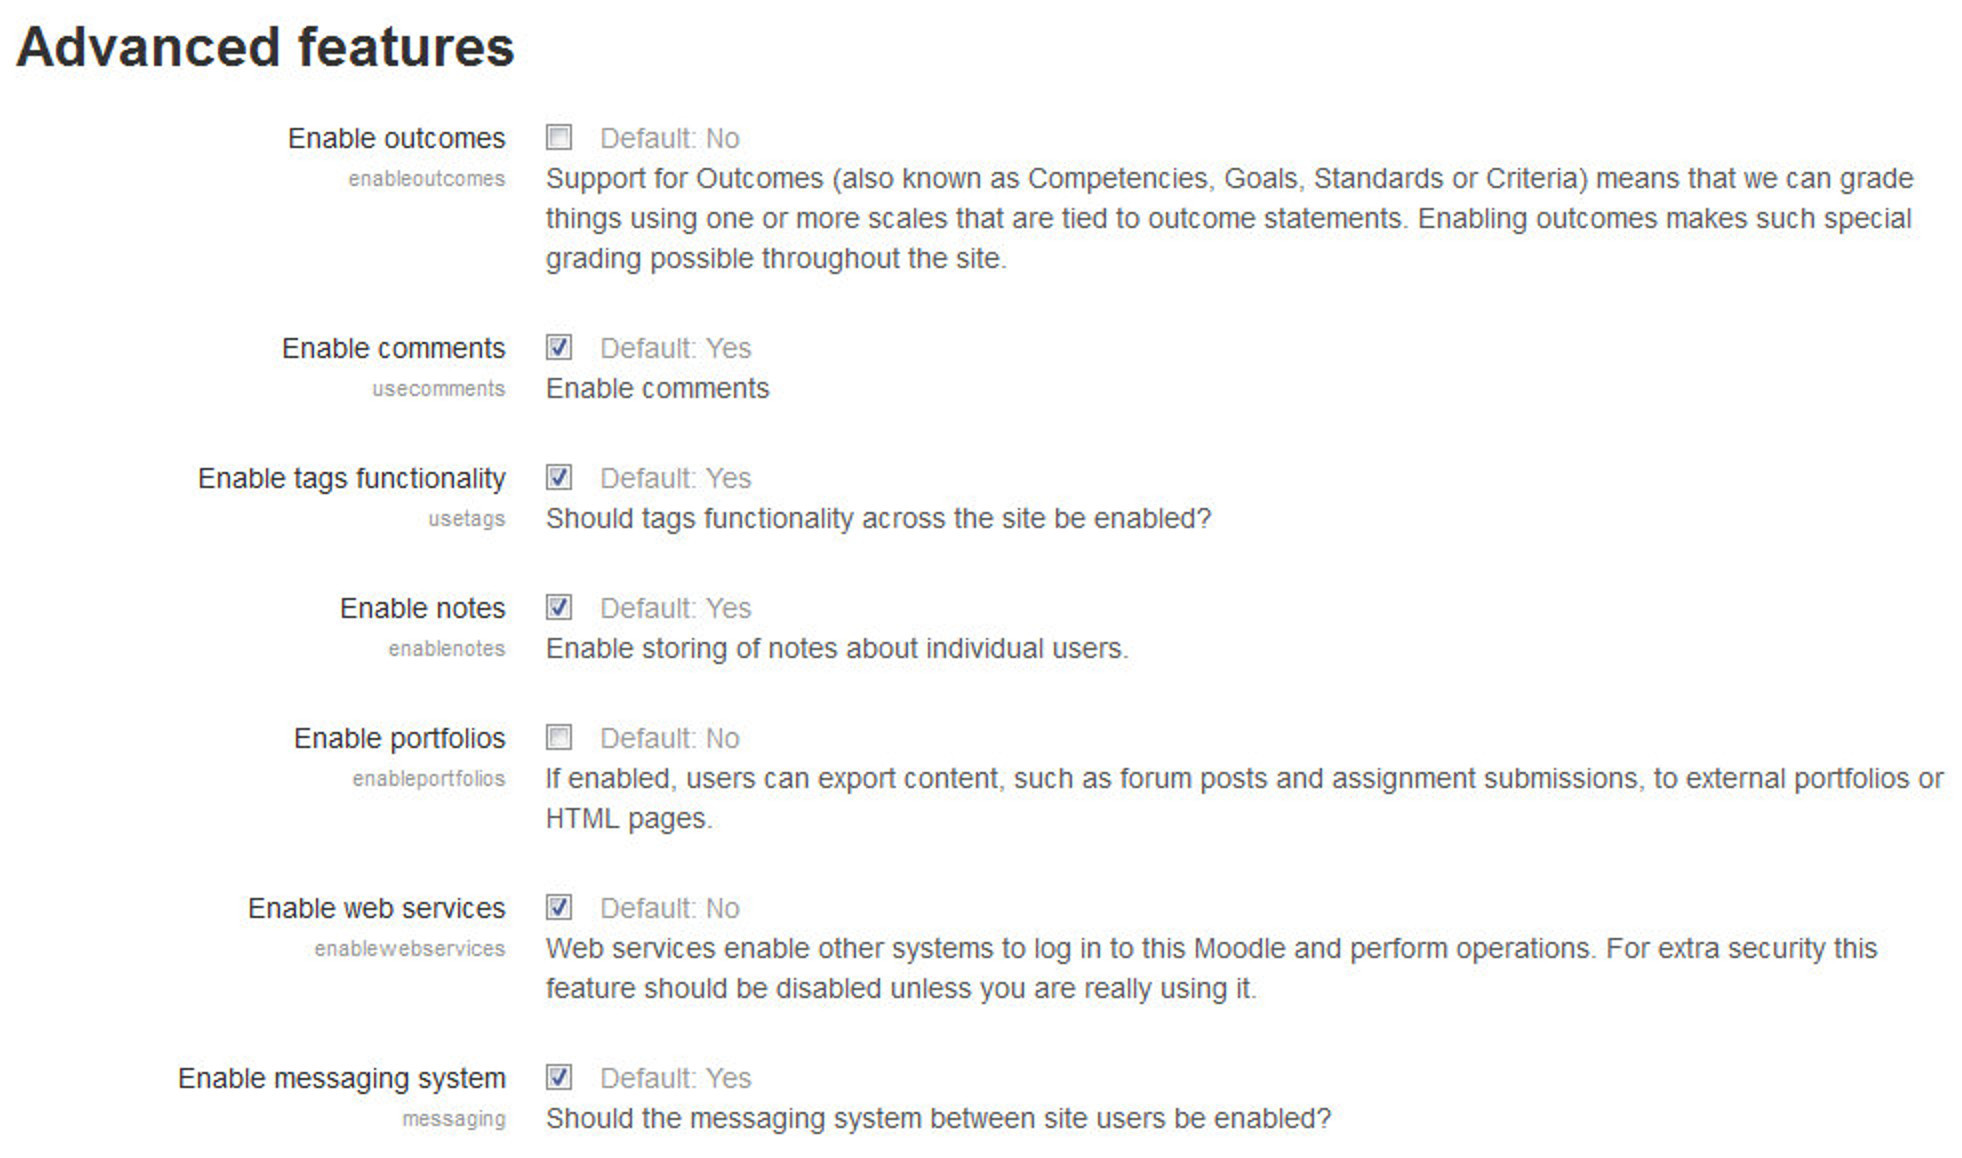
- Enable Messaging System: “Messaging” refers both to automatic alerts from Moodle about new forum posts, assignment submission notifications etc., and also to conversations using the instant messaging feature.
- Hide Read Notifications: This option will Hide read notifications of events like forum posts when viewing messaging history.
- Delete Read Notifications: Read notifications can be deleted to save space. You can choose the time delay for deleting the read notifications.
- Notification email override: This option allows users to have email message notifications sent to an email address other than the email address in their profile.
- Enable Statistics: If you choose ‘yes’ here, Moodle’s cronjob will process the logs and gather some statistics. If statistics are enabled for the site, graphs and tables of user activity may be generated. The statistics graphs and tables show how many hits there have been on various parts of your site during various time frames. They do not show how many distinct users there have been. They are processed daily at a time you specify.
- Enable RSS Feeds: RSS (really simple syndication) feeds in Moodle enable people to stay up to date with forum posts, glossary entries and other events within Moodle. You can also use a Remote RSS feeds block which enables RSS feeds (either from within Moodle or from an external site) to be displayed on pages in Moodle.
- Enable Blogs: Blogs are a form of online journal used by millions of people around the world for self-expression and communicating with family and friends. You can enable blogs for complete site using this option.
- Networking: The Moodle network feature allows a Moodle administrator to establish a link with another Moodle or a Mahara site and to share some resources with the users of that Moodle. Users go from the first Moodle to the linked site via the Network server’s block.
- Enable Completion Tracking: Activity completion allows the teacher to set completion criteria in a specific activity’s settings. A check (tick) appears against the activity when the student meets this criterion. The criterion might be viewing, receiving a certain score or a student marking it as complete.
T> If Completion tracking has been enabled, the teacher will see the Activity completion group in their course settings. However, it is possible to track activity completion without using the Course completion feature. It is also possible to use this feature with the Conditional activities feature. These 3 features can be used separately or in various combinations in an activity.
- Default Completion Tracking: The default setting for completion tracking when creating new activities.
- Enable Conditional Access: Conditional activities enable teachers to restrict the availability of any activity or even a course section (in Moodle 2.3 onwards) according to certain conditions such as dates, grade obtained, or activity completion. When it is enabled by the administrator, a “Restrict access” setting appears in the settings of activities or resources and also when editing a course section.
- Enable Plagiarism Plugins: Plagiarism is when a student submits content they have copied and the real author was not given credit for the words. Plagiarism prevention detects when this form of cheating or academic dishonesty has happened. Moodle doesn’t come with any pre-installed plagiarism prevention methods - they need to be added by a site administrator.
- Enable Badges: Badges are a good way of celebrating achievement and showing progress. Badges may be awarded based on a variety of chosen criteria and are fully compatible with Mozilla Open Badges. Badges created in Moodle may be displayed on a user’s profile or pushed to their Open Badges backpack and public badge collections in their backpack will display in their Moodle profile.
Users
User management can be one of the most time-consuming jobs for an administrator. As your system grows, the number of users who lose their password or have difficulty creating a new account grows as well. Fortunately, there are a few tools to help make the job of user management easier.
Accounts
Each user on your Moodle site has an account that contains profile information, forum posts, blog entries, and activity reports.
-
Browse list of users: The “Browse list of users” page provides a list of all user accounts. You can also add a new user using the link on the top of the page “Add a new user”. You can also filter the users using the advanced filter tools on the top of the page.
If you are using email-based self-registration and a user has a problem confirming his account, you can confirm his account for him by clicking the confirm link opposite his name.
You can also search for a particular user, using her name or email address as the search term, and then edit her profile. You will need to do so in order to reset user passwords if users are unable to log in. Another reason for editing a user’s profile is to disable her email address if you are receiving lots of undelivered mail!
T> If you want to temporarily disable an account (i.e., prevent a user from logging in to Moodle), you can do so by clicking the “Eye icon” in the Edit column to suspend the user.
- Bulk User Actions: The bulk user actions feature enables administrators to select users by creating a filter and then perform any of the following actions:
- Confirm user accounts created through Email-based self-registration which are not yet confirmed by the user
- Send a message (requires Messaging to be enabled)
- Delete user accounts
- Display a list of users on a page
- Download user data in text, ODS or Excel file format
- Force users to change their passwords
- Add users to a cohort
- Add a new user: This link will take you directly to add a new user page where you can provide the details for the user like Name, Email, Country, etc. You can choose to force change the password on first login.
- User profile fields: You can create new user profile categories and fields which may be a menu of choices, text area, text input or a checkbox and may be required or not. New profile fields will appear on each user’s profile page and can be displayed on Signup page also.
- Cohorts: Cohorts are site-wide or category-wide groups. Cohorts enable all members of a cohort to be enrolled in a course in one action, either manually or synchronized automatically.
- Upload Users: The “Upload users” page allows you to import a list of users via a text file. Moodle creates an account for each user and, if you want, can also enroll students in courses and arrange them in groups. The user data text file must follow a certain format, as described in the upload users help file. There are many robust options for uploading information (fields associated with a user) with this method: from enrolling users in multiple courses with course specific roles to updating user information in the User profile to deleting users from the site. Rather than uploading the text file, it can also be simply dragged from the desktop and dropped into the upload area. The format of the file should be as follows:
- Each line of the file contains one record
- Each record is a series of data separated by commas (or other delimiters)
- The first record contains a list of fieldnames defining the format of the rest of the file
- Required fieldnames are username, password, firstname, lastname and email
- Upload User Pictures: Site Administrator can also upload the user pictures in bulk to the Moodle site. You need to create a zip file containing the image files. The names of the files should be named in username.extension format.
Permissions
- User Policies: This page will enable you to define policies for the default users. The available options are:
- Role for Visitors: Users who are not logged in to the site will be treated as if they have this role granted to them at the site context. The default role is Guest.
- Role for Guest: This role is automatically assigned to the guest user.
- Default Role for all users: All logged in users will be given the capabilities of the role you specify here, at the site level; in ADDITION to any other roles they may have been given.
- ‘Creators’ role in new courses: If the user does not already have the permission to manage the new course, the user is automatically enrolled using this role.
- ‘Restorers’ role in courses: If the user does not already have the permission to manage the newly restored course, the user is automatically assigned this role and enrolled if necessary.
- Auto-login guests: Should visitors be logged in as guests automatically when entering courses with guest access?
- Hide user fields: Select which user information fields you wish to hide from other users other than course teachers/admins.
- Show user identity: When selecting or searching for users, and when displaying lists of users, these fields may be shown in addition to their full name.
- Full name format: This defines how names are shown when they are displayed in full.
- Maximum users per page: Maximum number of users displayed within user selector in course, group, cohort, webservice etc.
- Enable Gravatar: When enabled Moodle will attempt to fetch a user profile picture from Gravatar if the user has not uploaded an image.
- Site Administrators: Users may be assigned the role of site administrator by using this setting. Select the user whom you wish to assign the site administrator role and click Add in the middle of the page.
T> Note: The primary administrator (created when the site was created) cannot be removed from the site administrator role.
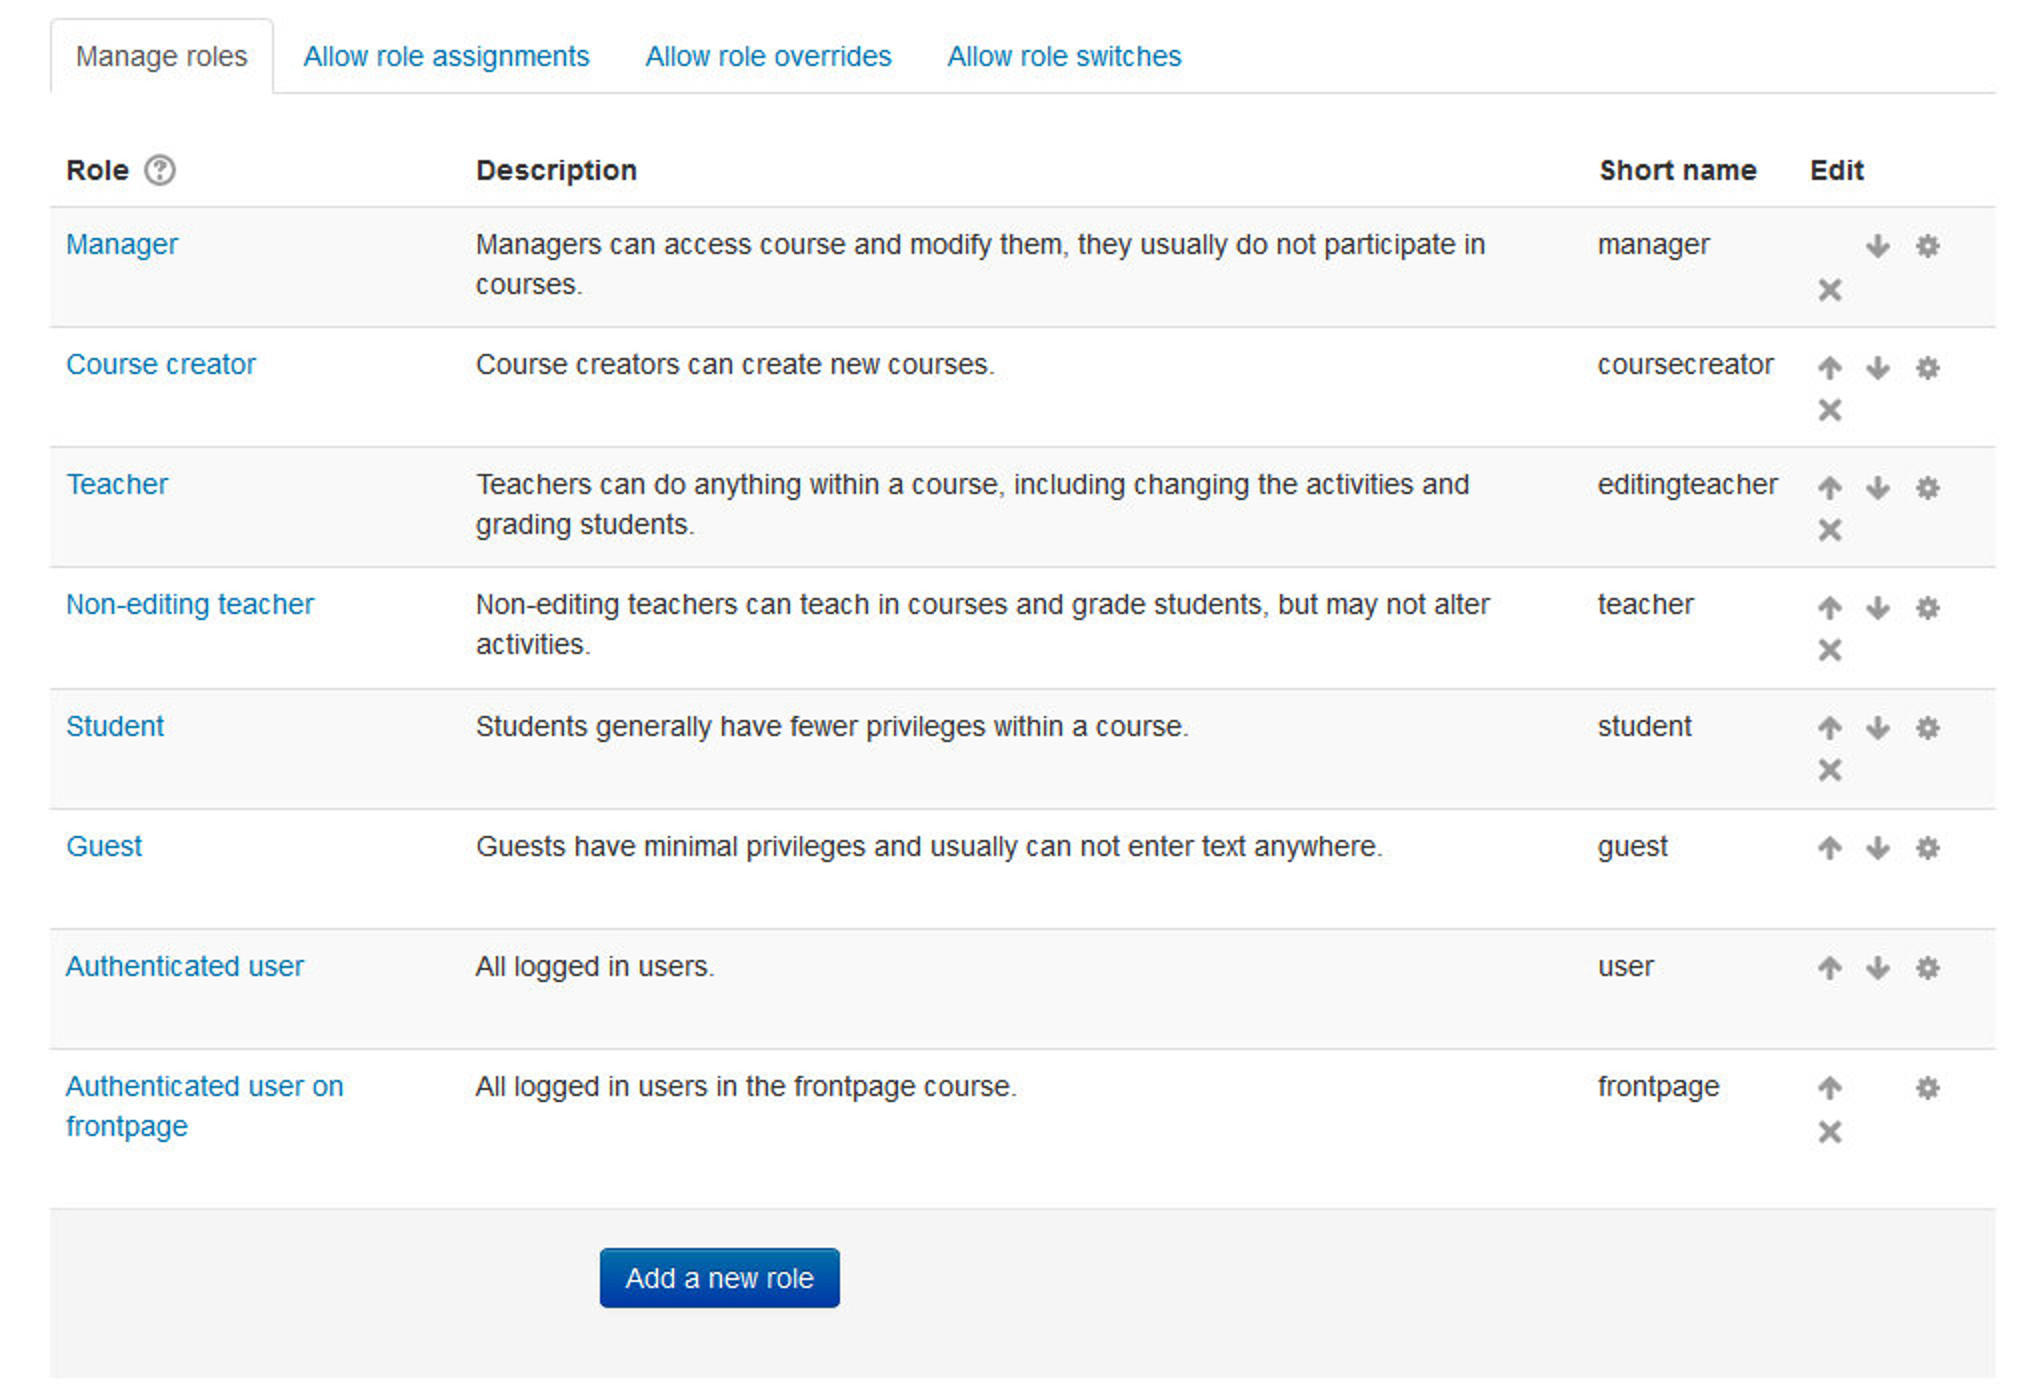
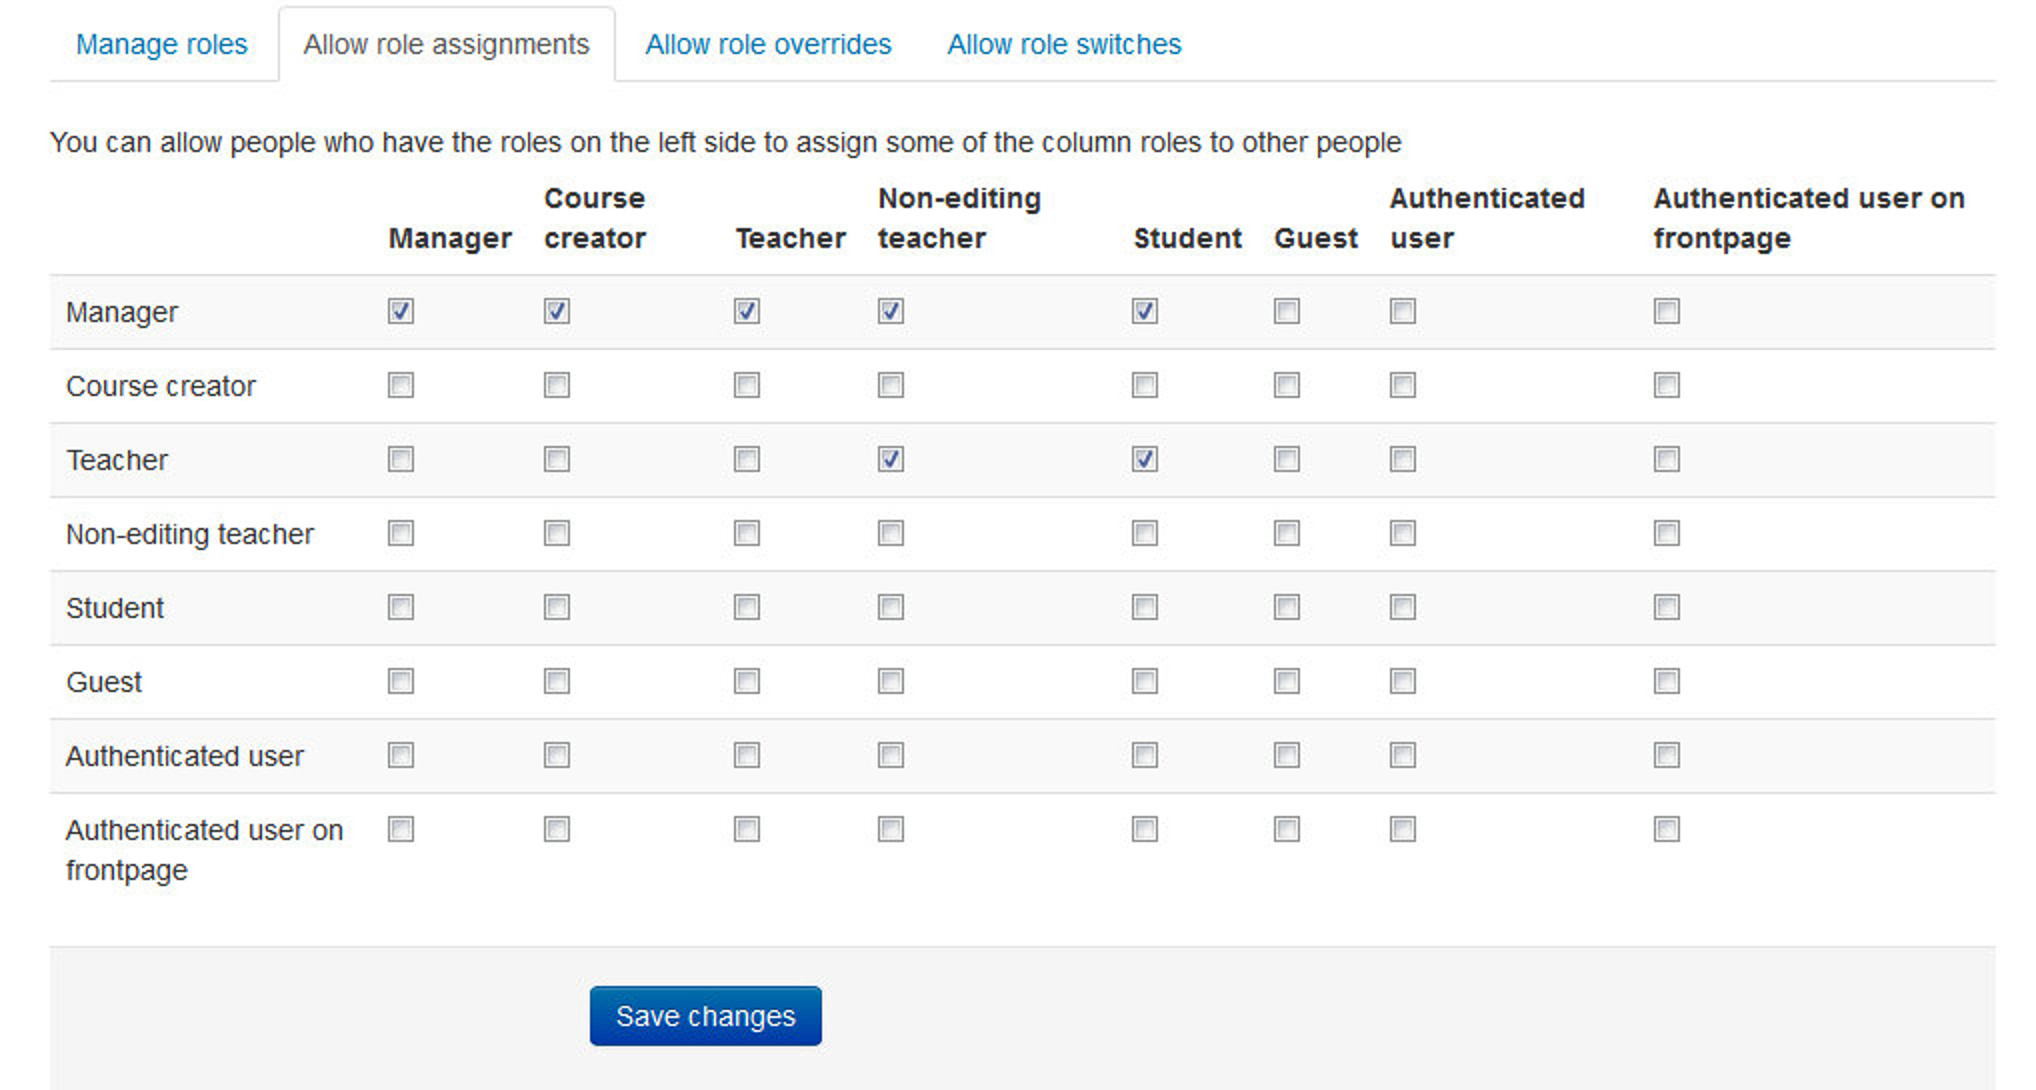
- Define Roles: This is the place to add custom roles or modify existing roles. The “Manage roles” tab, allows the system administrator to edit any one of over 350 different capabilities associated with any role. The “Allow role assignments”, “Allow role overrides” and “Allow role switches” contain a matrix which give the ability for a specific role to work with other specific roles.
- Assign System Roles: In Moodle, apart from the site administrator, users do not normally have a global, site-wide role. You may have a role of teacher in some course whereas you can also be a student in some other course. By assigning a role to a user in a context, you are granting them the permissions contained in that role, for the current context and all lower contexts. By default there are two roles to choose from: Manager and Course Creator.
- Check System Permissions: To check the permissions of a particular user in System Context you can use this page. It will display the complete list of capabilities of the user in the System context.
- Capability Overview: This report shows, for a particular capability, what permission that capability has in the definition of every role (or a selection of roles), and everywhere in the site where that capability is overridden.
- Unsupported Role Assignments: Unsupported role assignments are role assignments in contexts that make no sense for that role, such as the course creator role in the course or activity context, or the teacher role in the user context.
Courses
You, as the administrator, together with any colleagues you have assigned as course creators, are responsible for adding courses to Moodle.
-
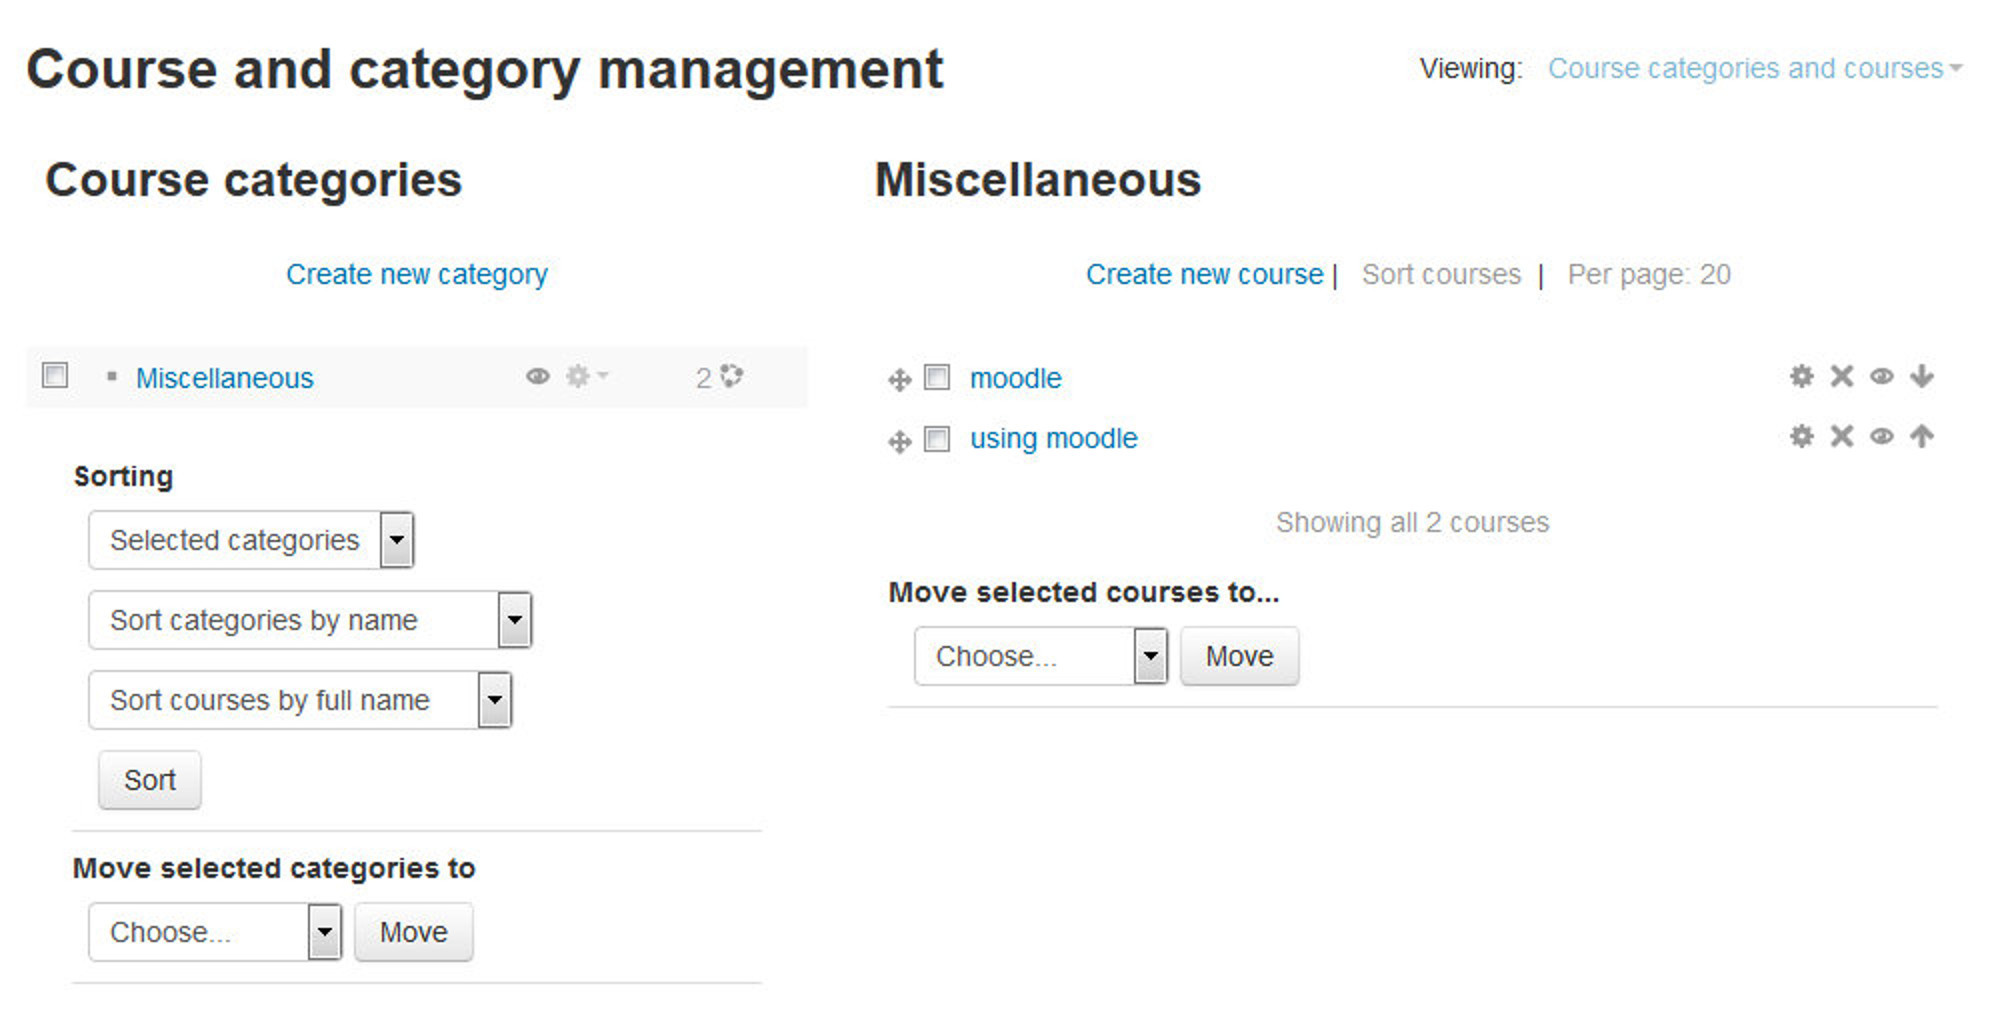
Manage Course and Categories: Course categories organize courses for all Moodle site participants. The default course category on a new Moodle site is “Miscellaneous”. Although you are certainly free to put all your classes in the miscellaneous category, your students will find it easier to find their classes if they are organized in descriptive categories. The list of courses within a category by default shows the teachers and the summary of each course.
The page is having 3 different view options:
- Course Categories and courses: All categories are shown on the left side and the courses within the selected category are shown on the right side.
- Course Categories: Display only the categories within the Moodle site.
- Courses: Display the courses within a particular category which can be chosen from a drop down menu on the top right corner.
-
Add a category: Most people organize their courses by department and college or by topic. Be sure to test the organizational scheme with a few users before entering a large number of courses, to save time in moving them later. You can add a new category by:
- Go to Administration > Site administration > Courses > Add a category
- Complete the details required and click ‘Create category.’
T> Alternatively, you can go to Administration>Site administration>Courses>Manage courses and categories and click the link ‘Create new category’.
-
You now have a new course category, which you can move up or down or into an existing category to create a subcategory.
Once you set up a few course categories, you are ready to create a course.
-
Restore Course: A course backup file (.mbz) may be restored from within any existing course for which you have permission. During the restore process, you will be given the option to restore as a new course or into an existing course.
T> If your new course has fewer sections than the course you are restoring, the extra sections will appear as “orphaned activities”. Increase the number of sections in the new course to make them visible.
- Course Default Settings: You can enter the default settings for the new courses like the format of the course, no. of sections, course layout, news items to be displayed etc.
- Course Request: By default a regular teacher can’t add a new course. This page will allow any authenticated user on the site to request a course to be created. You can define the default category for course requests and course request notification.
- Backups:
- General Backup Defaults: A course can be saved with some or all of its parts by using the course backup. On this page you can define the default settings for the items which will be included in the backup of the course like Users, Activities, Blocks, Filter’s etc.
- General Import defaults: On this page you can provide the number of courses that are listed during the first step of the import process.
- Automated Backup setup:
- Upload Courses: You can upload multiple courses via text file. In addition to creating new courses, this functionality may also be used to update or delete courses, or import content from another course. The format of the file should be as follows:
- Each line of the file contains one record
- Each record is a series of data separated by commas (or other delimiters)
- The first record contains a list of fieldnames defining the format of the rest of the file
- Required fieldnames are shortname, fullname, and category
Grades
- General Settings: Here you can set the general grades settings which will be applicable sitewide. You can define the roles to be graded, the report available on the user profile page, navigation method, maximum grade points and the default grade points for an activity.
- Grade Category Settings: This page enables you to choose which options appear for teachers when adding/editing a grade category in their course gradebook, and their default values. There are 2 check boxes next to most features on this page. The “Force” check box eliminates any options the teacher will see. For example, if you check the Forced checkbox besides the Aggregation dropdown, then the teacher will only see and are able to use the “mean of all grades” as an aggregation. The “Advanced” checkbox will hide the specific feature until the “Show advanced” button is used by the teacher. This will reduce initial menu choices for teachers but allow them to see them if they wish.
- Grade Item Settings: Grade item settings are the various settings that the administrator is able to edit for all gradebooks used by teachers. These settings will change what items are displayed for each grade. Let’s suppose that you want the grades to be displayed on the form of Letters (to represent a range of percentages) to the students then you have to set the grade display type option to letters so that the actual grades entered by the teachers will be displayed as letters to the students.
- Scales: Scales are a way of evaluating or rating a students’ performance. Administrators can create standard scales which are available across the site, and teachers can create custom scales just for their own course. We have discussed about Scales in chapter 18.
- Letters: TO define the range of percentage in the form of letters you can define the letters on this page. Moodle will provide you with some default letter grades. You can customize the same by clicking Edit Letter Grades anytime.
- Report Settings:
- Grader Report: Here you can define the default preferences for the Grader report to be displayed sitewide to all teachers. You can define how many students to be displayed on a page, quick grading, quick feedback, AJAX to be enabled by default or not, etc. However, teachers can still be able to change the default settings by using the “My Report Preferences” link.
- Overview Report: The overview report lists all the courses a student is enrolled in together with the total grade for each course. You can define whether to Show the rank of the students in relation to the rest of the class for each grade item and whether totals which contain hidden grade items are shown to students or replaced with a hyphen symbol.
- User Report: The user report shows the currently logged in user’s grades in the current course. It includes:
- A breakdown of the grades for each assessment (grade item) in the course.
- The optional teacher-given feedback for each grade.
- The overall grade for the course (called course total).
T> Teachers can choose whether to show or hide rank and percentages in the Gradebook course settings.
Badges
-
Badge Settings: Here you can set the name and email address of the badge issuer. You may set the name of the institution in this field as this name will be displayed while viewing the badges. You can also set the connection to the external backpacks like Mozilla’s Open Badges.
T> You can also enable the course badges on this page which allows the teachers to create and award badges.
-
Manage Badges: On this page you can manage the Site Badges. Site badges can only be awarded to users for site-related activities. These include completing a set of courses or parts of user profiles. Site badges can also be issued manually by one user to another.
Badges for course-related activities must be created at the course level. Course badges can be found under Course Administration > Badges.
You will find a link on this page to “Add a new Badge” to add a new badge to the Site badges.
-
Add a new badge: You can add a new site wide badge using this link. You have to enter the details like the name and description of the badge along with the badge image.
You have to enter the Issuer details on this page like the Name and Email address in the Issuer Section.
You may also enter the expiry date for the badges awarded by your institution. Optionally, badges can expire on a specific date, or the date can be calculated based on the date when the badge was issued to a user.
Location
- Location Settings: The location settings page includes the following options:
- Default TimeZone: This sets the default time zone for date display. This can be overridden by a user’s profile setting unless the default time zone is forced.
- Default Country: Select your country so that it appears by default on the new account page.
- IP Address Lookup: By default Moodle uses the free online NetGeo (The Internet Geographic Database) server to lookup location of IP addresses, which is not maintained anymore. It is recommended to install local copy of free GeoLite City database from MaxMind. IP address location is displayed on simple map or using Google Maps.
- Update Timezones: This page will search for new information about world timezones (including daylight savings time rules) and update your local database with this information.
Language
One of Moodle’s many strengths is its language-handling capabilities. As we mentioned in Chapter 2, you can provide users with a choice of language or force a language in a particular course. Even if you want your site in English only, you may well find the language editing facility useful for making changes to the standard text in Moodle.
- Language Settings: The language settings page includes the following options:
- Default language: This sets the default language for the site. The setting can be overridden by users using the language menu, or the setting in their personal profile.
T> If a preferred language is set in a user’s browser, then this will override the default site language.
- Display language menu: This sets whether the language menu is displayed on the login page and the front page. If it is turned off, the only places where a user can change the language setting are in her user profile or in the course settings if she is a teacher.
- Languages on the language menu: If you want to limit the number of languages students and teachers can select from, enter a reduced list here.
- Cache language menu: If enabled, the list of available translations is cached.
- Cache all language strings: Caches all the language strings into compiled files in the data directory.
- Sitewide locale: It’s generally best to leave this setting empty, as it’s set through each language pack.
- Excel encoding: Leave as default (Unicode) unless you have a particular reason for wanting Latin encoding.
-
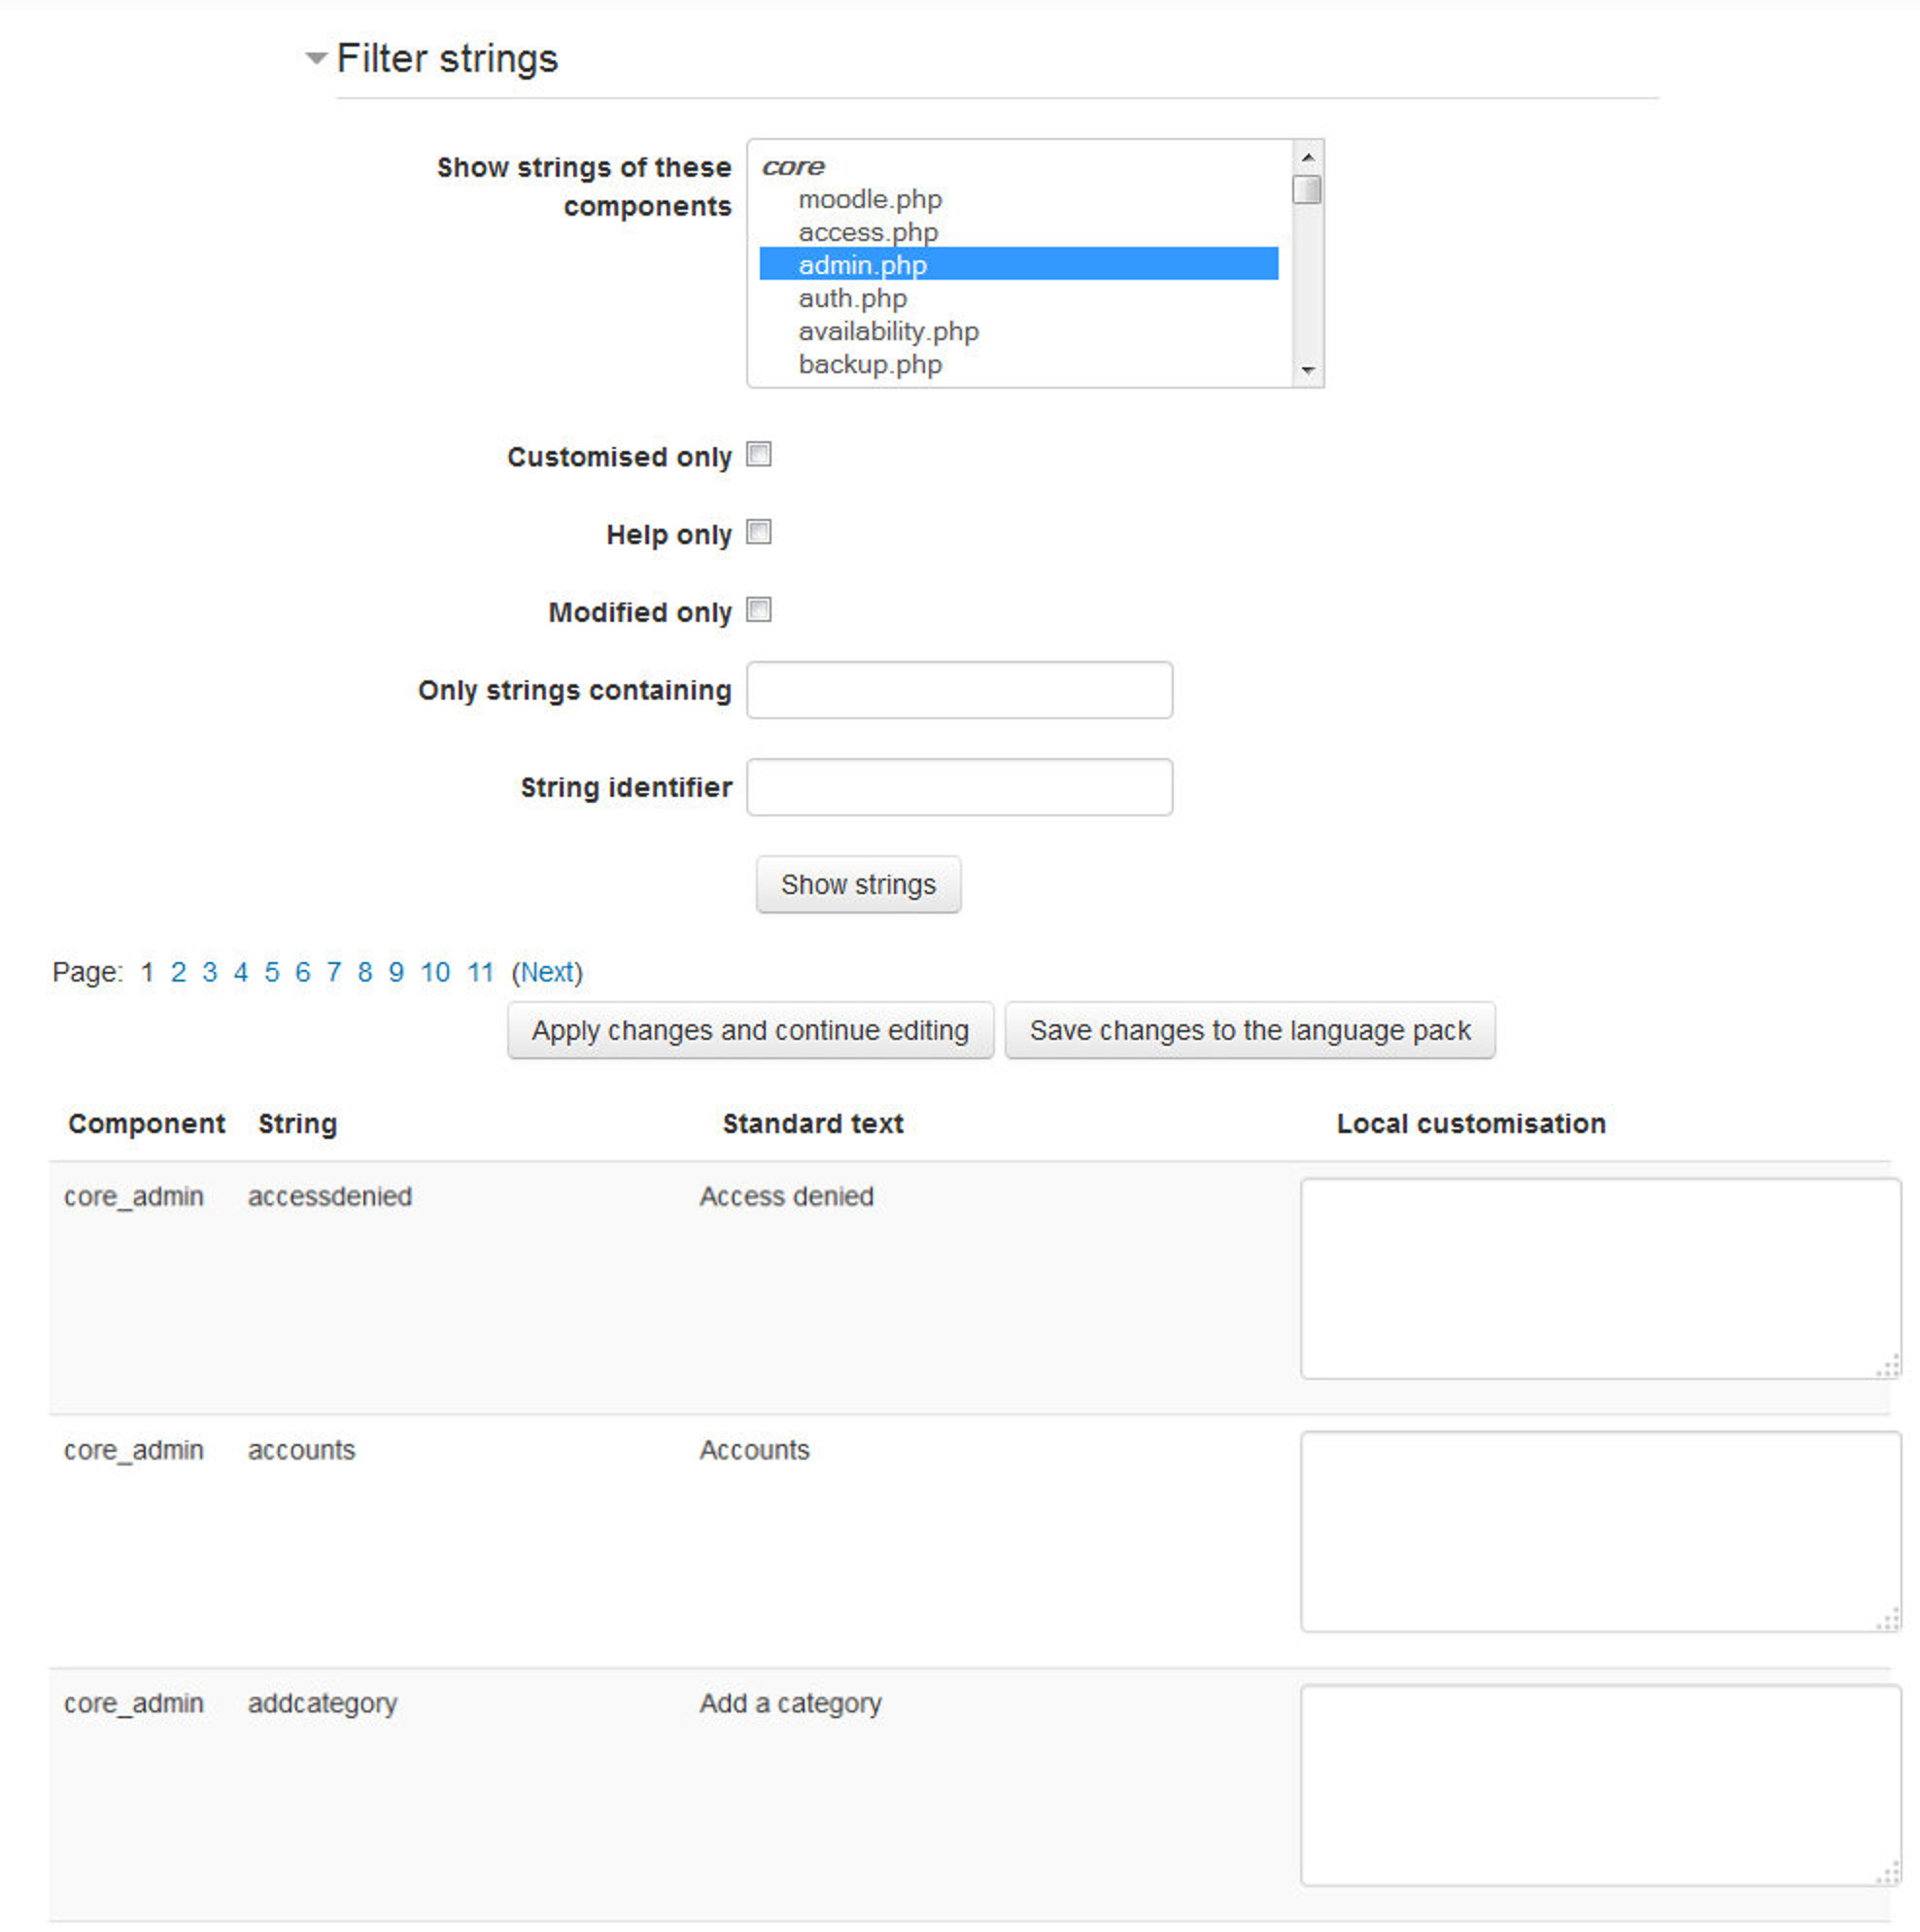
Language Customization: The language editing interface enables you to easily change any word or phrase used on the site. For example, you may want to change the word “Course” to “Unit.”
To change a word or phrase:
- Go to the Administration > Site administration > Language> Language customization page.
- Pick the language to customize from the pull down list.
- Click on the “Open language pack for editing” button. This may take some time to process.
- Once the language pack has loaded, click on the “Continue” button.
- Click or Ctrl+Click to select the files in the “Show strings of these components” list. Notice that the files are grouped. For example, you will find the lesson strings under “mod” and moodle.php under “core”.
- After selecting the file(s), it is possible to use the “Only strings containing” filter along with other filters. For example, to look at only the string text that has the word “teacher” the file(s) you selected.
- Click on “Show strings”.
- Make your changes in the appropriate “Local customization” box.
- Click on “Apply changes and continue editing” if you want to use another filter or edit other file(s).
- Click on “Save changes to the language pack” to save all of the changes you have made.
-
Language Packs: At the time of this writing, over 100 language packs are available for you to install on your Moodle site. Simply select the languages you require from the list of available language packs and click the “Install selected language pack” button.
T> All language packs, apart from English, are stored in the moodledata/lang folder.
Plugins
As mentioned in the beginning of this book, Moodle is an acronym for Modular Object Oriented Developmental Learning Environment. It has a modular design which can be extended by using the Plugins designed by the community members.
You can extend the functionality of your Moodle site by choosing Plugins from the large collection of plugins on Moodle Community site.
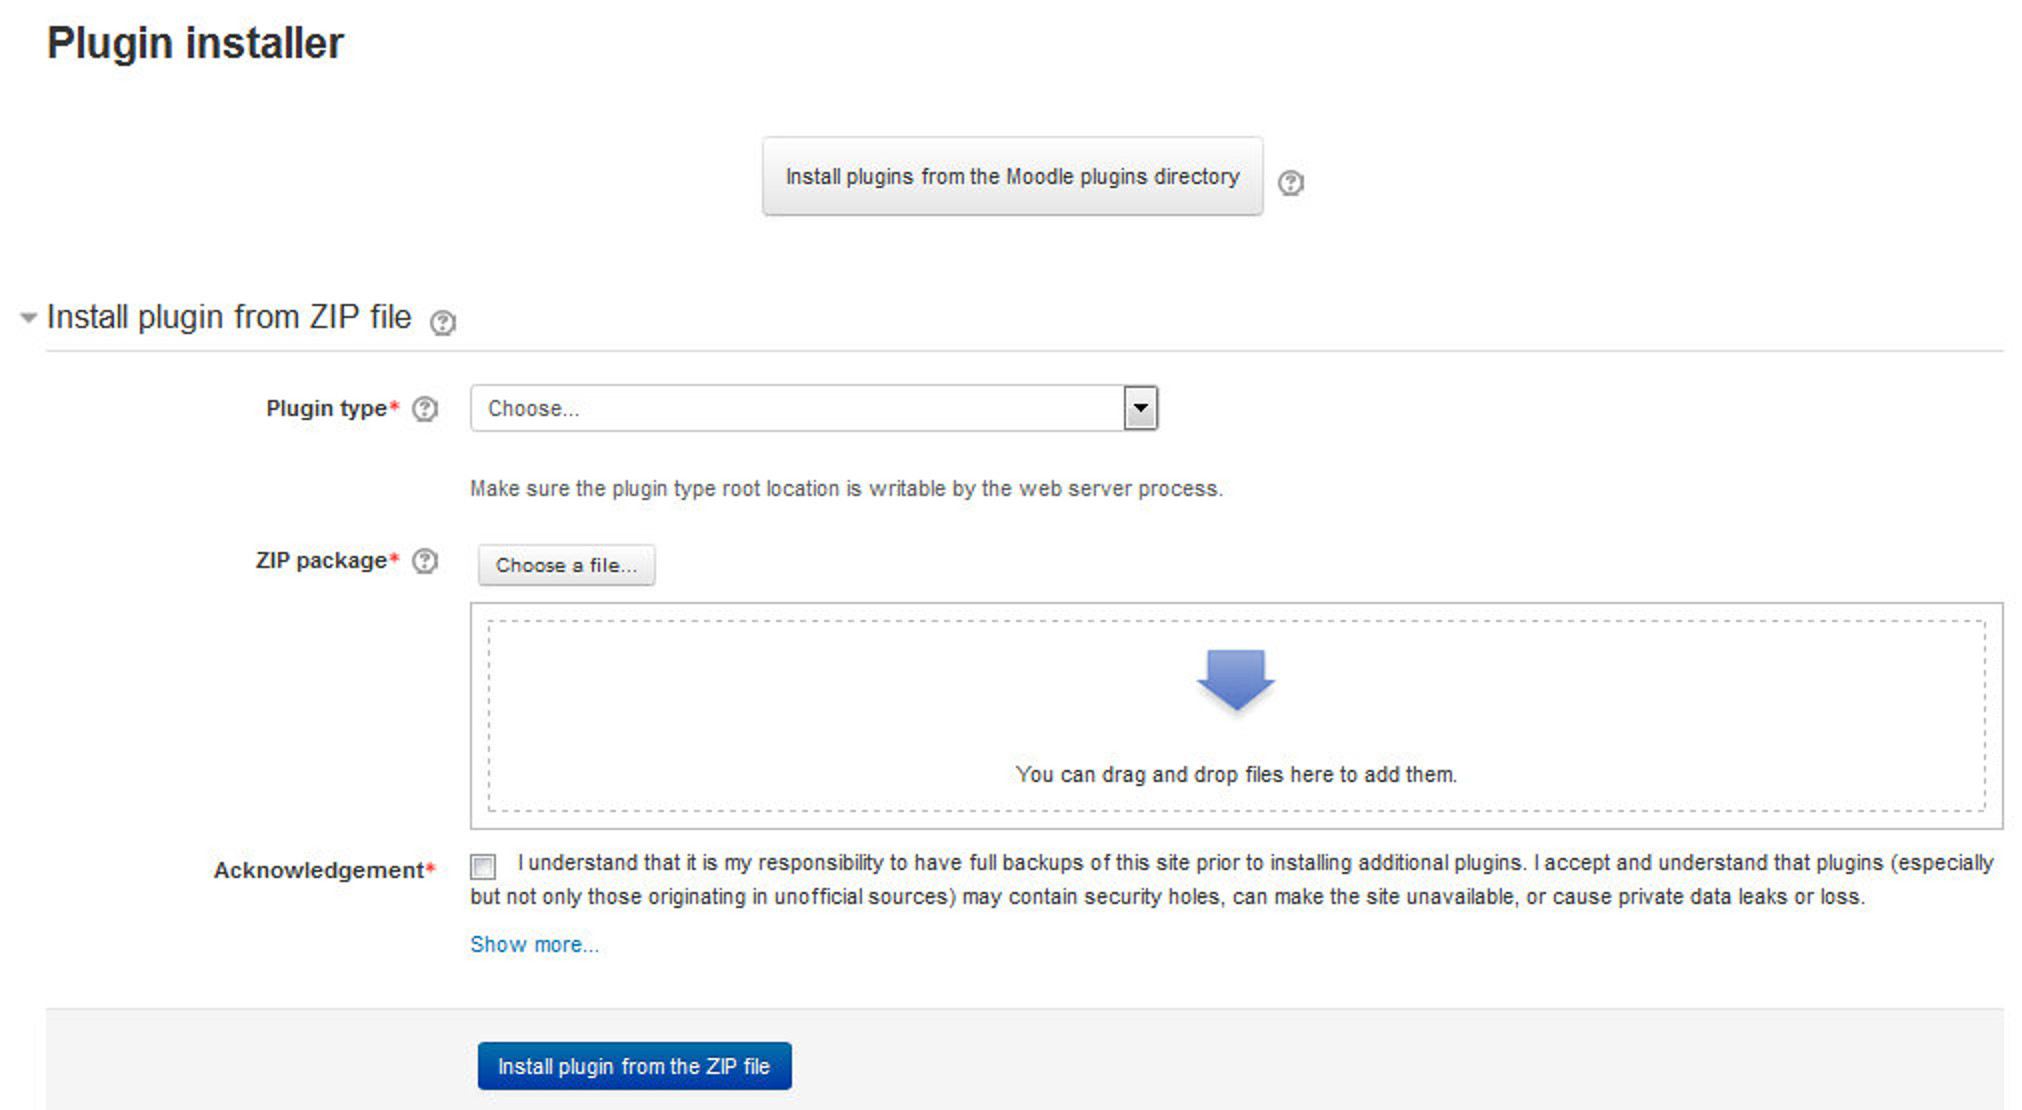
Install Plugin
In Moodle 2.7 you can install the plugins right within the Moodle site from your browser either directly from the Moodle plugins directory or by uploading a ZIP file. No need to install plugins through your FTP interface. Alternatively, an add-on code may be deployed manually at the server.
T> The web server process has to have write access to the plugin type folder where the new add-on is to be installed in order to use either of these methods.
To install a plugin from the Moodle plugins directory to your Moodle site:
- Go to Administration > Site administration > Plugins > Install plugins.
- Click the button ‘Install plugins from Moodle plugins directory’.
- Search for a plugin with an Install button, click the Install button then click Continue.
- Check that you obtain a ‘Validation passed!’ message, and then click the button ‘Install plugin’.
Plugins Overview
The Plugins overview page in Administration > Site Administration > Plugins > Plugins overview lists all installed plugins, together with the version number, release, availability (enabled or disabled) and settings link (if applicable).
A ‘Check for available updates’ button enables admins to quickly check for any updates available for plugins installed on the site (from the plugins directory). Any updates available are highlighted, with further information and a download link in the notes column opposite the plugin.
Activity Modules
The activities page, as shown in Figure 19-8, enables you to manage Moodle’s activity modules.
The Hide/Show column allows selected modules to be hidden, so they do not appear in any course “Add an activity” drop-down menu and cannot be used in any course. To hide a module, click the eye icon so that it changes to a closed eye.
For various reasons, few modules are hidden by default. For example, the Assignment 2.2 and Feedback modules are included in Moodle for historical reasons but kept as disabled by default.

The activities page also lists how many activities for each module there are on your Moodle site. If you click on a number, the list of courses containing that activity will be displayed.
Apart from the basic standard modules, any module can be deleted using the link in the Delete column.
There is no reason for standard modules to be deleted. However, nonstandard modules may need to be deleted before upgrading.
T> To delete a module completely, in addition to deleting it on the activities page, you also need to remove/delete the actual module folder from the moodle/mod folder. Otherwise, Moodle will reinstall it next time you access the site administration. This also applies to blocks.
Many of the modules have additional settings, which can be accessed via the links in the Settings column. Settings you may want to change include:
- Assignment: You can set the default feedback plugin, submission statement and various other default assignment settings.
- Book: Here you can define the available options for chapter formatting and the default option for chapter formatting.
- Chat: By default the chat method is Ajax which can be changed to Normal method or Chat Server daemon. Ajax method works everywhere but if many people are using chat simultaneously then it can put a large load on the server. On this page you can define the settings for the chat method you have chosen.
- Database, Forum & Glossary: If you have enabled RSS across the site (in the Server > RSS section of the Site Administration block), you will also need to enable RSS in the Database, Forum, and Glossary modules. You can also set the default settings for Forum and Glossary activities.
- IMS Content Package: IMS content package settings page allows you to set whether the description for the activity is required or not and how many packages should be archived.
- Label: Label module settings page allows you to set whether Moodle should offer to create a label when media files are dragged & dropped onto a course and the resized height and width of the image.
- Lesson: You can define the slideshow and popup media settings and the action which has to be taken after a correct answer.
- External Tool (LTI): You can add external tools providers (LTI providers) from this page. We have discussed about external tools in Chapter 17.
- Page: You can define the available display options for the page resource. By default only open is selected. You can also display a page resource in a popup window.
- Quiz: You can define the default values that are used in the settings form when you create a new quiz. You can simplify the “Add a new quiz” page by selecting a number of options to be hidden from teachers by default and only displayed when teachers click the “Show More” button.
- File: You can define the available display options and the default values available to the teacher while adding a file resource.
- SCORM: SCORM settings page will allows you to define the default settings like whether to display the course structure on entry page, the directory links, location bar, menu bar etc. You can also define the grading settings for the SCORM activity packages.
- URL: This page allows you to define the available display options for URL resource and the popup height /width.
- Workshop: Workshop settings page allows you to default grade settings for submission and assessment along with the maximum attachment size and grading strategy etc.
Admin Tools
You can uninstall the default available admin tools from the manage admin tools link. The page will display a table containing the name of the tool along with the version number and a link to uninstall it.
Authentication
One of the first things you need to consider when setting up your Moodle site is user authentication, i.e., enabling people to log in to your Moodle site.
In Chapter 3, we covered how to create a user account using email-based self-registration. You created the account and Moodle sent you an email with a link to confirm your address. While this is an effective and efficient way to create new accounts, particularly for smaller sites, Moodle provides a number of other authentication methods as well. If you are in a university environment and have access to a university email or directory server, you can tell Moodle to use them to authenticate new user accounts instead. External servers prevent users from creating multiple accounts and prevent people from outside your organization accessing your server when they shouldn’t.
Authentication methods (also known as authentication plug-ins) include:
- Manual accounts: This method requires the administrator to manually create all user accounts. It may be used together with the upload users facility.
- Email-based self-registration: With this method, users can create their own accounts. They then receive an email at the address they specified in their account profile to confirm their account.
- External database: This method uses an external database to check whether a given username and password are valid. You can choose whether certain Moodle user profile fields are filled with information from the external database.
- FirstClass/POP/IMAP/LDAP/NNTP server: These methods use an external server to check whether a given username and password are valid. If the name and password match, an account with the same username is created in Moodle.
- MNet Authentication: Moodle Networking is a feature enabling resources to be shared between Moodle sites using a single sign-on. You can also use the MNet authentication method to login to the external portfolio sites like Mahara.
- No authentication: Users can create accounts with no external validation. This option should only be used for testing purposes.
- Shibboleth: Shibboleth is open source software that provides a single sign-on across or within organizational boundaries.
- Web Services Authentication: Web Services Authentication method should be used for accounts that are exclusively for use by web service clients.
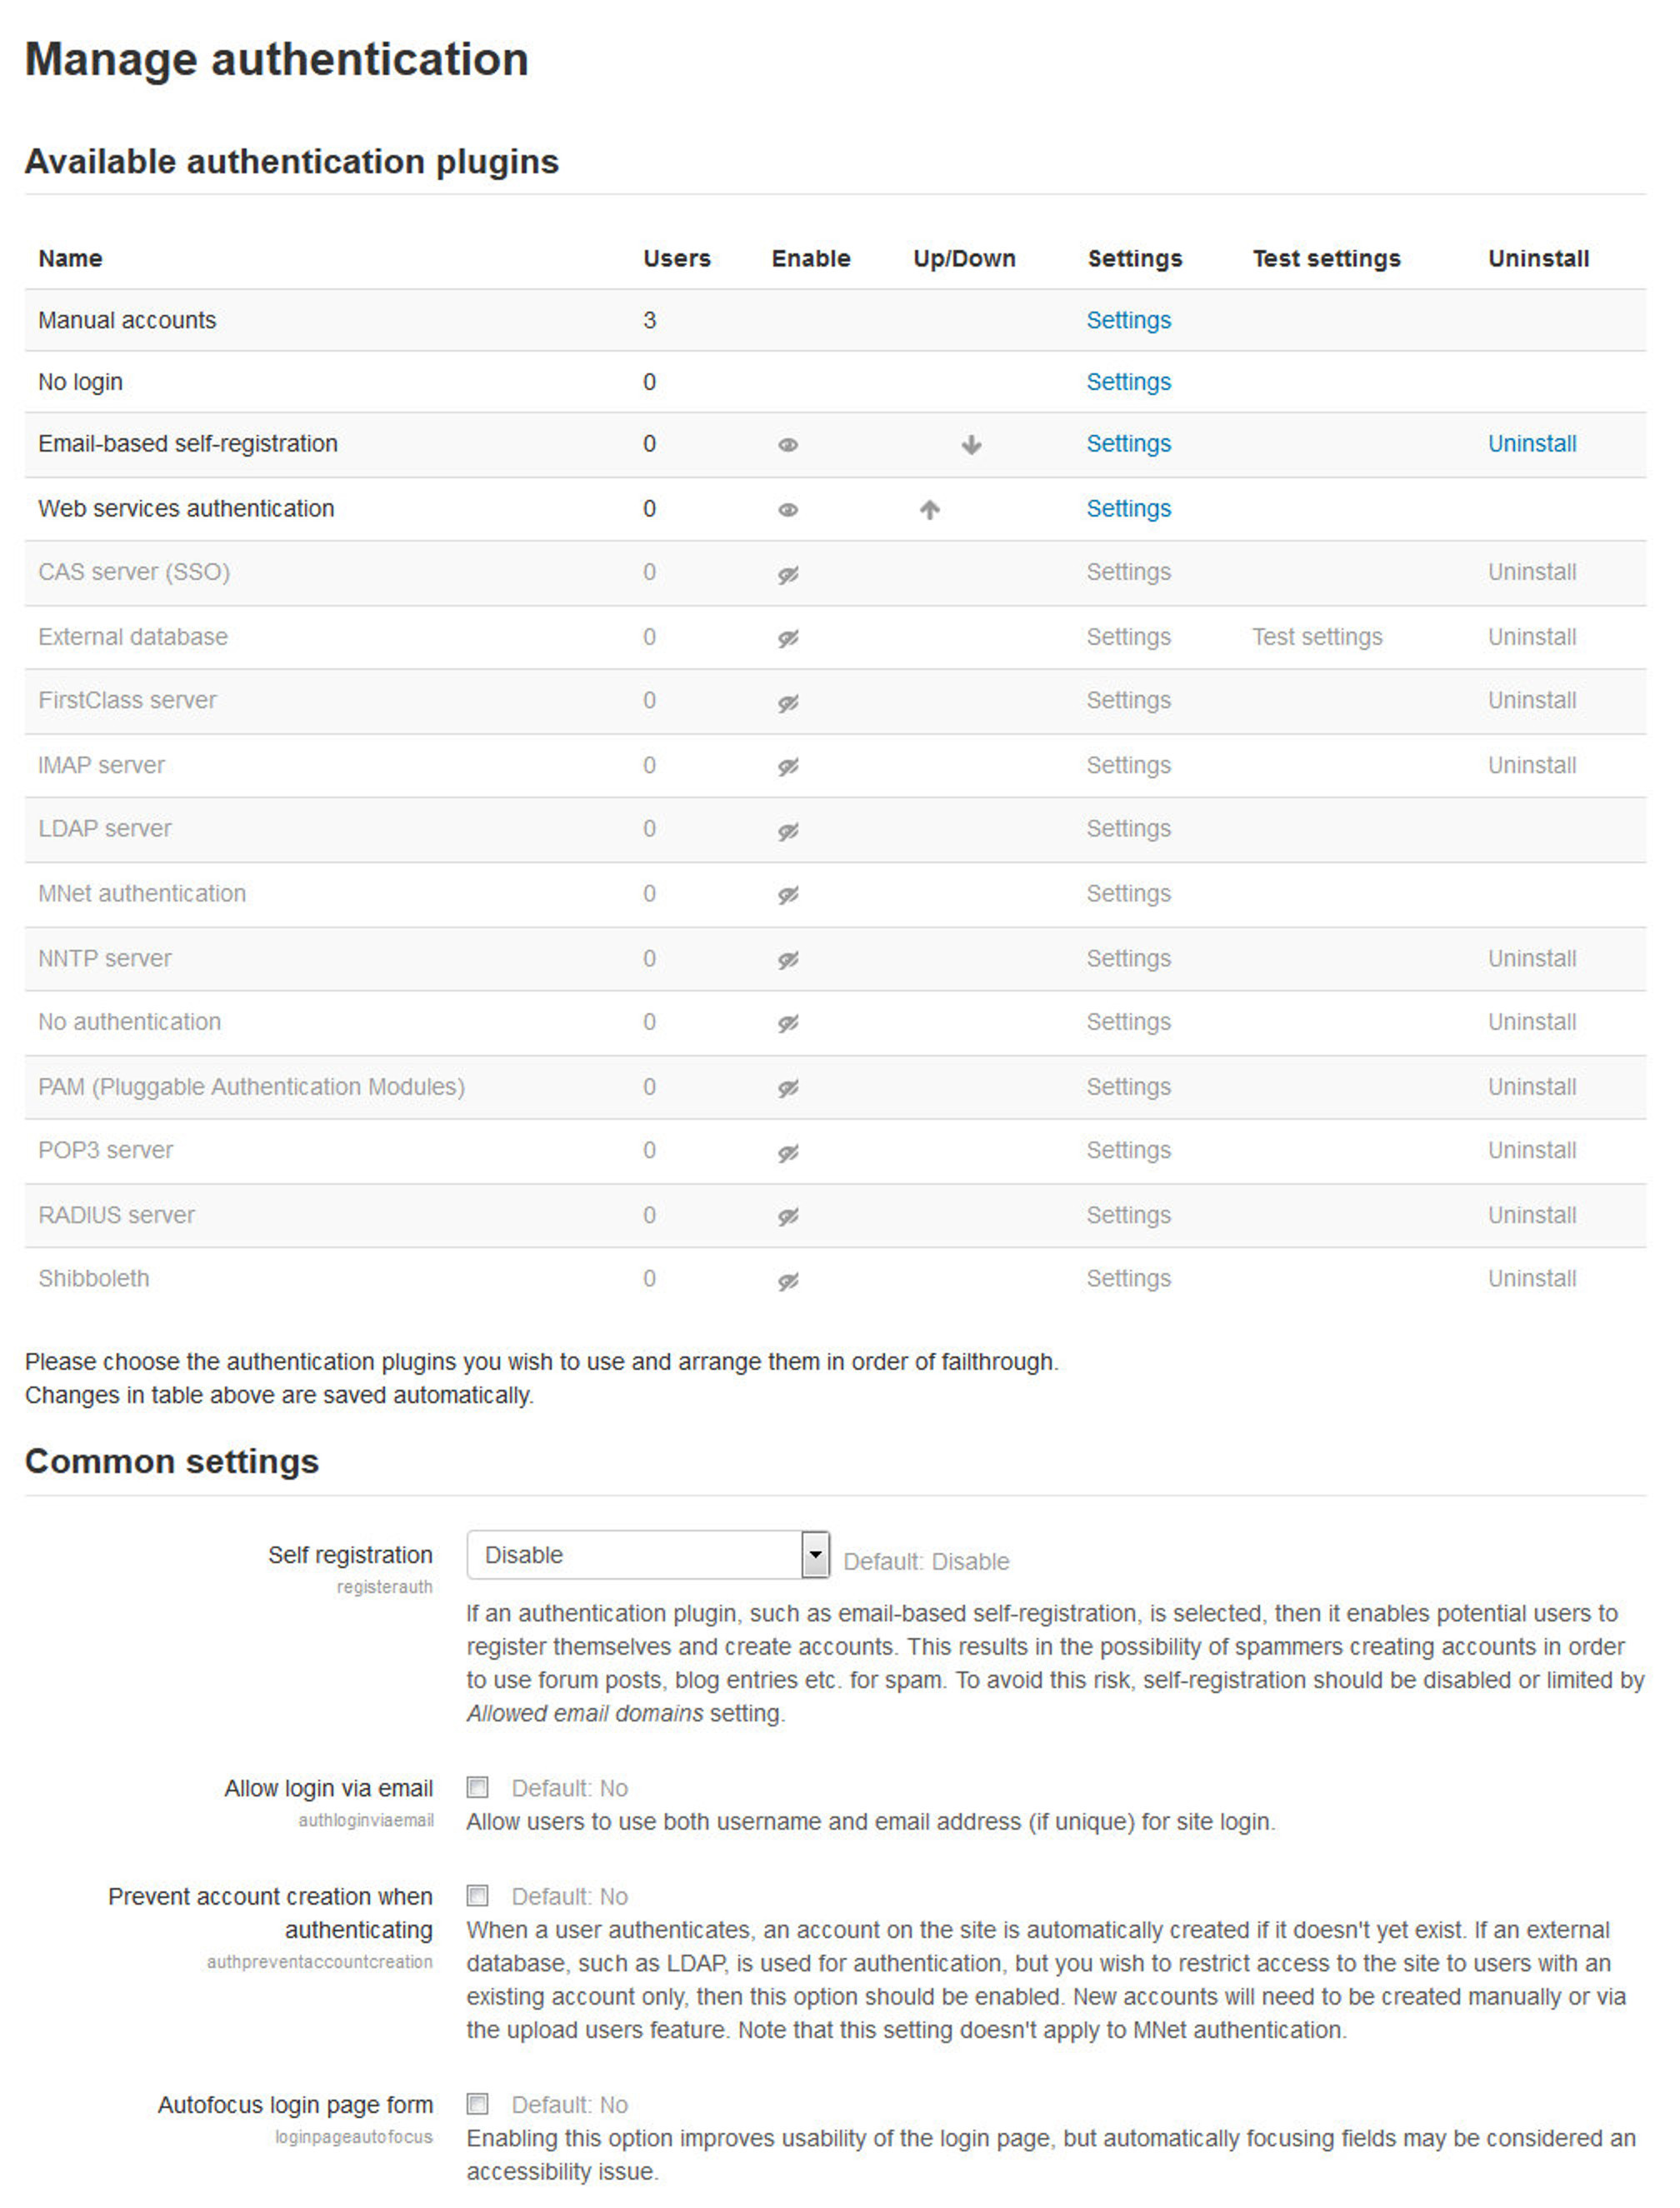
To set the authentication method:
- Click on Authentication in the Site Administration block.
-
On the authentication page, as shown in Figure 16-1, click on the closed-eye icon to enable your chosen authentication plug-in.
T> If you want, you may choose to use more than one authentication method. Use the up/down arrow icons to arrange the plug-ins in order, with the plug-in handling the most logins at the top of the page. This will minimize authentication server load.
- If you have courses with guest access, set the Guest login button to show.
- Click the “Save changes” button.
- Click on Settings opposite the authentication plug-in(s) you have chosen.
- Configure the required settings and click the “Save changes” button.
Blocks
The blocks page, which looks similar to the activities page, enables you to manage blocks in Moodle. As for activity modules, you can show, hide, and delete blocks.
The blocks page also lists the number of instances of each block. Clicking on a number results in the list of courses containing that block being displayed.
A few blocks have additional settings, which can be accessed via the links in the settings column. Settings that you may want to change include:
Remote RSS feeds
You may want to allow teachers or even everyone to be able to add new RSS feeds. If not, then teachers will have to contact you to add new RSS feeds.
To add a new RSS feed:
- Click the “Add/edit feeds” link at the bottom of the “Remote RSS feeds settings” page.
- On the “Add/edit feeds” page, add the news feed URL and a custom title (optional).
- Click the Add button.
Course Formats
You as a site administrator can manage which Course formats are available for courses. Course formats can be disabled (hidden), re-organized or deleted.
Enrolments
By now you should have set up user authentication, i.e., enabled people to log in, created some courses, and assigned teachers to them. The next thing to consider is course enrollment, which is, assigning users the role of student in a course.
By default, students can enroll themselves in whatever courses they choose. They do so by clicking on the course name, then answering Yes to the question “You are about to enroll yourself as a member of this course. Are you sure you wish to do this?” This method of enrollment is called self-enrollment.
Whilst self-enrollment is an effective and efficient way of managing course enrollment, particularly if you don’t have a lot of courses, Moodle also provides a number of other enrollment methods (or enrollment plug-ins). They include:
- Paypal: This method allows you to set up an e-commerce system so students can pay to enroll in a course. If you are running a business selling Moodle-based courses, you can use this method to enable students to use a credit card.
- External database: This method looks up enrollments in another database. You’ll need to configure the login settings so Moodle can access the remote server and map the fields in Moodle to the fields in the external database.
- Flat/IMS Enterprise file: Like the upload users tool, these methods allow you to import user enrollment data via a specially formatted text file. IMS Enterprise file format is described in a help file, and flat file format is described on the flat file settings page.
- Self-Enrollment: This is the default enrollment method, as described above.
- LDAP: You can use an LDAP server to manage enrollment as well as manage authentication. Setup instructions can be found in the Moodle documentation.
To set the enrollment method:
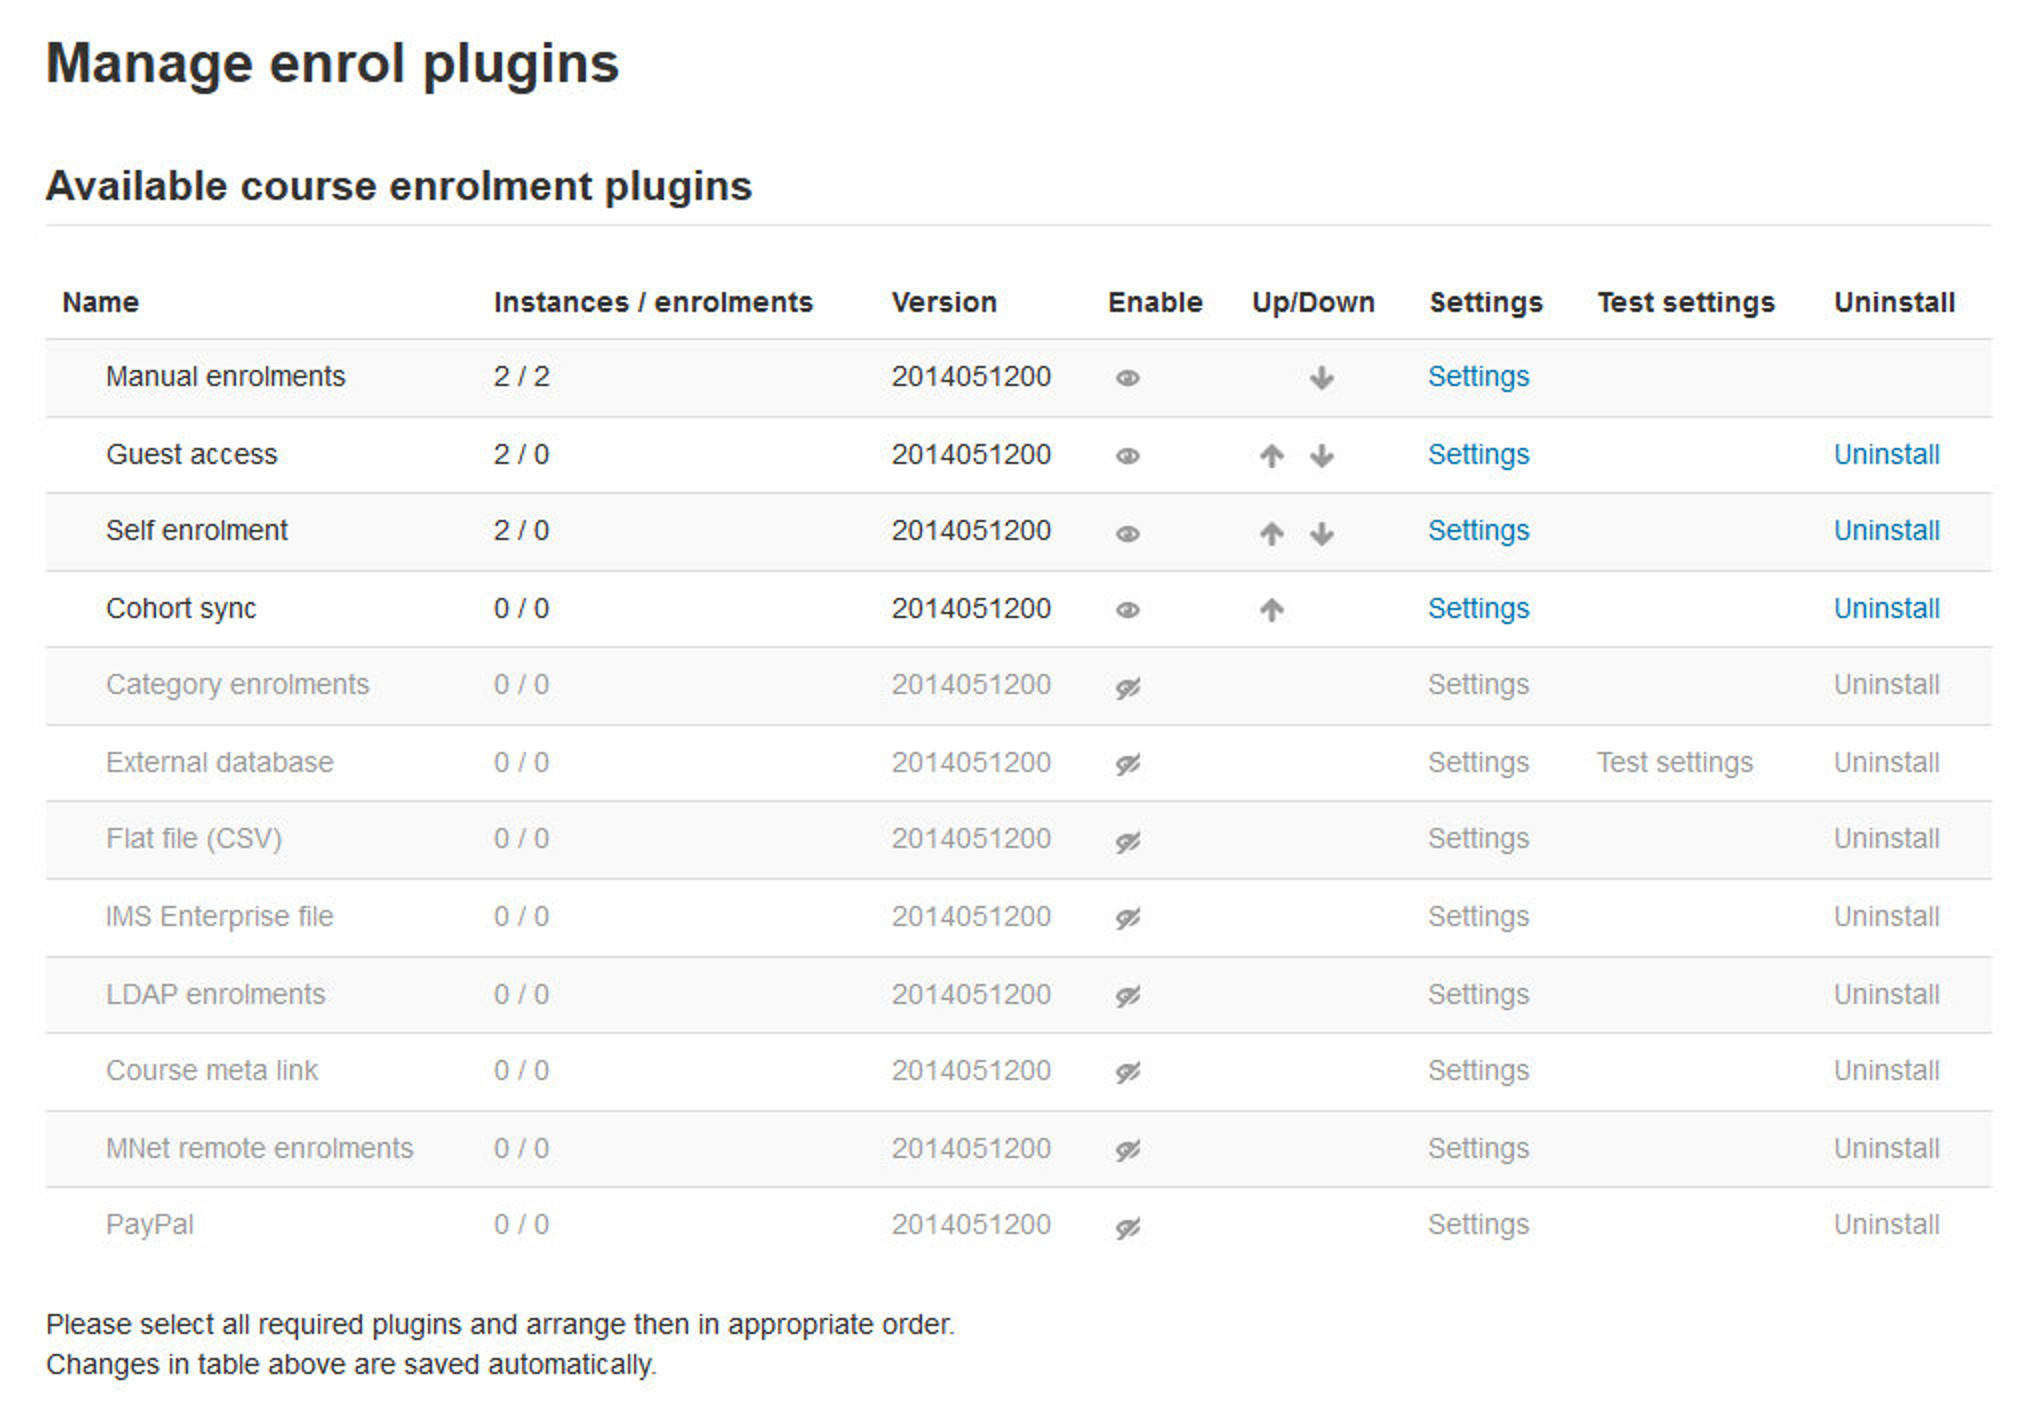
- Click on the Site Administration > Plugins > Enrollments > Manage Enrollments.
-
On the enrollments page, as shown in Figure 19-10, click the closed eye icon opposite to your chosen enrollment plug-in to enable it.
As for authentication methods, you may choose more than one enrollment method, if you wish. For example, if you have some courses that students must pay for and some free courses, you can use PayPal and self-enrollment.
- Click on Settings link opposite the enrollment plug-in(s) you have chosen.
- Configure the required settings and click the “Save changes” button.
Filters
Filters allow for the automatic transformation of entered text into different, often more complex forms. For example, the titles of resources can automatically become hyperlinks that take you to the relevant resource, or URLs pointing to MP3 files can become Flash controls embedded in the web page that let you pause and rewind the audio. There are a number of standard filters included with Moodle and many more specialized filters available from the Moodle.org modules and plug-ins database.
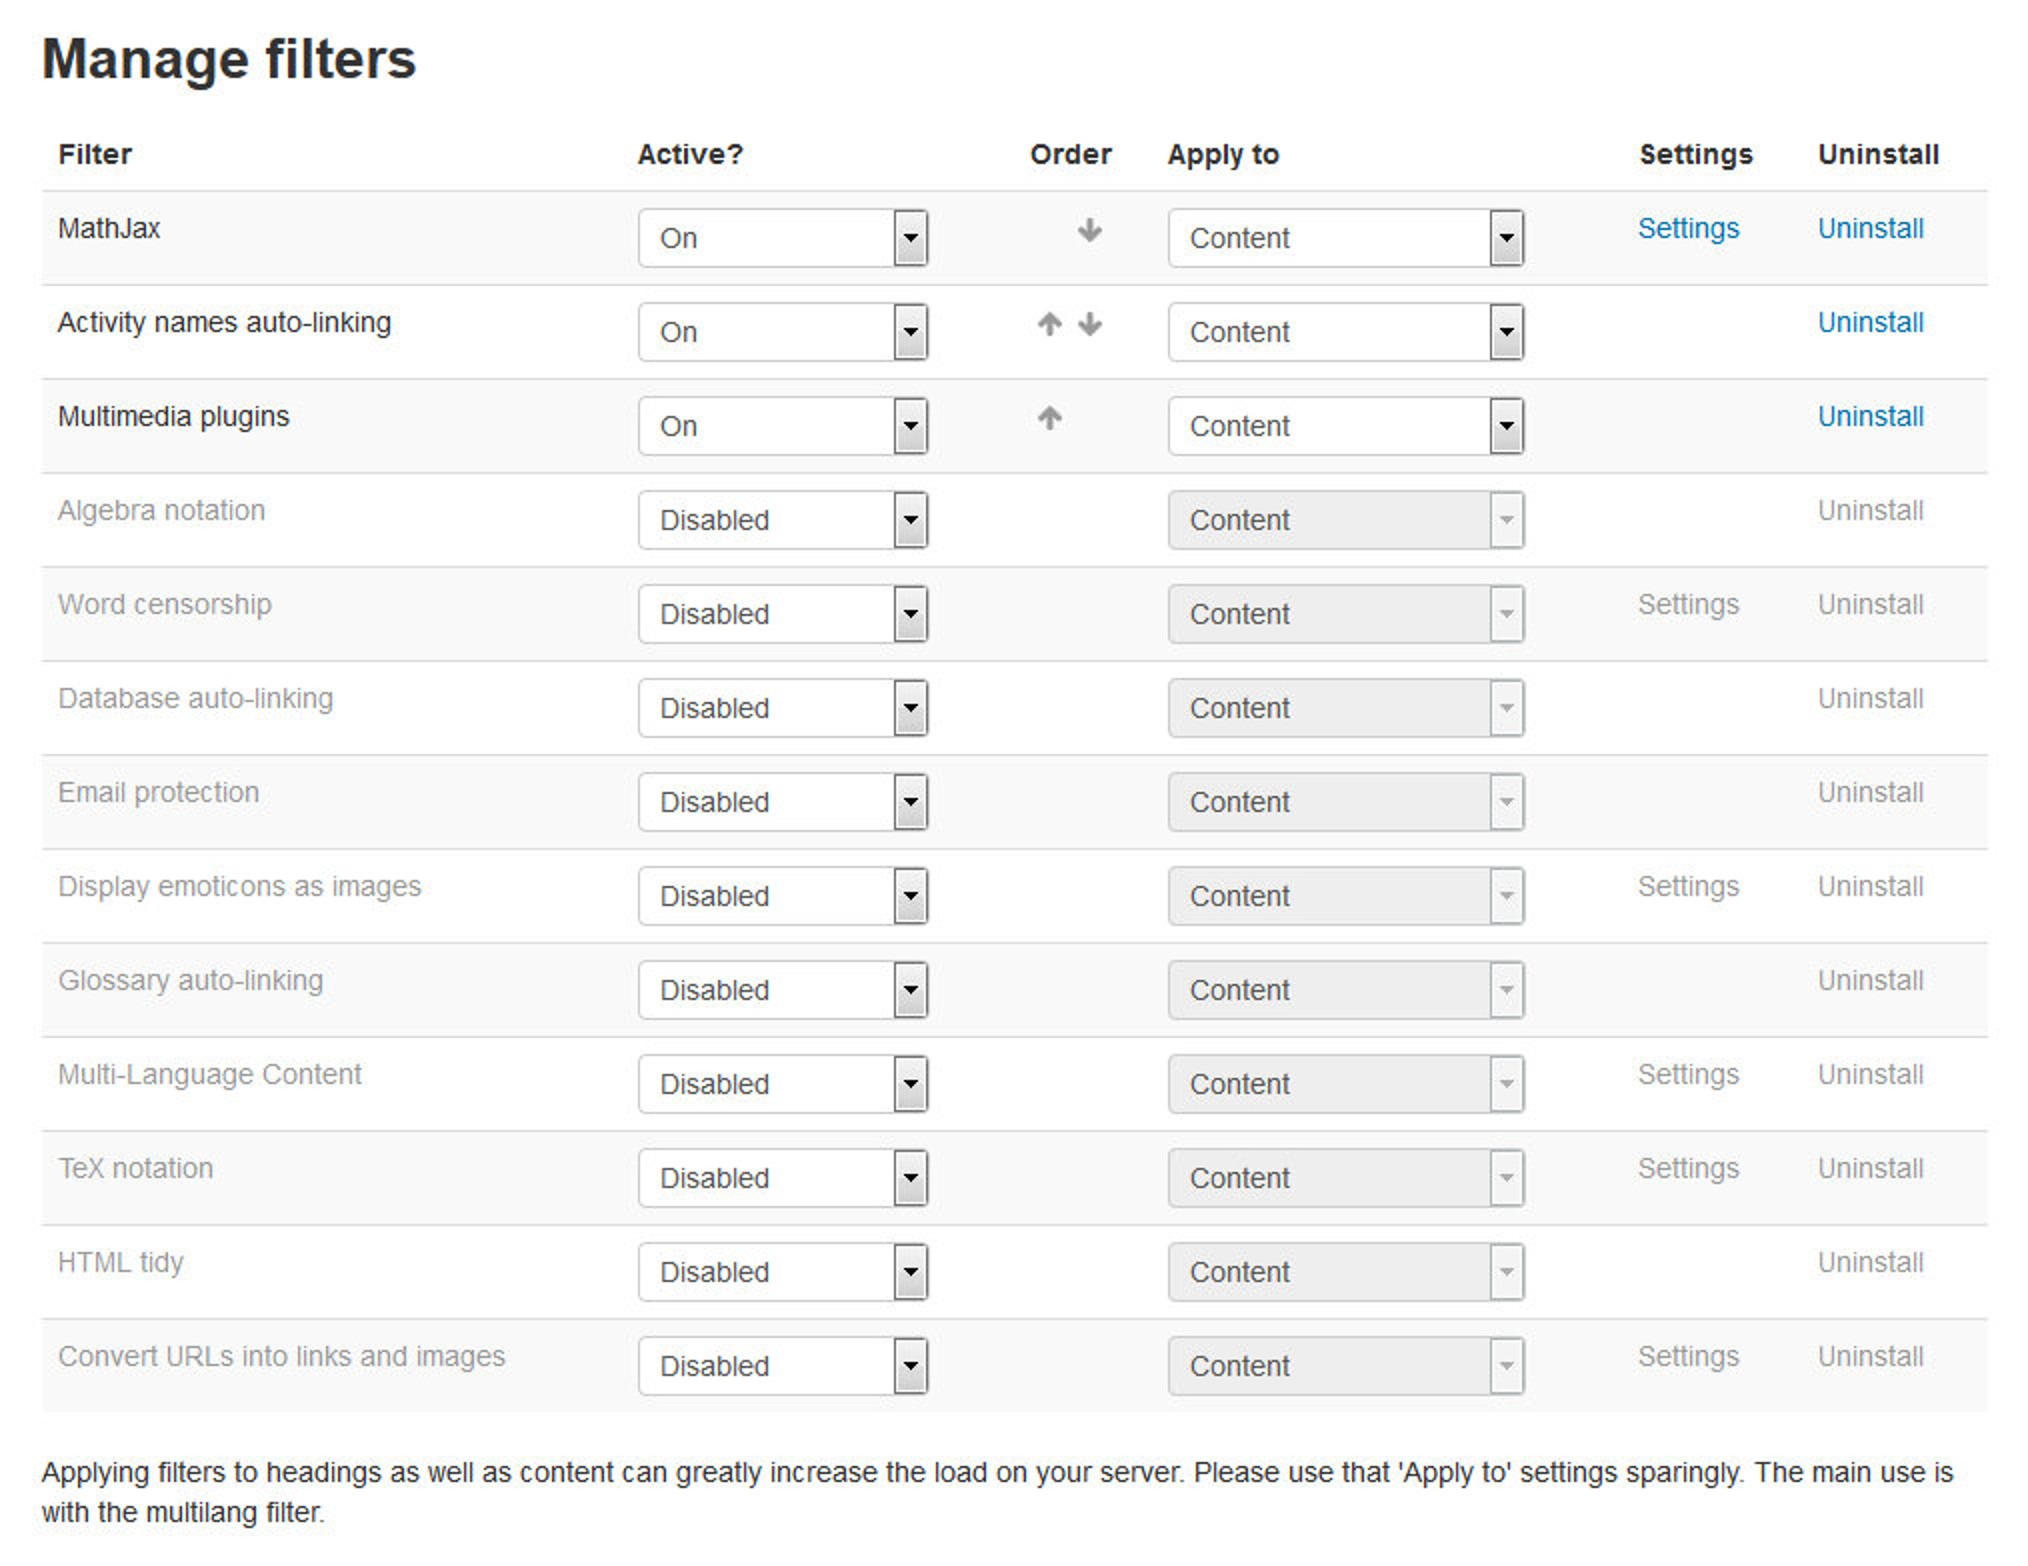
The filters included in the standard download are:
- Activity names auto-linking - This scans text for activity titles that exist in the same course and creates a link.
- Algebra notation - This filter will convert algebra code into GIF images
- Convert URLs into links - This filter converts URLs in selected formats, such as Moodle auto-format, to click-able links
- Database auto-linking - As the name suggests, this filter enables automatic linking of Database module entries
- Display emoticons as images - This converts emoticon (smiley) characters into images
- Email protection - This obfuscates email address links to make them more difficult for spammers to harvest
- Glossary auto-linking - This scans text for glossary entries that exist in the same course and creates a link
- MathJax - For adding Mathematical equations and expressions using an equation editor
- Multimedia plugins - This finds a link in text that points to a multimedia resource and replaces the link with an appropriate multimedia player code which can play the resource
- Multi-language content - This filter enables resources to be created in multiple languages
- Word censorship - This filter “blacks out” words found on a list
To enable a filter:
- Go to Administration > Course administration > Filters or if you are in an activity Administration > Activity administration > Filters
- Set each filter on or off as required
- Click the ‘Save changes’ button.
Certain filters have additional settings, which can be accessed via the links in the settings column.
Licences
You can enable/disable any/all of the licences in Administration > Site administration > Plugins > Licences > Manage licences for user selection when publishing a course to a Community Hub or uploading a file from a File Repository.
Local Plugins
You can manage any local plugins from this page. It is basically meant for plugins developed by your own or any local customization of a standard plugin.
Logging
You can define which log stores are available, and in which order. Available stores are: Standard, Legacy and External database.
The default Standard log is very detailed and should meet most requirements. The Legacy log should be disabled unless you have old custom reports that need it. An External database log store also allows you to connect to an external log database.
T> A new Moodle site will have Standard logging enabled and Legacy logging disabled. A site which has been upgraded will have both enabled.
Message Outputs
There are four default types of output methods for messaging: popup notices, Jabber IM type messages, messages sent as email and mobile notifications. By default Popup and Email are both enabled, though email will only work of course if the site has been properly configured to deliver email. Jabber and Mobile notifications are off by default and needs to be configured first.
Question Behaviors
On this page you can disable few question types or even uninstall them if you are not going to use them. You will also find out the information about No of question attempts and the version number.
Question Type
You can manage the question types available for the teachers on your moodle site to choose from. You can see the no of questions are there for a particular question type and a link to uninstall a few of them.
Reports
You can manage the available reports on your site from the manage reports page.
Repositories
You can enable/disable the repositories available for your Moodle site using this page. You can set any repository plugin to:
- Enabled and visible - appears in the file picker
- Enabled and hidden
- Disabled - default setting
The order in which repositories are shown in the file picker may be set using the up and down arrows. You can also change the common repository settings using this link and change the individual repository settings. We have discussed about repositories in Chapter 6.
Text Editors
Manage Editors page will show you about the available text editors on your Moodle site. You can enable/disable, uninstall and change the order of the text editors according to your preference.
Apart from this you can access the settings page of any text editor using the settings link where you can define the settings for the individual text editor like Atto or TinyMCE text editor.
Web Services
In the sub links you can manage the web services to be enabled and activated on your Moodle site.
Security
The Moodle project takes security seriously and is continuously improving Moodle to fix any security issues that may arise. We recommend that you take the following basic security measures:
- Update Moodle regularly on each release. Published security holes draw crackers’ attentions after release. The older the version, the more vulnerabilities it is likely to contain.
- Disable register globals. This will help prevent against possible XSS problems in third-party scripts.
- Ensure that administrators and teachers use strong passwords. This protects against “brute force” cracking of accounts.
- Only give teacher permissions to trusted users and avoid creating public sandboxes with free teacher accounts.
T> Further security advice can be found in the Moodle documentation.
You will find the following links in the Security tree:
- IP Blocker: If you are using Moodle on your own local server then you can define the list of the allowed IP addresses and blocked IP addresses. You can also define whether to process the allowed IP’s or the blocked IP’s first.
- Site Policies: You can set site policies affecting the security and privacy of the site on the Site Policies Page. The site policies page includes the following options:
- Protect Usernames: It will enable to hide the user name in case of any forget password reset attempt. It will not provide any hint to guess the username.
- Force Users to Login: Requires everyone to login before being able to view the
- also.
- Force users to login for profiles: Requires any visitor to login to the site with a valid account before being able to access any user’s profile.
- Force users to log in to view user pictures: If enabled, users must be login in order to view user profile pictures.
- Open to Google: Enabling this setting allows Google’s search spider’s guest access to your site. Any part of the site that allows guest access will then be searchable on Google. In addition, people coming into your site via a Google search will automatically be logged in as a guest.
- Profile visible roles: You can select the list of roles that are visible on user profiles and participation page.
- Maximum uploaded file size: Upload file sizes are restricted in a number of ways—each one in this list restricts the following:
- The Apache setting LimitRequestBody
- The PHP settings post_max_size and upload_max_filesize
- The site-wide maximum uploaded file size setting in the Security > Site policies section of the Site Administration block
- The course maximum uploaded file size setting in the course settings
- Certain activity module settings
- User quota: The limit of file size area for the user’s private files. By default it is set to 100MB.
- Allow EMBED and OBJECT tags: As a default security measure, normal users are not allowed to embed multimedia (like Flash) within texts using explicit EMBED and OBJECT tags in their HTML. If you wish to allow these tags then enable this option.
- Enable trusted content: By default Moodle will always thoroughly clean text that comes from users to remove any possible bad scripts, media etc. that could be a security risk. The Trusted Content system is a way of giving particular users that you trust the ability to include these advanced features in their content without interference. To enable this system, you need to first enable this setting, and then grant the Trusted Content permission to a specific Moodle role. Texts created or uploaded by such users will be marked as trusted and will not be cleaned before display.
- Maximum time to edit posts: This sets the editing time for forum postings. The editing time is the amount of time users have to change forum postings before they are mailed to subscribers.
- Allow extended characters in usernames: Enable this setting to allow students to use any characters in their usernames.
- Site policy URL: If you have a site policy that all registered users must see and agree to before using this site, then specify the URL to it here, otherwise leave this field blank.
- Site policy URL for guests: If you have a site policy that all guests must see and agree to before using this site, then specify the URL to it here.
- Keep tag name casing: Check this if you want tag names to keep the original casing as entered by users who created them.
- Profiles for enrolled users only: To prevent misuse by spammers, profile descriptions of users who are not yet enrolled in any course are hidden. New users must enroll in at least one course before they can add a profile description.
- Cron execution via command line only: If this is set, then the cron script can only be run from the command line instead of via the web. This overrides the cron password setting below.
- Cron password for remote access: This means that the cron.php script cannot be run from a web browser without supplying the password.
- Account lockout threshold: Select number of failed login attempts that result in account lockout. This feature may be abused in denial of service attacks.
- Account lockout observation window: Observation time for lockout threshold, if there are no failed attempts the threshold counter is reset after this time.
- Account lockout duration: Locked out account is automatically unlocked after this duration.
- Password policy: Turning this on will make Moodle check user passwords against a valid password policy i.e. whether the password should contains minimum number of digits, uppercase, lowercase, numerical letters to be included in the password.
- Maximum time to validate password reset request: This specifies the amount of time people have to validate a password reset request before it expires. 30 minutes will be the default value.
- Group enrolment key policy: Turning this on will make Moodle check group enrolment keys against a valid password policy.
- Disable user profile images: Disable the ability for users to change user profile images.
- Email change confirmation: Require an email confirmation step when users change their email address in their profile.
- Remember username: Enable if you want to store permanent cookies with usernames during user login.
T> Permanent cookies may be considered a privacy issue if used without consent.
- Strict validation of required fields: If enabled, users are prevented from entering a space or line break only in required fields in forms.
- HTTP Security: The HTTP security page contains the following options:
- Use HTTPS for logins: HTTPS encrypts the user’s login data, so it’s difficult to sniff out a user’s username and password on the network. You will need to enable HTTPS on your server before you turn on this setting, or else you will be locked out of your site. Every web server has a different method for enabling HTTPS, so you should check the documentation for your web server.
- Secure cookies only: If server is accepting only https connections it is recommended to enable sending of secure cookies.
- Only http cookies: Enables new PHP 5.2.0 feature - browsers are instructed to send cookie with real http requests only, cookies should not be accessible by scripting languages.
- Allow frame embedding: Allow embedding of this site in frames on external sites. (T> Enabling of this feature is not recommended for security reasons.)
- Prevent password auto completion on login form: Having this off will let users save their account password in their browser. Switching this setting on will result in your site no longer following XHTML strict validation rules.
-
Notifications: The notifications page contains the following options:
- Display login failures to: Set this to Administrators to be warned of anyone attempting to steal student or teacher logins. When set, a link stating the number of failed logins appears in the top-right corner of the page when an administrator logs in. Click the link to access the login error page.
- Email login failures: If you’re concerned about login failures, you can set up email notification for administrators.
- Threshold for email notifications: This sets the number of failed logins for a given user from a single computer that will trigger notification.
- Antivirus: The use of the open source virus scanner clam AV on uploaded files can be enabled to make use of Moodle’s anti-virus feature. The open source virus scanner ClamAV should be installed on your server.
T> See http://www.clamav.net for more information.
Appearance
Themes: A theme sets the appearance—colors, fonts, and icons—for your Moodle site.
- Theme settings: The theme settings page includes the following options:
- Theme list: This lists the themes available for course and user themes. Leave this blank to allow any valid theme to be used.
- Theme designer mode: Turn this on if you are designing and testing themes as it will stop the themes being cached and enable you to see theme changes quickly.
- Allow course themes: If you enable this, then teachers will be able to set their own course themes.
- Allow category themes: When enabled, themes can be set at the category level. This will affect all child categories and courses unless they have specifically set their own theme.
- Allow theme changes in the URL: If this is checked then the theme may be changed by adding ?theme=theme_name (or &theme=theme_name if there are other URL parameters) to the URL in the browser.
- Allow users to hide blocks: Do you want to allow users to hide/show side blocks throughout this site? This feature uses JavaScript and cookies to remember the state of each collapsible block, and only affects the user’s own view.
- Allow blocks to use the dock: If enabled and supported by the selected theme users can choose to move blocks to a special dock.
- Custom menu items: The custommenuitems setting allows you to create a drop down menu that can be displayed by themes that support it. Currently all themes that are provided with Moodle 2.7 support this custom menu.
- Enable device detection: Enables detection of mobiles, smartphones, tablets or default devices (desktop PCs, laptops, etc.) for the application of themes and other features.
- Device detection regular expressions: This will allow you to customize the theme selector options. For example, you can add a custom theme for IE6 and another for Windows CE by entering the identifying expressions the browser sends and the “Return value” you want to display as the theme selectors “Device type”.
-
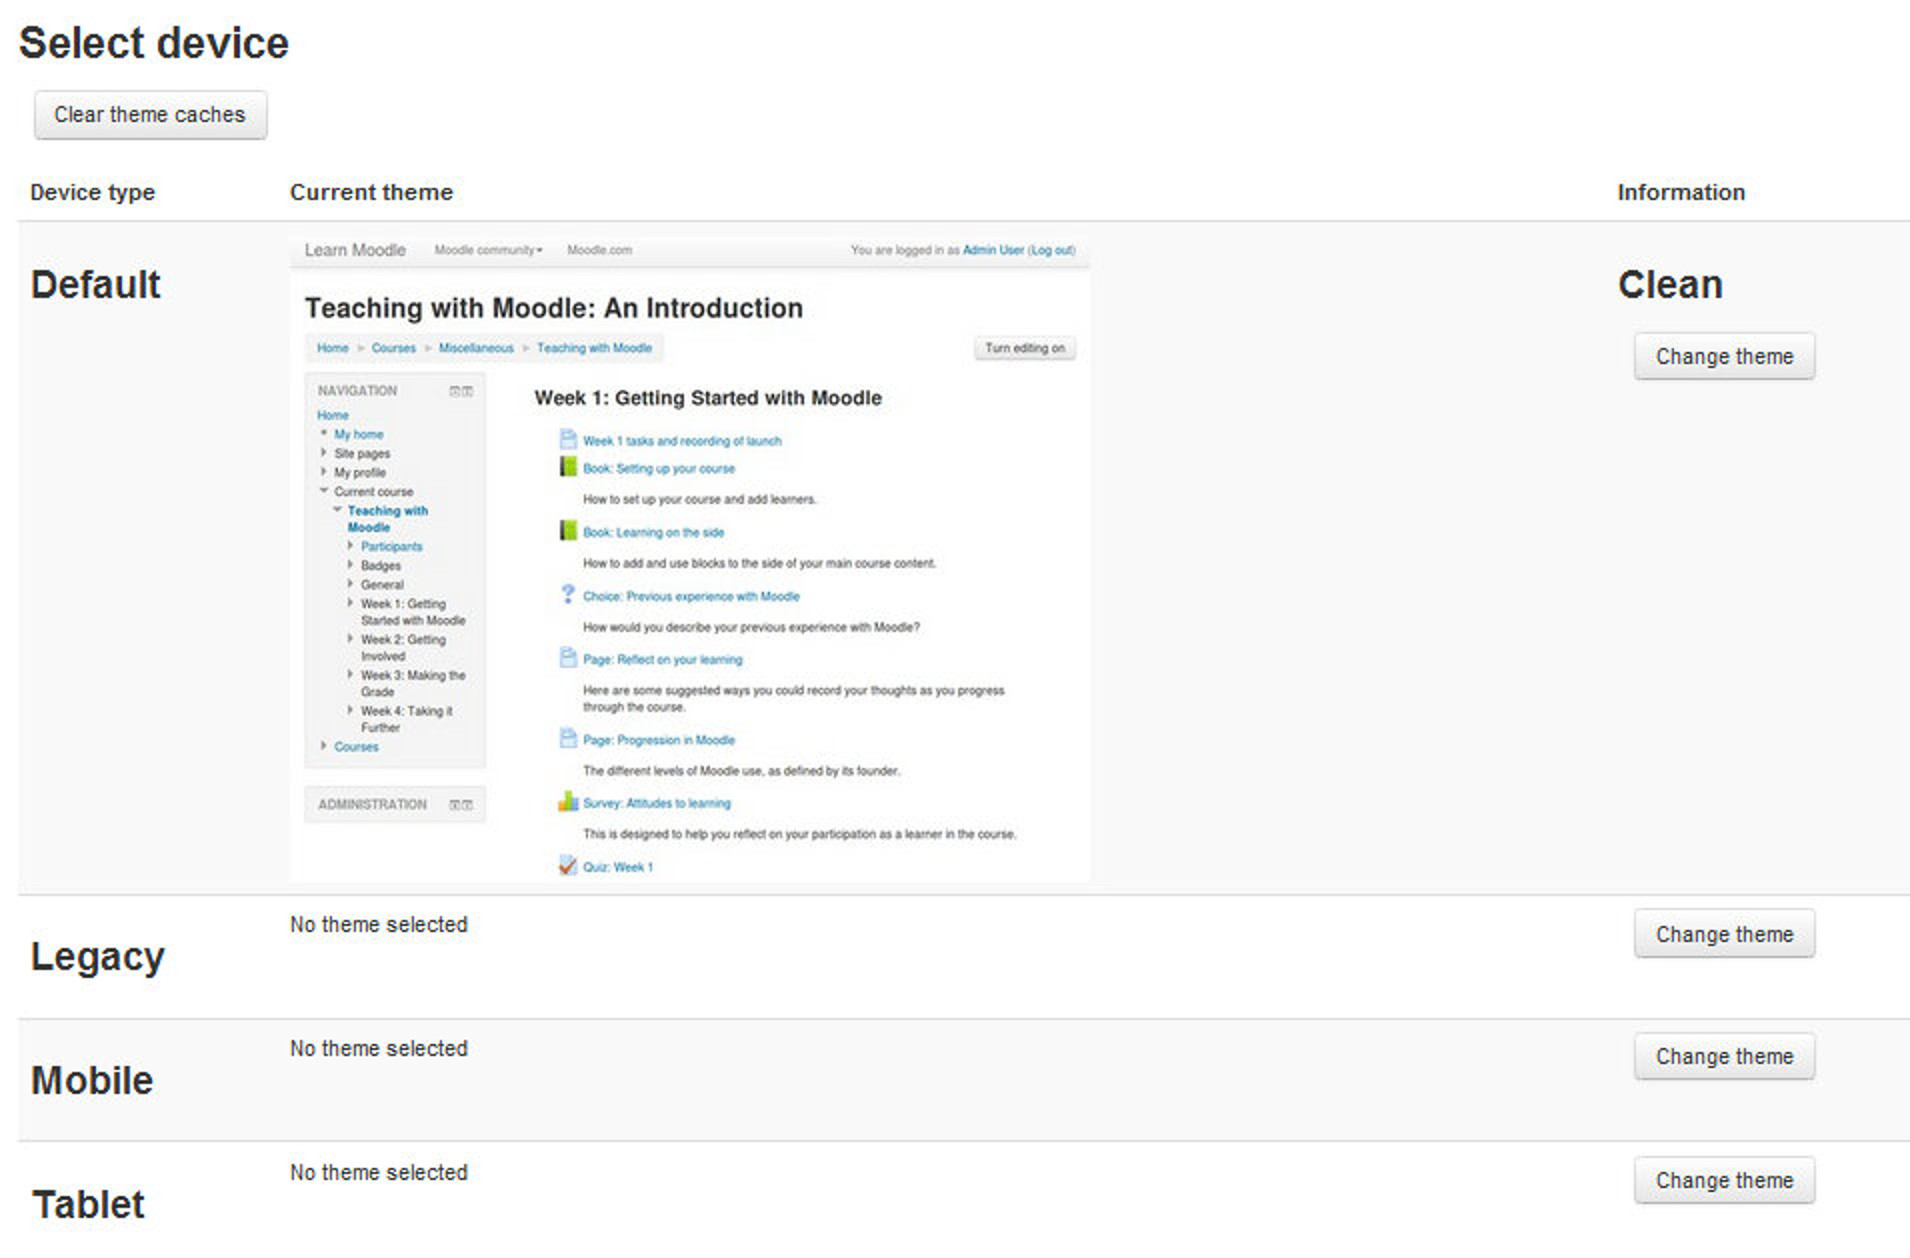
Theme Selector: An administrator can set a theme for the site from the theme selector page. Moodle has two standard themes: Clean, a responsive, bootstrap based theme which is used as default, and More, a theme customizable from within the admin interface.
Different themes may be set according to ‘device type’ - default, legacy (for older browsers), mobile and tablet.
To change the theme for the device type for which you wish to change the theme:
- Go to Administration > Site administration > Appearance > Themes > Theme selector
- Click on the “Select theme” button next to the type you wish to change
- Scroll down to see the previews of the available themes and click on the “Use theme” button to choose the theme
- The next screen will provide information about the theme. Click “Continue”
T> Moodle caches themes so if you don’t immediately see changed settings that you were expecting, click the “Clear theme caches” button at the top of the Theme selector page.
T> The selected theme may be overridden if user/course or category themes have been allowed in the Theme settings.
Below the theme selector link you will find the links for customizing the individual theme through the settings page of the theme. By default there will be only Clean and More themes which can be customized.
- Calendar: You can change the default display settings for the site calendar. The following options are available:
- Calendar type: The admin can choose a default calendar type for the whole site here. Individual users can override this in the course settings or in their user profile.
- Admins see all: Whether admins see all calendar events or just those that apply to themselves
- Time display format: Whether a 12 or 24 hour format is used. This setting can be overridden by user preferences.
- Start of week: Default is Sunday
- Weekend days: Weekend days are shown in a different color.
- Days and events to look ahead: For determining how many events are listed in the Upcoming Events block. If the Upcoming Events block becomes too long you can reduce the number of days and events to look ahead.
- Calendar export days to look ahead and back: A custom range of dates, such as a school term or year, may be set as a calendar export option.
- Calendar export salt: The calendar export salt is a random string of characters used for improving of security of authentication tokens used for exporting of calendars.
- Show source information for iCal events: If enabled, the subscription name and link will be shown for iCal-imported events.
- Blog: Here you can set the default settings applicable to the blogs sitewide. The following options are available:
- Enable blog associations: Enables the association of blog entries with courses and course modules.
- Blog visibility: This setting allows you to restrict the level to which user blogs can be viewed on this site. Note that they specify the maximum context of the VIEWER not the poster or the types of blog posts. Blogs can also be disabled completely if you don’t want them at all.
- Enable external blogs: Enables users to specify external blog feeds. Moodle regularly checks these blog feeds and copies new entries to the local blog of that user.
- External blog cron schedule: How often Moodle checks the external blogs for new entries.
- Maximum number of external blogs per user: The number of external blogs each user is allowed to link to their Moodle blog.
- Enable comments: Blog comments are enabled by default, though may be disabled if required
- Show comments count: Show comments count, it will cost one more query when display comments link.
- Navigation: There are two standard blocks on every page - the Navigation block and the Administration block. You can change navigation settings, such as the default home page, and whether to show course categories in the navigation. The following options are available:
- Default home page for users: This determines the home page for logged in users
- Allow guest access to My home: If enabled guests can access My home, otherwise guests are redirected to the site front page.
- Show course full names: If enabled, course full names will be used in the navigation rather than short names.
- Show course categories: Show course categories in the navigation bar and navigation blocks. This does not occur with courses the user is currently enrolled in; they will still be listed under mycourses without categories.
- Show my course categories: If enabled courses in the users my courses branch will be shown in categories.
- Show all courses: This setting determines whether users who are enrolled in courses can see Courses (listing all courses) in the navigation, in addition to My Courses.
- Sort my courses: This determines whether courses are listed under My courses according to the sort order (i.e. the order set in Site administration > Courses > Manage courses and categories) or alphabetically by course setting.
- Course limit: Limits the number of courses shown to the user when they are either not logged in or are not enrolled in any courses.
- Use site name for site pages : If enabled the site’s shortname will be used for the site pages node in the navigation rather than the string ‘Site pages’
- Link admin categories: If enabled admin setting categories will be displayed as links in the navigation and will lead to the admin category pages.
- Show front page activities in the navigation: If enabled, front page activities will be shown on the navigation under site pages.
- Add links to view user posts: If enabled two links will be added to each user in the navigation to view discussions the user has started and posts the user has made in forums throughout the site or in specific courses.
- HTML Settings: The HTML settings page has two options only:
- Remove HTML tags from all activity names: Uncheck this setting to allow HTML tags in activity and resource names. By default it is set to remove HTML tags from the activity names.
- Emoticons: You can define the list of images that will be used to replace the emoticon text. The form table maps the emoticon characters like :-) to an image that will be used to display that emoticon. Images can be provided either by the Moodle core itself or by any other installed plugin (like an activity module, block, theme or your local plugin). For accessibility reasons, alternative texts for these images should be defined, too. You can also define custom emoticons too for your Moodle site.
- Media Embedding: You can enable the embedding of media files by selecting appropriate media players on this page. When players are enabled in these settings, files can be embedded using the media filter (if enabled) or using a File or URL resources with the Embed option. When not enabled, these formats are not embedded and users can manually download or follow links to these resources.
- The list of available players are:
- YouTube (displays videos hosted on youtube)
- Vimeo (displays videos hosted on vimeo)
- .mp3 - MPEG Audio Stream, Layer III
- .flv - Flash video
- .f4v - Flash video
- .swf - Macromedia Flash animation File (Adobe, Inc.)
- .ogg - HTML 5 audio
- .acc - HTML 5 audio
- .mp3 - HTML 5 audio
- .webm - HTML 5 video
- .m4v - HTML 5 video
- .ogv - HTML 5 video
- Legacy media players: The following legacy media player formats are also available but not recommended for general usage:
- .mov - QuickTime player (requires QuickTime player or codec)
- .mp4 - QuickTime player (requires QuickTime player or codec)
- .m4a - QuickTime player (requires QuickTime player or codec)
- .mpg - MPEG animation - QuickTime player (requires QuickTime player or codec)
- .wmv - Windows media player (Microsoft)-not guaranteed to work in browsers other than IE and non-Windows systems
- .avi - Windows media player - not guaranteed to work in browsers other than IE and non-Windows systems
- The list of available players are:
-
Moodle Docs: By default, managers, teachers and non-editing teachers have “Moodle Docs for this page” links at the bottom of each page in Moodle for accessing context-specific documentation. An administrator can change Moodle Docs settings in Administration > Site administration > Appearance > Moodle Docs.
The following options are available:
- Moodle Docs document root: It defines the path to the Moodle Docs for providing context-specific documentation via ‘Moodle Docs for this page’ links in the footer of each page. If the field is left blank, links will not be displayed.
- Language for docs: This language will be used in links for the documentation pages.
- Open in new window: If you enable this, then links to Moodle Docs will be shown in a new window.
- Default my home page: You as a site administrator can define which blocks will appear on the default My Home page. But first you need to turn on the Block editing Mode to make any changes to the block configuration.
- Default profile page: In a similar manner you can define the default look of the Profile page i.e. which blocks will appear on the profile page by default for a new user.
- Courses: Here you can define the display settings related to course. The options available are:
- Course Contacts: This setting allows you to control who appears on the course description. Users need to have at least one of these roles in a course to be shown on the course description for that course. By default Teacher’s role is selected to be displayed on the course description.
- Display Extended Course names: If enabled, course short names will be displayed in addition to full names in course lists.
- Courses per Page: Enter the number of courses to be displayed per page in a course listing.
- Courses with summaries limit: The maximum number of courses to display in a course listing including summaries before falling back to a simpler listing.
- Course summary files limit: The maximum number of files that can be attached to a course summary.
- Course summary files extensions: A comma-separated list of allowed course summary files extensions.
- AJAX and JavaScript: Ajax is required for drag and drop functionality and is enabled by default. You can change the default settings related to AJAX and JavaScript for your Moodle site.
-
Use online YUI libraries: Instead of using local files, use online files available on Yahoo‘s servers.
T> This requires an internet connection, or no AJAX will work on your site. This setting is not compatible with sites using https.
- YUI combo loading: This option enables combined file loading optimization for YUI libraries. This setting should be enabled on production sites for performance reasons.
- Cache JavaScript: JavaScript caching and compression greatly improves page loading performance. It is strongly recommended for production sites. Developers will probably want to disable this feature.
- Activity chooser default: Should the activity chooser be presented to users by default?
- Activity editing menus: If enabled many of the activity editing icons shown when viewing a course with editing on will be displayed within a drop-down menu. This reduces the content on screen when editing a course by hiding the icons until they are needed.
- Block editing menus: If enabled many of the block editing icons shown when editing is on will be displayed within a drop-down menu. This reduces the content on screen by hiding the icons until they are needed.
-
-
Manage Tags: The manage tags page provides a list of tags, together with information on their creators, how many times they are used, when they were last modified and which tags have been flagged as inappropriate. Inappropriate tags are shown in red when using the default theme.
Selected tags may be having their flag reset (in other words remove the inappropriate flag) or be deleted. Tag names and types may also be changed.
The manage tags page also allows for official tags to be added. Official tags are tags which are added by a site administrator and are displayed to all users of the Moodle site when adding a blog entry. Creating a set of official tags for commonly used topics can reduce the amount of duplication in blog tags.
-
Additional HTML: Using the Additional HTML link you can add additional HTML or CSS or JavaScript to every page. These settings allow you to specify HTML or CSS or JavaScript that you want added to every page without altering the Moodle code files.
You can add HTML, CSS or JavaScript, to three sections in the Additional HTML page.
- Within HEAD: within the <head></head> tag for the page. (Example: Meta tags, CSS, JavaScript).
- When BODY is opened: above the header section of the main body of the page that is displayed. (Example: Banner image or text heading, alert message).
- When BODY is closed: below the footer of the page. (Example: Google Analytics).
Doing this allows you add custom headers or footers on every page, or add support for services like Google Analytics very easily and independent of your chosen theme.
Another way of adding a custom footer or support for Google Analytics is via the settings of certain themes such as the Clean theme.
Front Page:
The front page is the initial page seen by someone reaching a Moodle site after or before a login. Typically a student will see courses, some blocks of information, displayed in a theme. In the Navigation bar and Navigation block it is called “Home”.
In many ways, a Front Page has similar features and functions to those in a Course. For example, Activities, Resources and Blocks can be added to the Front Page to give it different looks.
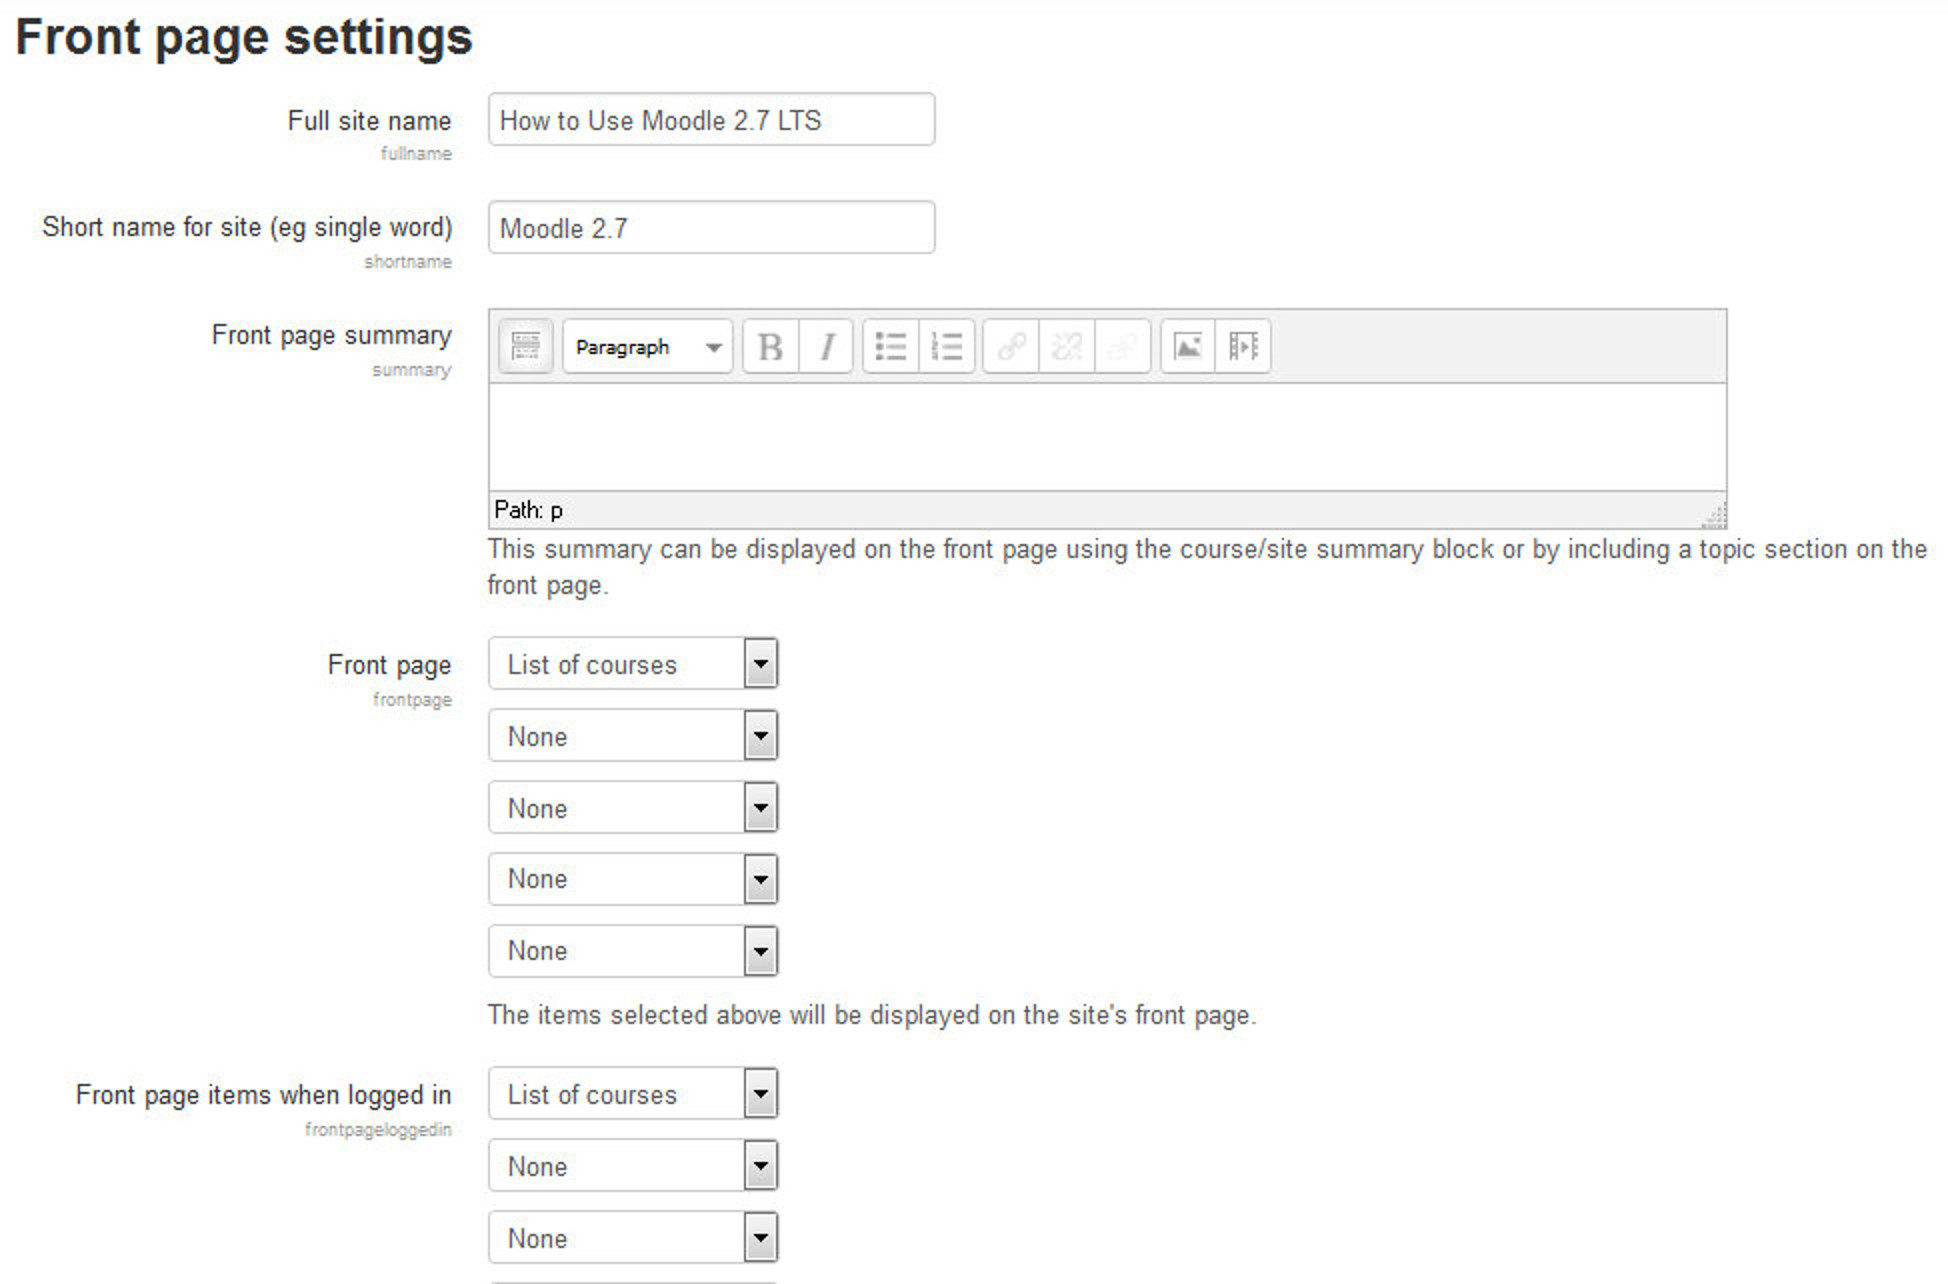
The front page settings link enables you to customize the appearance of the front page of your Moodle site. The form has the following options to choose from:
- Full site name: This name appears at the top of every page above the navigation bar.
- Short name for site: The short name appears at the beginning of the navigation bar as a link back to your site front page.
- Front page summary: This summary can be displayed on the front page using the course/site summary block.
-
Front page & Front page items when logged in: The center of the front page can display any combination of the following: news items, a list of courses, a list of enrolled courses, a list of course categories, a list of categories and courses, a course search box or none. The order is determined by a combination box.
It is possible to create one setting for anyone who gets to the front page without logging in to the Moodle site, and another look for only those who have logged into the Moodle site. There are two combination boxes.
- Maximum category depth: This specifies the maximum depth of child categories expanded when displaying categories or combo list. Deeper level categories will appear as links and user can expand them with AJAX request.
- Maximum number of courses: Maximum number of courses to be displayed on the site’s front page in course listings.
-
Include a topic section: This adds a topic section to the center-top of the front page. When editing is turned on, resources and/or activities can be added to the topic section using the dropdown menus, in the same way as on a course page.
T> The label resource can be used to add text and/or an image to the center-top of the front page.
- News items to show: This setting only applies if the front page is set to display news items or if you are using the Latest News block.
- Comments displayed per page: Each course may include a Comments block which allows the display of user comments. The number of comments displayed at any time is set here.
- Default frontpage role: The default frontpage role enables logged-in users to participate in front page activities. It is recommended that it is set to frontpage role.
Server
- System Paths: An administrator can set the following system paths
- Path to du: If you enter this, pages that display directory contents will run much faster for directories with a lot of files.
- Path to aspell: To use spell-checking within the editor, you MUST have aspell 0.50 or later installed on your server, and you must specify the correct path to access the aspell binary.
- Path to dot: To be able to generate graphics from DOT files, you must have installed the dot executable and point to it here.
- Support Contact: can specify a support name, email and/or support page for including in the confirmation email sent for email based self-registrations.
- Session Handling: Once someone logs in to your Moodle server, the server starts a session. The session data allows the server to track users as they access different pages. The available settings are:
-
Use database for session information: Moodle needs to store the session data in some storage. By default either file or database session storage is selected, this option allows admin to change it.
T> This option disappears if you specify session driver in config.php file.
- Timeout: If users don’t load a new page during the amount of time set here, Moodle will end their session and log them out. Be sure this time frame is long enough to cover the longest test your teachers may offer. If a student is logged out while they are taking a test, their responses to the test questions may be lost.
- Cookie prefix: This setting customizes the name of the cookie used for Moodle sessions. This is optional, and only useful to avoid cookies being confused when there is more than one copy of Moodle running within the same web site.
- Cookie path: The relative path to this Moodle installation, this may be used to force sending of Moodle session cookie to parent directories. Invalid values are ignored automatically.
- Cookie domain: This can be used to send session cookies to higher domains instead of just the server domain. This may be useful for some SSO solutions. Invalid values are ignored automatically.
-
- HTTP: here you can change the proxy settings for your server. The settings are:
- Use slash arguments: Files (images, uploads etc.) are provided via a script using ‘slash arguments’. This method allows files to be more easily cached in web browsers, proxy servers etc.
- Reverse proxy: If your server is located behind a reverse proxy you may need to select appropriate order of headers that is being used in your setup. Contact your network administrator if not sure.
- Web proxy settings: Your Moodle server may need to access the Internet through a proxy server, depending on your network configuration. If you’re not sure about whether you need a proxy server, contact your network administrator or ISP.
-
Maintenance Mode: Maintenance mode is for preventing any users other than administrators from using the site while maintenance is taking place, though it’s not designed to prevent user access during version upgrades.
When users attempt to access a course when your site is in maintenance mode, they obtain a message informing them that the site is in maintenance mode. If you wish, you can create a customized maintenance mode message, perhaps stating when the site will be available again or giving the reason for doing maintenance.
T> The front page of your site will appear as normal when your site is in maintenance mode. Users will only see the maintenance mode message when they attempt to access a course.
- Cleanup: You can limit the size of certain tables in the database by setting appropriate options on this page.
- Delete not fully setup users after: If you are using email authentication, this is the period within which a response will be accepted from users. After this period, old unconfirmed accounts are deleted.
- Delete incomplete users after: After this period, old not fully setup accounts are deleted.
- Disable grade history: Disable history tracking of changes in grades related tables. This may speed up the server a little and conserve space in database.
- Grade history lifetime: This specifies the length of time you want to keep history of changes in grade related tables. It is recommended to keep it as long as possible. If you experience performance problems or have limited database space, try to set lower value.
-
Environment: You can check that whether your site meets all system requirements for the current and future versions of Moodle in Administration > Site administration > Server > Environment.
T> It is important to check system requirements prior to upgrading your site to a new Moodle version.
- PHP Info: The phpinfo display contains information about the configuration of your PHP installation. This is useful for checking:
- That your PHP installation meets Moodle’s system requirements.
- the values that are currently applied to your server’s PHP install, e.g. File upload limits
- That you have installed the required modules needed for Moodle to work, e.g. the LDAP module for LDAP authentication.
- Performance: Various performance settings can be changed by an administrator in Administration > Site administration > Server > Performance. The available options are:
- Extra PHP memory limit: Some scripts like search, backup/restore or cron require more memory. Set higher values for large sites.
- Maximum time limit: The setting “Maximum time limit” lets you restrict the maximum PHP execution time that Moodle will allow without any output being displayed.
- cURL cache TTL: Time-to-live for cURL cache, in seconds.
- Bitrate to use when calculating cURL timeouts (Kbps): This setting is used to calculate an appropriate timeout during large cURL requests. As part of this calculation an HTTP HEAD request is made to determine the size of the content. Setting this to 0 disables this request from being made.
- Hubs: An administrator can register their site with moodle.org in Administration > Site Administration > Registration. When you register your site with Moodle.org :
- You are added to a low-volume mailing list for important notifications such as security alerts and new releases of Moodle
- Statistics about your site will be added to the statistics of the worldwide Moodle community http://moodle.org/stats/
- Your site is also registered with Moodle.net, allowing users with the publish courses capability (by default only managers) the option of publishing courses to Moodle.net.
- Update Notifications: You can configure the default update notifications about your Moodle site on this page. You can change options like turn off automatic updates, Alpha maturity plugins to be installed on your site etc. The available options are:
- Automatically check for available updates: If enabled, your site will automatically check for available updates for both Moodle code and all additional plugins. If there is a new update available, a notification will be sent to site admins.
-
Enable updates deployment: If enabled, you will be able to download and install available updates directly from Moodle administration pages. Note that your web server process has to have write access into folders with Moodle installation to make this work.
T> That can be seen as a potential security risk.
- Required code maturity: Notify about available updates only if the available code has the selected maturity level at least. Updates for plugins that do not declare their code maturity levels are always reported regardless this setting.
- Notify about new builds: If enabled, the available update for Moodle code is also reported when a new build for the current version is available.
-
Scheduled tasks: An administrator can schedule routine tasks very precisely from Administration>Site administration>Server>Scheduled tasks.
T> You still need to run the CRON scripts at regular intervals.
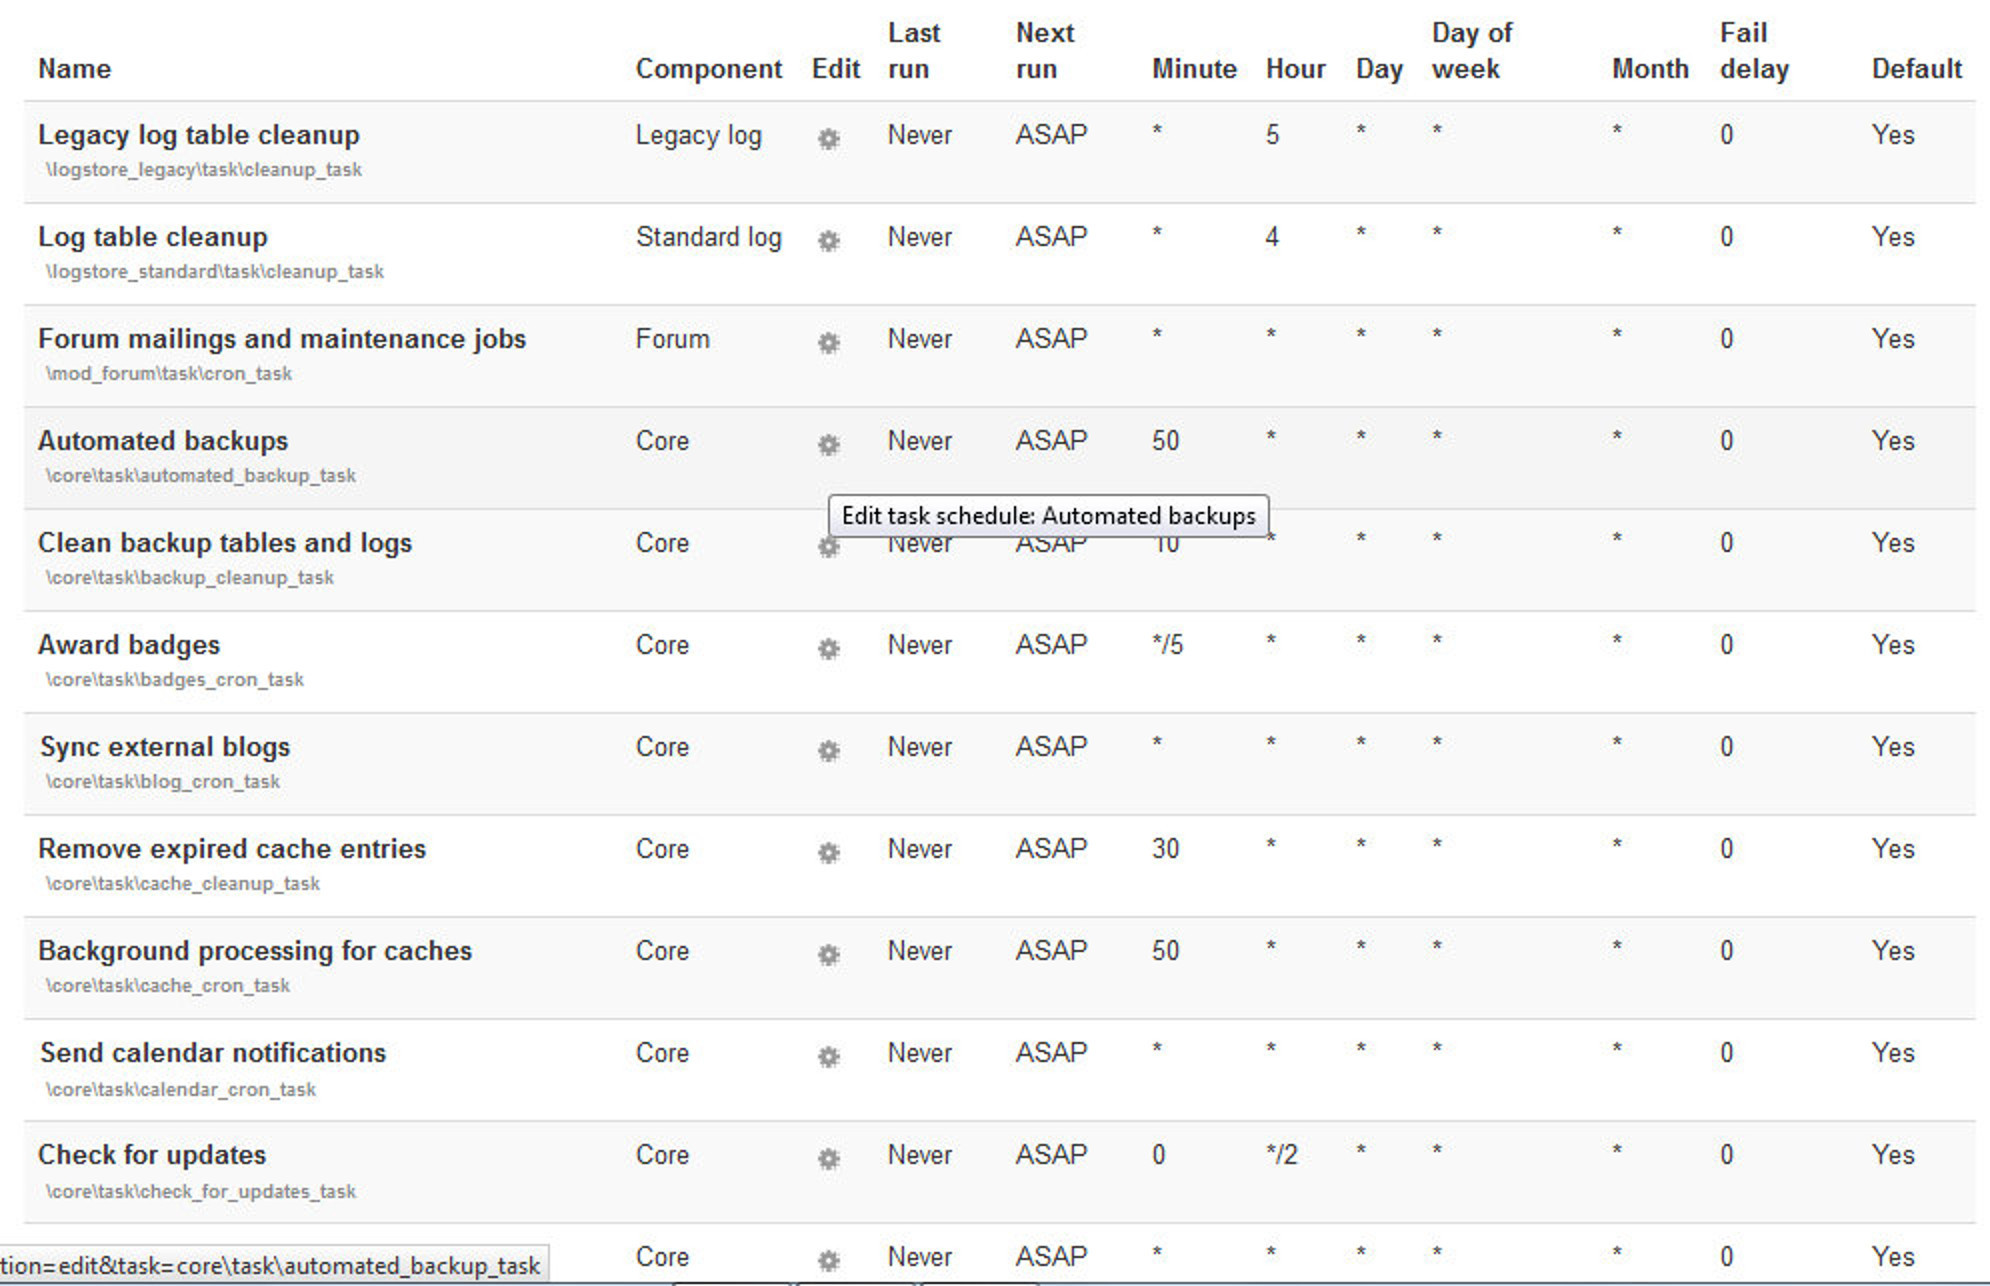
Clicking the edit icon allows the administrator to specify the minute/hour/day/month or day of the week the task is to be run. It is also possible to reset the task to its default setting or disable it completely.
T> When typing into the fields, the format is the same as for Unix cron.
Reports
Just as teachers can obtain detailed logs and reports of student activity in their course, as an administrator you have access to logs and reports for the whole site.
- Comments: You will get a complete list report of comments posted on your Moodle site including the author name and the content of the comment. You can also delete the unwanted/spam comments.
- Backups: If you have enabled the automated backups of your courses then this page will display the reports about the last execution log. The table includes the course name, time taken, status and next scheduled backup.
- Config Changes: This report enables an Administrator to see at a glance which aspects of the Moodle site have been recently altered and, where applicable, by which administrator.
- Events List: Events are atomic pieces of information describing something that happened in Moodle. Events are primarily the result of user actions, but could also be the result of the cron process or administration actions undertaken via the command line. This report provides a list of all events happening on your Moodle site. The list can be filtered to show specific components (core, Assignment, Book etc.) levels (Teaching, Participating, Other) and database query types (create, delete, read, update).
-
Logs & Live Logs: Logs in Moodle are activity reports. Logs are available at site and course level. You can select any combination of course or site, participants, date, activity, actions, and education level and choose whether they are displayed on the logs page or downloaded in text, ODS, unpaged XHTML document, tab separated values text file or CSV text format.
The Live logs page displays the live logs for the events happening on your site. Since Moodle 2.7 you can Stop and restart the live logs by clicking the “Pause Live Updates” button.
- Performance Overview: The performance overview report lists issues which may affect performance of the site. Recommended values are displayed with a Green background whereas the others are shown with yellow background.
- Question Instances: This report lists all the contexts in the system where there are questions of a particular type. You can select a question type and click Get the report button to fetch the data about the context where the question type is used.
- Security Overview: This report provides the security overview report about the current settings for your Moodle site. Recommended settings are shown with Green background, warnings are shown with yellow color and critical settings with Red color.
- Spam Cleaner: This script allows you to search all user profiles for certain strings and then delete those accounts which are obviously created by spammers. You can search for multiple keywords using commas.
Development
- Experimental: An experimental feature is defined as a feature which requires additional testing and bug-fixing. We recommend you use a test server for testing experimental features before enabling them on your production site. The available links are:
- Experimental settings: An administrator can enable certain experimental features in Settings > Site administration > Development > Experimental > Experimental settings.
- Database migration: This script will transfer the entire contents of this database to another database server. It is often used for migration of data to different database type.
- Debugging: Debugging messages are intended to help diagnose problems and/or help Moodle developers. If you have a problem with your Moodle site and ask for help in a Moodle.org forum, a developer may ask you to turn debug messages on, in order to locate the cause of the problem. By default Moodle does not show any error messages at all. If you are having problems (e.g. blank screens or incomplete screens) turning on debugging is usually the first thing to try.
-
Web service test client: Admins can simulate external access to their own Web Services.
T> The web service test client executes the functions for REAL. Do not test functions that you don’t know.
- Purge all caches: Moodle can cache themes, JavaScript, language strings, filtered text, rss feeds and many other pieces of calculated data. Purging these caches will delete that data from the server and force browsers to refetch data, so that you can be sure you are seeing the most up-to-date values produced by the current code.
- Third party libraries: This page displays the list of third party libraries used on your Moodle site including the libraries used by Authentication plugins, Filters, Themes and Modules etc.
- Acceptance testing: This administration tool helps developers and test writers to create feature files describing Moodle’s functionalities and run them automatically. For more details refer Moodle Documentation at https://docs.moodle.org/dev/Acceptance_testing
-
Make test course: This tool creates standard test courses that include many sections, activities, and files. This is intended to provide a standardized measure for checking the reliability and performance of various system components (such as backup and restore).
Courses created using this feature can occupy a large amount of database and file system space (tens of gigabytes). You will need to delete the courses (and wait for various cleanup runs) to release this space again.
T> Do not use this feature on a live system. Use only on a developer server.
- Make Jmeter test plan: This tool creates a JMeter test plan file along with the user credentials file. You may refer Moodle documentation for more details.
- PHPUnit tests: PHPUnit is an advanced unit testing framework for PHP. It is installed as Composer dependency and is not part of Moodle installation. To run PHPUnit tests, you have to manually install it on your development computer or test server.
- XMLDB Editor: The XMLDB editor is a tool for developers to easily edit tables/fields/keys/indexes in install.xml files.
Assignment Upgrade Helper
The Assignment upgrade tool is an administrator tool for upgrading assignments in Moodle 2.2 and older to the new assignment module in Moodle 2.3 onwards.
T> It is recommended that admins upgrade all existing assignments to use the new assignment module as soon as possible after upgrading.
Summary
In this final chapter we have taken a glance on the administration part of the Moodle which is basically meant for the site administrators who have the responsibility to fix your Moodle site in any catastrophic situation.