Chapter 8 - Quizzes and Question Bank
Feedback on performance is a critical part of a learning environment, and assessment is one of the most important activities in education. As educators, we can’t tell what’s going on inside students’ heads, so we need a way for them to demonstrate what they understand and what they don’t. A well-designed test, even a multiple-choice test, can give you valuable information about students’ misconceptions. If the feedback is rapid enough, it can also be a critical tool for students to gauge their own performance and help them become more successful.
Moodle’s quiz module is one of the most complex pieces of the system. The community has added a large number of options and tools to the quiz engine, making it extremely flexible. You can create quizzes with different question types, randomly generate quizzes from pools of questions, allows students to re-take quizzes multiple times, and have the computer score everything.
These features open up a number of strategies that usually aren’t practical with paper based testing. It’s hard enough to score one batch of quizzes, and nearly impossible to score it 10 times for each student. When the computer does the work for you, it’s easy to give students a chance to practice taking a test or give frequent small quizzes. We’ll explore how to apply these advantages later in the chapter. For now, let’s get started building your first Moodle quiz.
The quiz activity enables a teacher to create quizzes comprising questions of various types, including multiple choice, matching, short-answer and numerical.
The teacher can allow the quiz to be attempted multiple times, with the questions shuffled or randomly selected from the question bank. A time limit may be set. Each attempt is marked automatically, with the exception of essay questions, and the grade is recorded in the gradebook.
The teacher can choose when and if hints, feedback and correct answers are shown to students.
Quiz Uses
Quizzes may be used
- As course exams
- As mini tests for reading assignments or at the end of a topic
- As exam practice using questions from past exams
- To deliver immediate feedback about performance
- For self-assessment
Standard Question Types
Moodle offers a variety of question types to choose from to create a quiz. The standard quiz question types are listed below:
- Calculated: Calculated questions are like numerical questions but with the numbers used selected randomly from a set when the quiz is taken.
- Calculated Multichoice: Calculated multichoice questions are like multichoice questions which choice elements can include formula results from numeric values that are selected randomly from a set when the quiz is taken.
- Calculated Simple: A simpler version of calculated questions which are like numerical questions but with the numbers used selected randomly from a set when the quiz is taken
- Embedded Answers (Cloze): Questions of this type are very flexible, but can only be created by entering text containing special codes that create embedded multiple-choice, short answers and numerical questions.
- Essay: Allows a response of a few sentences or paragraphs. This must then be graded manually.
- Matching: The answer to each of a number of sub-question must be selected from a list of possibilities.
- Multiple Choice: Allows the selection of a single or multiple responses from a pre-defined list.
- Numerical: Allows a numerical response, possibly with units, which are graded by comparing against various model answers, possibly with tolerances.
- Random Short answer matching: Like a Matching question, but created randomly from the short answer questions in a particular category.
- Short Answer: Allows a response of one or a few words that is graded by comparing against various model answers, which may contain wildcards.
- True/False: A simple form of multiple choice question with just the two choices ‘True’ and ‘False’.
- Description: This is not actually a question. Instead it is a way to add some instructions, rubric or other content to the activity. This is similar to the way that labels can be used to add content to the course page.
T> Besides the standard question types that are part of the core Moodle distribution, there are a number of question type add-ons in the add-ons database.
Creative Quiz Strategies
Of course, using the quiz engine effectively takes some work and practice. The first thing to do is use effective question-design strategies. If you ask good questions, you’ll get useful data about your students’ performance and understanding of the material. Of course, the converse is also true. There is a ton of literature about effective assessment design available. We’ll just highlight a few of the most important ideas:
- Tie each question to a course goal. After all, you want to know whether your students are achieving the goals of the course, so why not ask them directly?
- Try to ask multiple questions about each important idea in the class. This gives you more data points about a student’s understanding.
- When writing a multiple-choice question, be sure each wrong answer represents a common misconception. This will help you diagnose student thinking and eliminate easy guessing.
- Write questions requiring your students to think at different levels. Include recall questions, comprehension questions, and application and analysis questions. You can determine where students are having problems in their thinking. Can they recall the material but not apply it?
- Test your questions. After you’ve established an initial question bank, use item analysis to determine which questions are useful and which aren’t. As you write new questions, give them a lower point value and throw in a few to establish their reliability.
Once you have a few well-written test banks, be sure to use the quiz reports and statistics to monitor your classes’ performance. The detailed reports and statistics are valuable tools for measuring your students’ understanding of the material.
How to Create a Quiz
Moodle quizzes have two major components: the quiz body and the question pools. Think of the quiz bodies as containers for various types of questions from the question pools. The body is what students see when they take the assessment. It also defines how the students interact with the quiz.
Creating a new quiz is a two-step process. In the first step, you create the quiz activity and set its options which specify the rules for interacting with the quiz. In the second step you add questions to the quiz.
The questions in a quiz body can be of any type, chosen manually or at random, and displayed in a set or random order. The question pools can contain questions arranged in a manner that makes sense to you.
You can create pools based on chapters in the textbook, weeks in the semester, important concepts, or any other organizational scheme. Pools can be reused in multiple quizzes, shared between classes and courses, and even moved between systems.
To start, we need to create a body for our first quiz.
Creating the Quiz Body
When you create the quiz body, you are creating a container for the questions and setting the rules for interacting with the quiz.
To create a quiz body:
- Click “Turn Editing On” if you are not in the editing mode already.
- Click “Add and activity or resource” link in the section where you want to add the quiz and select “Quiz”.
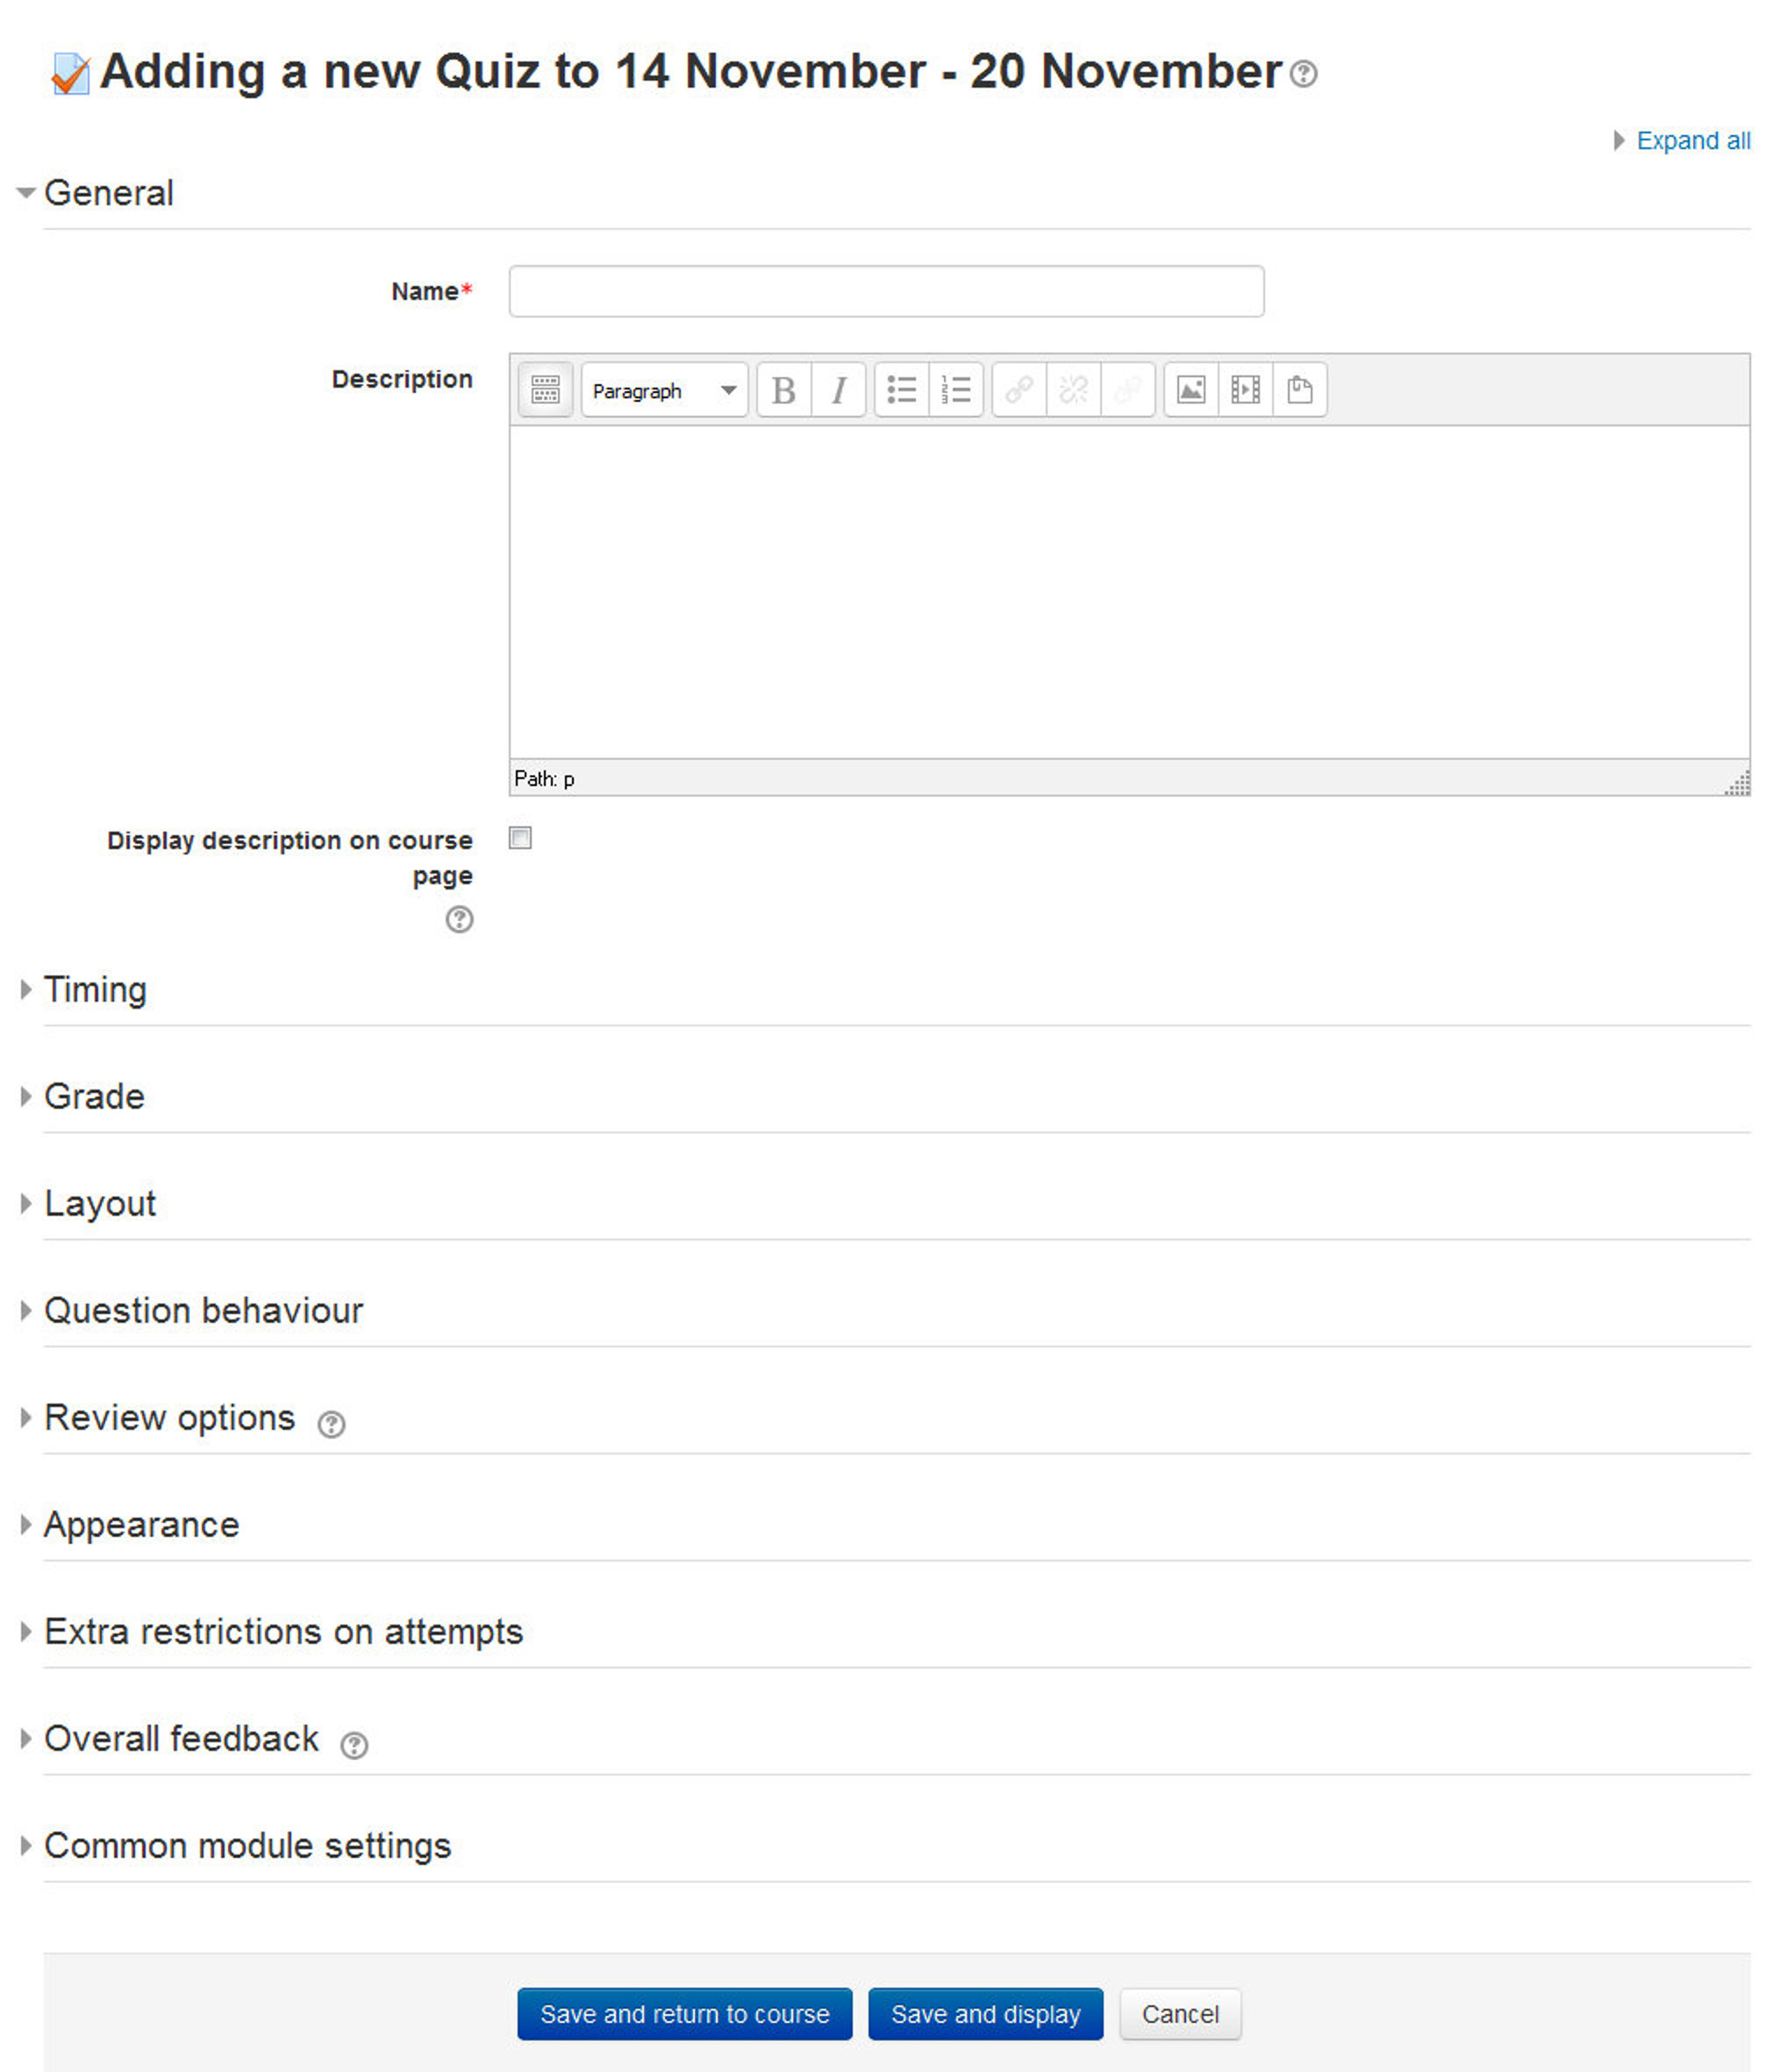
- In the general section on “Adding a new quiz” page, as shown in Figure 8-1,
- Name: Give the quiz a descriptive name. This name will appear on the home page of the course, navigation menu and other places which will show or provide links to this quiz.
- Description: Describe the syllabus of the quiz and provide instructions or background information, chapters etc.
- Display description on course page: If ticked, the quiz description will appear on the course page directly under the quiz name.
- In the Timing Section:
- Open the quiz: You can specify times when the quiz is accessible for people to make attempts. Before the opening time the quiz will be unavailable to students. They will be able to view the quiz introduction but will not be able to view the questions. Quizzes with start times in the future display both the open and close date for students.
- Close the quiz: After the closing time, the students will not be able to start new attempts. Answers that the student submits after the quiz closing date will be saved but they will not be marked.
T> Even after the quiz has closed students will still be able to see the quiz description and review their attempts. What exactly they will see depends on the settings you choose for review options.
- Time limit: By default, quizzes do not have a time limit, which allows students as much time as they need to complete the quiz. If you do specify a time limit, several things are done to try and ensure that quizzes are completed within that time:
- A countdown timer is shown in the quiz navigation block.
- When the timer has run out, the quiz is submitted automatically with whatever answers have been filled in so far.
- If a student manages to cheat and goes over the allotted time, no marks are awarded for any answers entered after the time ran out.
- When time expires: There are three options as to what will happen when the time limit is up. Choose the one you need from the dropdown menu:
- Open attempts are submitted automatically.
- There is a grace period when open attempts can be submitted, but no more questions answered.
- Attempts must be submitted before time expires, or they are not counted (default).
- Submission grace period: If you select “There is a grace period…” then you can check the box to enable the “Submission grace period” and specify a period of time during which learners may still submit the quiz after the time is up.
- In the Grade Section:
- Grade category: If you have categories in your gradebook, select the one you wish the quiz to be in here.
- Attempts allowed: Students may be allowed to have multiple attempts at a quiz. This can help make the process of taking the quiz more of an educational activity rather than simply an assessment. If the quiz is randomized then the student will get a new version for each attempt. This is useful for practice purposes.
- Grading method: When multiple attempts are allowed, there are different ways you can use the grades to calculate the student’s final grade for the quiz.
- Highest grade - the final grade is the highest (best) grade in any attempt
- Average grade - the final grade is the average (simple mean) grade of all attempts
- First grade - the final grade is the grade earned on the first attempt (other attempts are ignored)
- Last grade - the final grade is the grade earned on the most recent attempt only
- In the Layout Section:
- Question order: If ‘Shuffled randomly’ is selected, then the order of questions in the quiz will be randomly shuffled each time a student starts a new attempt at the quiz. The intention is to make it a little harder for students to copy from each other.
- New page: For longer quizzes it makes sense to stretch the quiz over several pages by limiting the number of questions per page. When adding questions to the quiz, page breaks will automatically be inserted according to the setting you choose here. However, you will also be able to move page breaks around by hand later on the editing page.
- Navigation method*: By choosing Sequential instead of Free, the teacher is forcing the student to progress through the questions in order without being able to go back to a previous question or skip to a later one.
- In the Question Behavior Section:
- Shuffle within questions: If set to ‘yes’, then each time the student takes a quiz the parts of the question will be shuffled randomly.
- How questions behave: The following question behaviors are available when creating a quiz -
- Deferred feedback: Students must enter an answer to each question and then submit the entire quiz, before anything is graded or they get any feedback.
- Adaptive mode and Adaptive mode (no penalties): Allows students to have multiple attempts at the question before moving on to the next question. This behavior requires that the “Whether correct” box is ticked under “During the attempt” in the “Review options” section, at a minimum.
- Manual grading: Previously used for essay questions (irrespective of what the quiz is set to) but you can now choose to have every question in the quiz manually graded, if you wish.
- Interactive mode: After submitting one answer, and reading the feedback, the student has to click a ‘Try again’ button before they can try a new response. They can be given hints to help them. Once the student has got the question right, they can no longer change their response. Once the student has got the question wrong too many times, they are just graded wrong (or partially correct) and get shown the feedback and can no longer change their answer. There can be different feedback after each try the student makes. The number of tries the student gets is the number of hints in the question definition plus one.
- Immediate feedback: Similar to interactive mode in that the student can submit their response immediately during the quiz attempt, and get it graded. However, they can only submit one response, they cannot change it later.
- Deferred feedback or Immediate feedback with Certainty-based marking (CBM): With CBM, the student does not only answer the question, but they also indicate how sure they are they got the question right. The grading is adjusted by the choice of certainty, so that students have to reflect honestly on their own level of knowledge in order to get the best mark.
- Each attempt builds on the last*: If multiple attempts are allowed and this setting is set to Yes, then each new attempt contains the results of the previous attempt. This allows the student on the new attempt to concentrate on just those questions that were answered incorrectly on the previous attempt. If this option is chosen then each attempt by a particular student uses the same questions in the same order, independent of randomization settings. To show a fresh quiz on every attempt, select No for this setting.
-
In the Review options Section: This section controls what information students will be shown when they review their past attempts at the quiz, and during the attempt in adaptive mode. It is a matrix with check boxes.
The various pieces of information that can be controlled are:
- The attempt: Will show how the student responded to each question.
- Whether correct: Displays whether the students response to each question is correct or incorrect.
- Marks: Reveals the marks awarded to the student and the grade for the quiz.
- Specific feedback: Will show the feedback for the response to the answer as set when adding the question to the quiz. Each response to a question can have feedback for both correct and incorrect answers.
- General feedback: Displays the general feedback for the whole question as set when adding the question to the quiz. You can use the general feedback to give students some background to what knowledge the question was testing.
- Right answer: Reveals the correct answer to each question, whether the student answered correctly or not.
- Overall feedback: Displays feedback for the entire quiz as set in the quiz settings.
- For each of the above items, you can determine the timeframe when the students will see them:
- During the attempt: Is only available when ‘How questions behave’ has been set to ‘Immediate feedback’, ‘Immediate feedback with CBM’ and ‘Interactive with multiple tries’. If set to one of these options then a ‘Check’ button will appear below the answer and when clicked the student will submit that response and then receive immediate feedback.
- Immediately after the attempt: means within 2 minutes of the student clicking “submit all and finish”.
- Later, while the quiz is still open: means after 2 minutes, but before the close date (if the quiz does not have a close date, this phase never ends).
- After the quiz is closed: means what it says (you never get here for quizzes without a close date).
- In the Appearance Section:
- Show the user’s picture: If enabled, the student’s name and picture will be shown on-screen during the attempt, and on the review screen, making it easier to check that the student is logged in as themselves in an invigilated (proctored) exam.
- Decimal places in grades: This option determines how many digits will be shown after the decimal separator when the grade is displayed. A setting of 0 for example means that the grades are displayed as integers. This setting is only used for the display of grades, not for the display or marking of answers.
- Decimal Places in Question Grades*: This setting specifies the number of digits shown after the decimal point when displaying the grades for individual questions.
- Show Block during Question Attempts*: If set to yes then normal blocks will be shown during quiz attempts.
- In the Extra Restrictions on Attempt Section:
- Require password: If you specify a password in here then participants must enter the same password before they are allowed to make an attempt on the quiz. This is useful to give only a selected group of student’s access to the quiz.
- Require network address: You can restrict access for a quiz to particular subnets on the LAN or Internet by specifying a comma-separated list of partial or full IP address numbers. This is especially useful for a proctored (invigilated) quiz, where you want to be sure that only people in a certain room are able to access the quiz.
- Enforced delay between attempts: You can set a time (from seconds to weeks) between the first and second attempt of a quiz. You can also (or alternatively) set a time from seconds to weeks for subsequent attempts after the second attempt. Thus, you might allow a student to take the quiz twice immediately with no delay, but if they want to improve their score with a third attempt, they are forced to wait a week and use the time for extra revision.
- Browser security: The options in this section offer various ways to try to restrict how students may try to ‘cheat’ while attempting a quiz. If “Full screen pop-up with some JavaScript security” is selected,
- The quiz will only start if the student has a JavaScript-enabled web-browser
- The quiz appears in a full screen popup window that covers all the other windows and has no navigation controls
- Students are prevented, as far as is possible, from using facilities like copy and paste.
- In the Overall Feedback Section: Overall feedback is text that is shown after a quiz has been attempted. The text that is shown can depend on the grade the student got. Grade boundaries can be specified either as a percentage, for example “31.41%”, or as a number, for example “7”. If your quiz is out of 10 marks, a grade boundary of 7 means 7/10 or better.
T> Note that the maximum and minimum grade boundaries (100% and 0%) are set automatically.
- In the Common module settings Section:
- Visible: Show/hide the quiz activity from the students.
- ID Number: Set and ID number to easily identify the quiz activity in the gradebook.
- Group Mode: This setting has 3 options:
- No groups - There are no sub groups, everyone is part of one big community
- Separate groups - Each group member can only see their own group, others are invisible
- Visible groups - Each group member work in their own group, but can also see other groups.
- Grouping: A grouping is a collection of groups within a course. If a grouping is selected, students assigned to groups within the grouping will be able to work together.
- Click “Save and Display” to proceed with building the quiz and adding questions to the quiz.
Building Quiz
Once you have saved your changes, you’ll see the quiz activity and description with a Edit Quiz button which will take you to the second editing screen where you will write and select questions to include in the quiz body. Here you’ll also categorize your quiz questions and add them to the quiz body you just created.
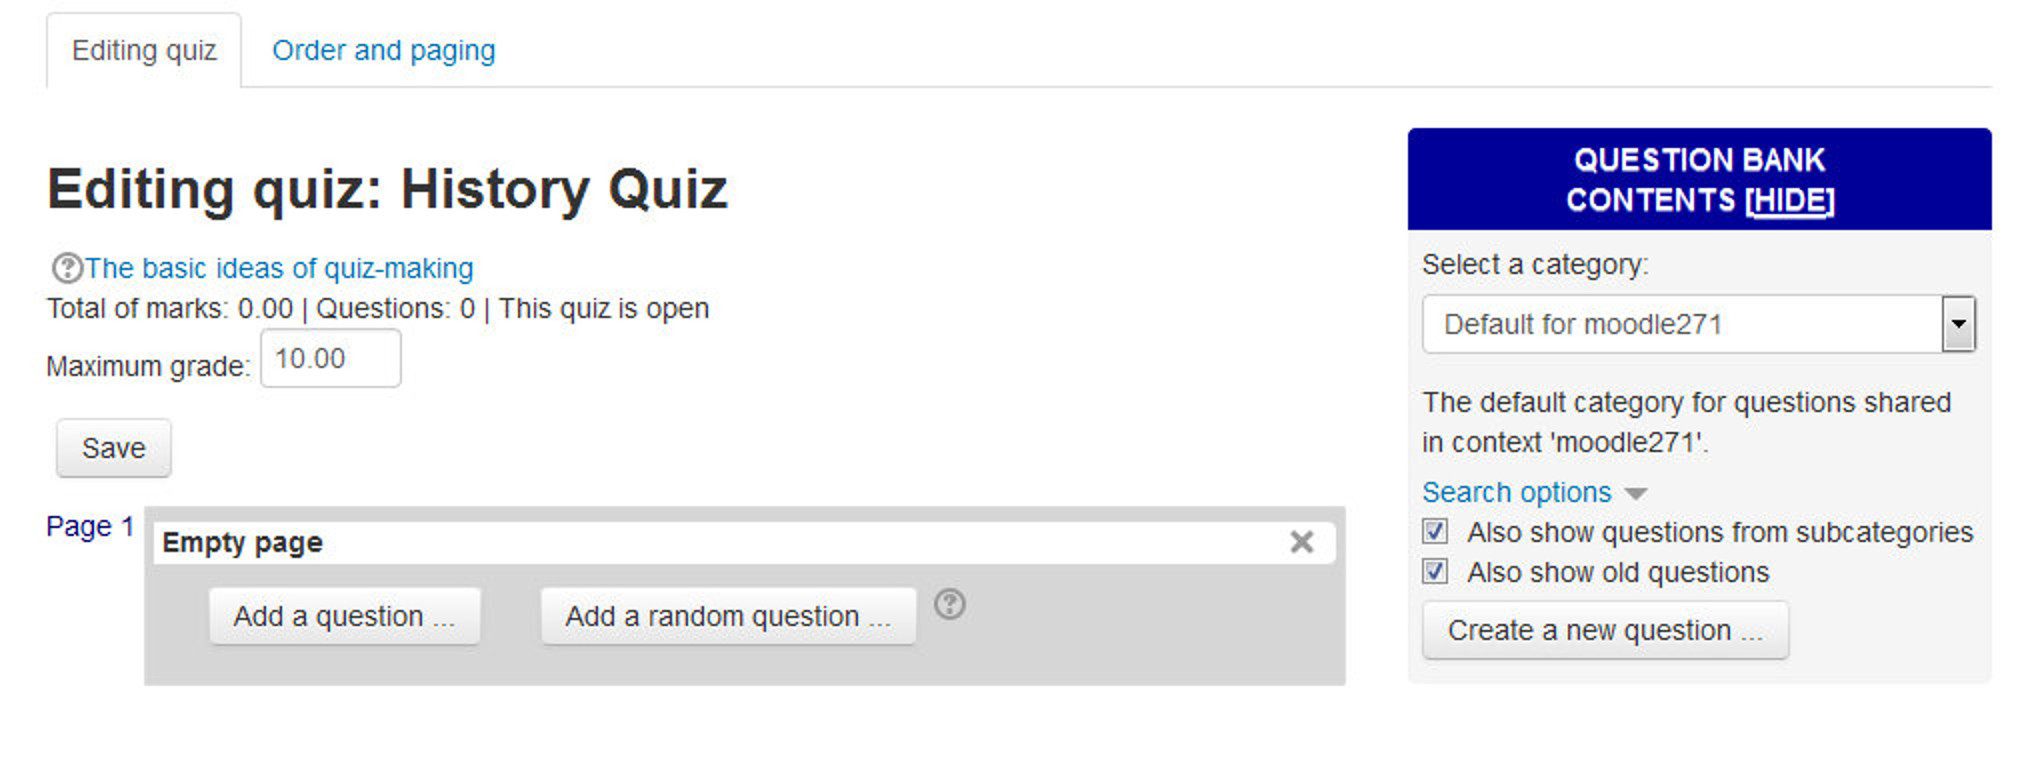
On the center of the page you’ll see the questions you’ve added to the quiz. Since this is a new quiz, so there are no questions there.
On the right side of the page, you’ll see a block named “Question Bank contents”, when expanded it will show the contents of the question bank.
Before we start adding questions to our quiz or creating questions, let’s take a more detailed look at question bank and categories
Question Bank
Question Bank allows a teacher to create, preview, and edit questions in a database of question categories. The categories can be limited to being used on the site, course or quiz level. The questions in a category can be added to a Quiz or to a lesson activity via an export process. You can access the question bank by creating or editing a quiz activity or via Settings > Course administration > Question bank.
Select a category
Questions are organized into categories. Initially each course has only one category called “Default”. It is good practice to create more categories to organize your questions. This not only makes it easier to find questions, but makes the use of random questions and matching question easier.
You can create a hierarchy of categories because you can create subcategories inside parent categories. It is better than keeping all your questions in one big list in the quiz module. The hierarchy feature enables you to separate categories into sub categories and sub categories into sub sub-categories etc. indefinitely. Categories and sub categories, etc., are very powerful when combined with random questions that can select either from one category or from a category or any of its sub categories.
Each category has a context which determines where the questions in the category can be used:
- Activity context - Questions only available in the activity module
- Course context - Questions available in all activity modules in the course
- Course category context - Questions available in all activity modules and courses in the course category
- System context - Questions available in all courses and activities on the site
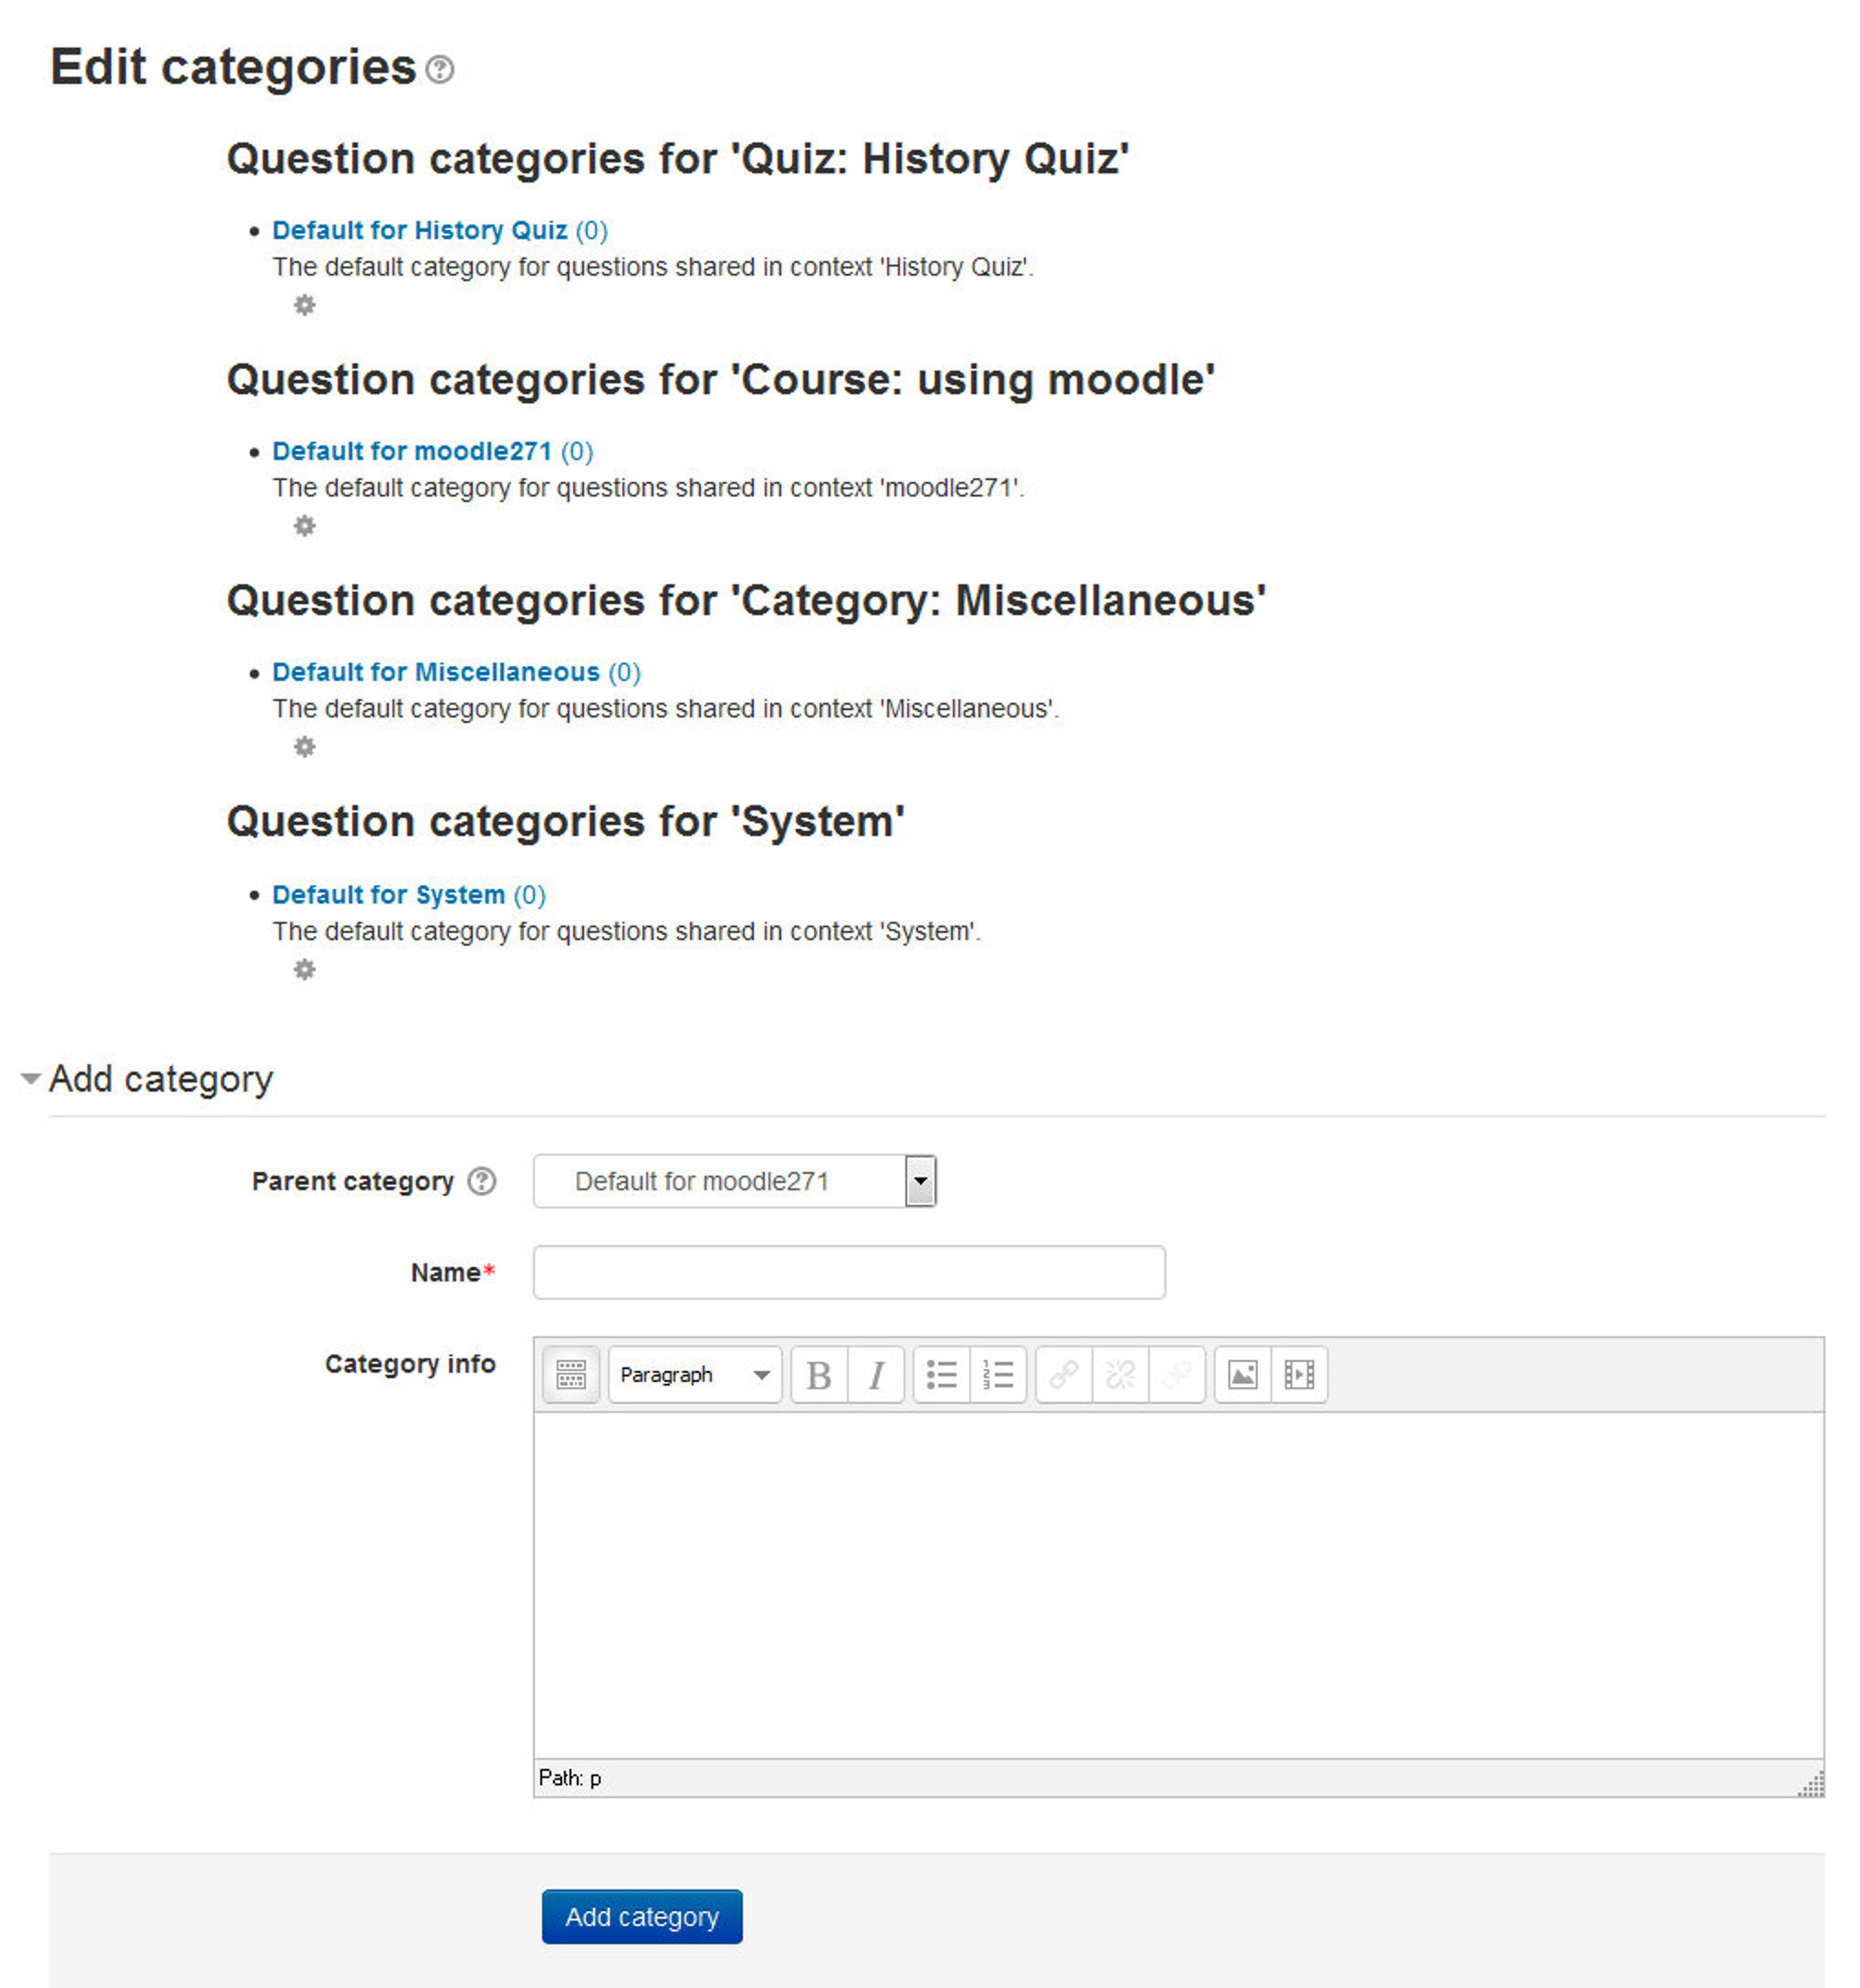
To add a category
- Open the question bank from Settings > Quiz administration > Question Bank > Categories.
- Below the list of current categories you will see a form to add a new category.
- Choose the ‘parent’ category in which your new category will be placed. The parent category is the one in which the new category will be placed. “Top” means that this category is not contained in any other category.
- Placing your category in another category makes it a sub-category of the parent.
- Choosing ‘Top’ means that your category is a top level category, not a sub category.
- Type the name of your new question category in the text box.
- Add an optional meaningful description in the category info area.
- Click the ‘Add Category’ button. Your new question category will appear in the list of current categories.
Adding questions
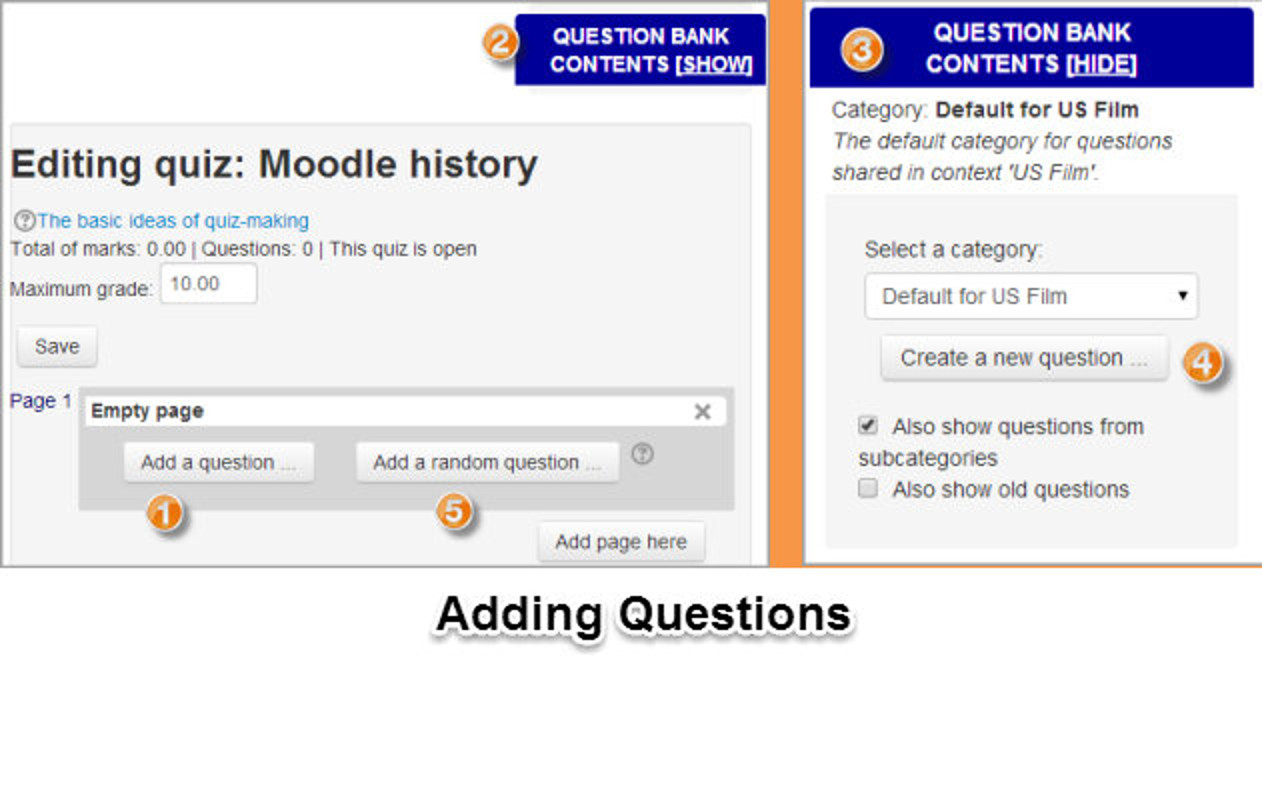
After creating the categories for questions, now you can add questions from a number of locations within the editing quiz page:
- Click the “Add question” button to begin a new question (1 below)
- Click “Show” (2) to reveal the contents of the question bank (3) and then choose a pre-made question or click “Create new question” (4)
- Click (5)”Add a random question” to add a random question, providing there are questions in the question bank already.
- Click “Create a new question” from the Question Bank, if you are still at the questions tab of Question Bank.
Creating a new question
- To create a new question from scratch, click “Add a question”.
- From the next screen, choose the question type you want to add.
- Select the Question Category for the question you are creating.
- Fill in the question form, making sure to give a grade to the correct answer.
- Click “Save changes”.
T> If you have a very complex question, and you want to check it as you go along, you can preview it and then click “Save changes and continue editing”.
Each question type has its own form and options. We’ll spend the next few pages detailing the options for each question type.
Calculated Questions
Calculated questions offer a way to create individual numerical questions by the use of wildcards (i.e. you can use common variables names as x , y enclosed in curly braces to create the wildcards {x} and {y}) that are substituted with random values when the quiz is taken.
The main purpose of the calculated question is to create multiple versions of a question with different numerical values. This means you must have at least one wildcard in one of the answers.
To create a calculated question:
- Select Calculated from the “Create new question” drop-down menu.
- Select the question category.
- Give the question a descriptive name - this allows you to identify it in the question bank.
- Enter the question text: This should be the question you want the student to answer, and it must include all the information they need to calculate an answer. Therefore it must contain at least one wildcard, inside curly braces. For example, if you wanted the student to sum numbers A and B, the question text might read: “What is {A} + {B}?”
- Set the default question grade (i.e. the maximum number of marks for this question).
- If you wish, add general feedback for the question. It will be displayed to all the students after they have completed the question.
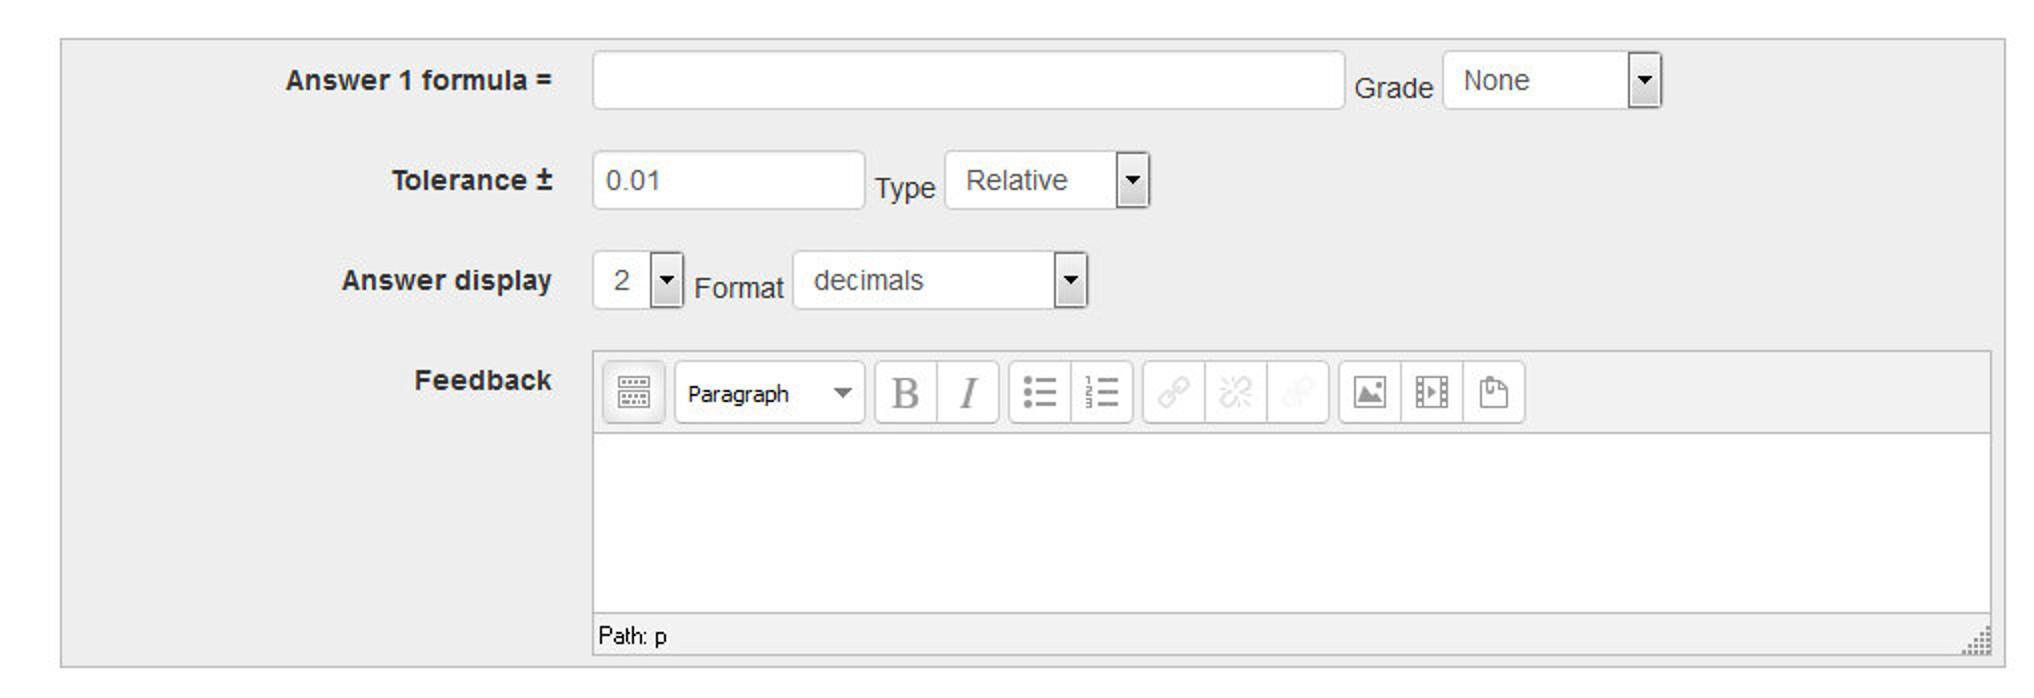
- In the Answers Section: Enter the formula for the answer (see Figure 8-5). Be sure to use the same placeholders so Moodle can substitute the same values.
- Choose the grade that the student will get for this question if they give this answer. This should be a percentage of the total marks available.
- Determine the tolerance for error that you will accept in the answer. The tolerance and tolerance type settings combine to give a range of acceptable scores. So, if tolerance = t, correct answer = x and the difference between the user’s answer and the correct answer is dx, then the tolerance types are as follows:
- Nominal - mark correct if dx <= t
- Relative - mark correct if dx / x <= t
- Geometric - mark correct if dx² / x² <= t²
- The next 2 settings, “Answer Display” and “Format” determine the precision of the answer. You can use these to select the number of decimal places or significant figures you want to use.
- Add some feedback which the student will see if they enter this answer.
- You can specify as many answer formulae as you like - click “Add another answer blank” to add more.
- In the Unit Handling Section you can specify units for the answers. For example, if you enter a unit of ‘cm’ here, and the accepted answer is 15, then the answers ‘15cm’ and ‘15’ are both accepted as correct. If you add more than one unit, you can also specify a multiplier. So, if your main answer was 5500 with unit W, you can also add the unit kW with a multiplier of 0.001. This means that the answers ‘5500’, ‘5500W’ or ‘5.5kW’ would all be marked correct. Note that the accepted error is also multiplied, so an allowed error of 100W would become an error of 0.1kW.
- In the Multiple Tries Section: When questions are run using the ‘Interactive with multiple tries’ or ‘Adaptive mode’ behavior, so that the student will have several tries to get the question right, then this option controls how much they are penalized for each incorrect try. The penalty is a proportion of the total question grade.
- In the Question Tags section you can enter tags for the questions to easily identify them.
- Click Save Changes Button.
Page 2: Choose Dataset Properties:
- On the Next page you can choose the dataset properties.
- Each wildcard that you specify in the answer formula must have an associated set of possible values - this is its dataset. Each of the wildcards is listed on this page along with a choice of dataset:
- private i.e. only used by this question
- shared i.e. shared with other calculated questions in the same category
T> *Using a shared dataset can save time when you are creating a lot of similar calculated questions. *
- To continue, simply choose your preferred dataset for each wildcard, then click “Next Page”.
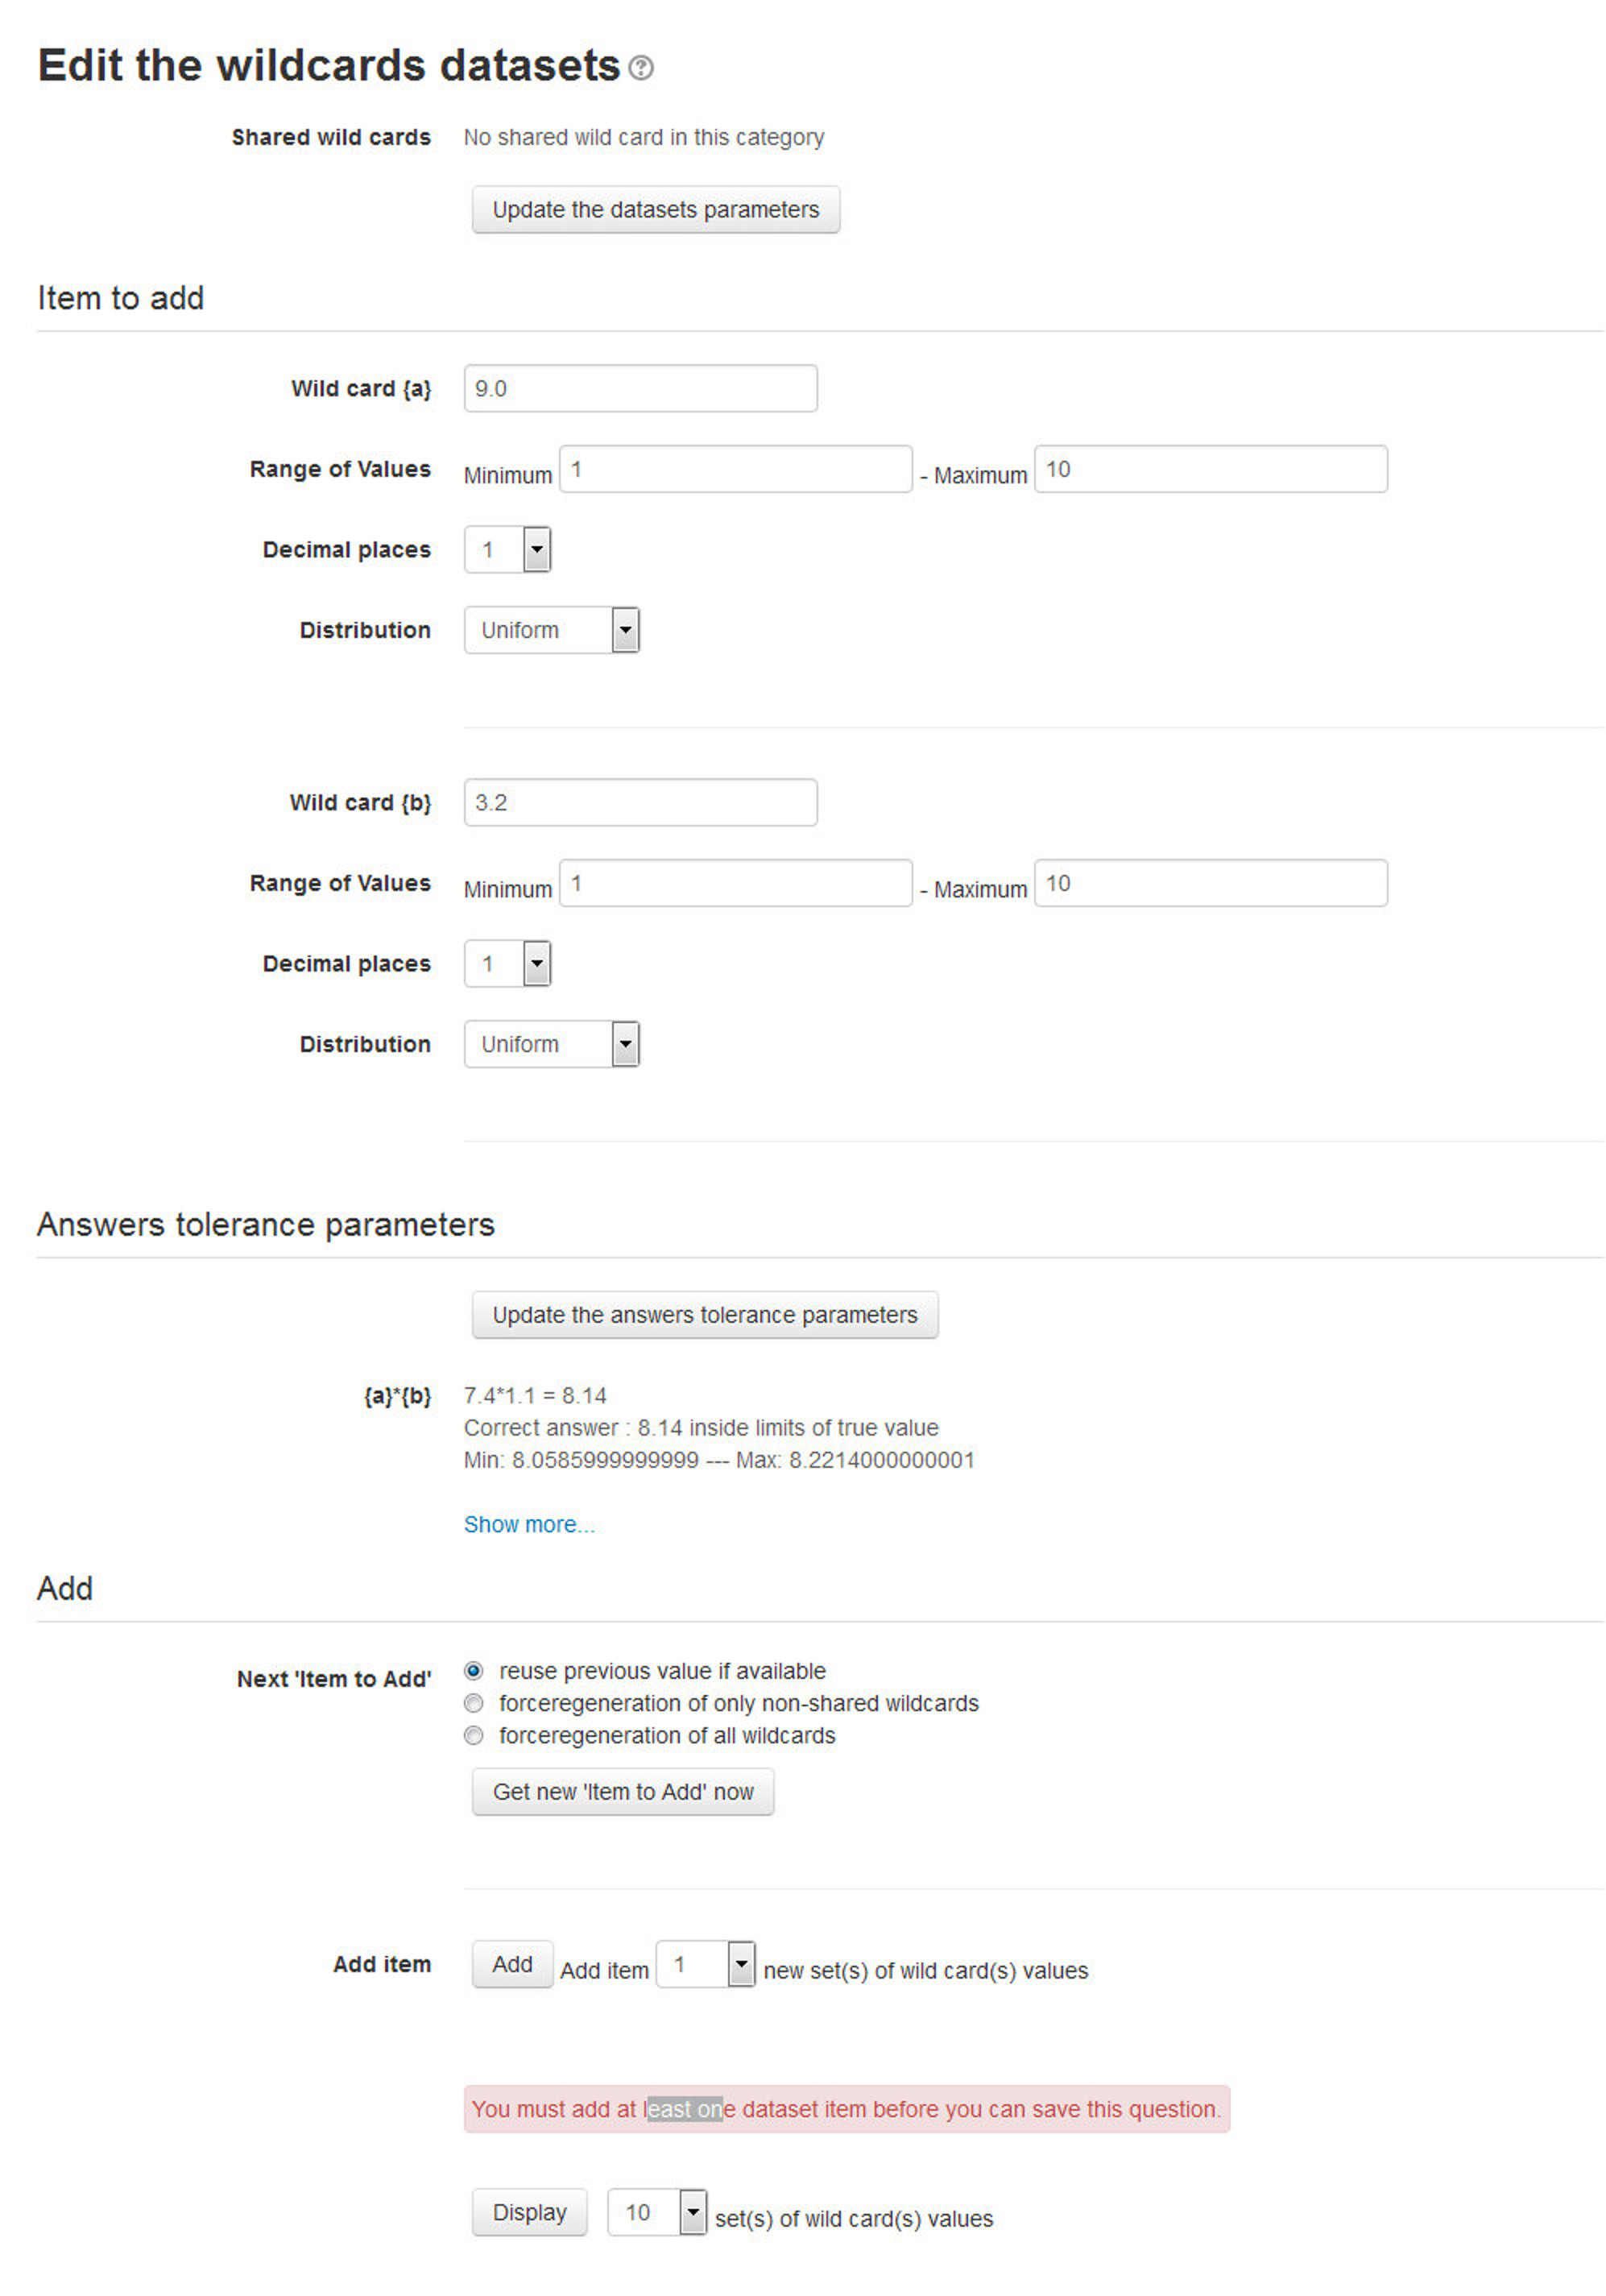
Page 3: Edit the datasets
Now we need to create the set of possible values that each wildcard can take. There are two ways of creating values - you can type them in yourself and add them to the list, or you can have Moodle generate them for you.
Adding/deleting your own values:
Adding individual values to the list is easy:
- In the ‘Param’ field for each wildcard, enter the value you want
- Scroll down to the ‘Add’ section and click the Add button (leaving the number of items set to 1)
- Repeat the above steps as many times as necessary (the maximum number of items is 100)
To delete values from the list:
- In the ‘Delete’ section, select the number of items to delete
- Click the Delete button
Letting Moodle create values
- Start with the “Range of Values” fields, and enter the lower and upper limits for the values you would accept
- Choose a number of decimal places for the value.
- Choose the distribution of values between the limits - ‘uniform’ means any value between the limits is equally likely to be generated; ‘loguniform’ means that values towards the lower limit are more likely.
- Now move down to the ‘Add’ section and click on “force regeneration”
- In the menu next to the Add button, choose the number of sets of random values (items) you wish to add to the list.
-
Finally, click Add to append the new values to the list
T> If you want more control over the items that Moodle adds, you can do them one at a time and preview the values before you add them. Click the “Get New Item to Add” button to make Moodle generate new values in the “Item to Add” section at the top. If you like them click “Add” for 1 item; if not, click “Get New Item to Add” again to get new values.
- Click Save Changes Button to finish things off.
Calculated questions can use more than simple arithmetic operators. The full list of operators includes abs, acos, acosh, asin, asinh, atan, atanh, ceil, cos, cosh, deg2rad, exp, expm1, floor, log, log10, log1p, rad2deg, round, sin, sinh, sprt, tan, tanh, atan2, pow, min, max, and pi. Each function’s placeholders and other arguments are in parentheses.
For example, if you want students to calculate the sine of one angle and two times the cosine of another, you would enter sin({a}) + cos({b}*2).
Calculated Multichoice
Calculated multichoice questions are like multichoice questions with the additional property that the elements to select can include formula results from numeric values that are selected randomly from a set when the quiz is taken. They use the same wildcards than Calculated questions and their wildcards can be shared with other Calculated multichoice or regular Calculated questions.
The main difference is that the formula is included in the answer choice as {=…} i.e. if you calculate the surface of a rectangle {={l}*{w}}.
The value will be displayed as set by the Correct answer shows (0,1,2 etc.) and Format (decimals, significant figures) options setup.
So a Choice text could be: The rectangle surface is {={l}*{w}} cm2. If {l} = 4.0, {w} = 2.5, Correct answer shows 1 and Format decimals
The choice will display as: The rectangle surface is 10.0 cm2
Calculated Multichoice setup is similar to that of calculated question type including the handling of wild cards and available functions.
To add a calculated multichoice question:
- Select Calculated Multichoice from the Create New Question dropdown menu.
- Repeat steps 2 to 6 as for calculated question type.
- In the Answers Section: You can provide multiple choices to choose from with a formula as the option. The suggested choice formula is …{={x}+..}…
- Rest all steps are also same as for calculated question type.
- Click “Save Changes” button to save the question.
Calculated Simple
Simple calculated questions offer a way to create individual numerical questions whose response is the result of a numerical formula which contain variable numerical values by the use of wildcards (i.e. {x} , {y}) that are substituted with random values when the quiz is taken.
The simple calculated questions offer the most used features of the calculated question with a much simpler creation interface.
The only difference between the calculated and calculated simple question is that you can create the values for the wildcards right within the same page. The steps are exactly same as for calculated question type.
Description
A Description question page simply shows some text (and possibly graphics) without requiring an answer. It is more of a label than a question type. When shuffling questions is turned off, this type of page can provide information to be used by a following group of questions.
Embedded Answers (Cloze)
Embedded answers (Cloze) questions consist of a passage of text (in Moodle format) that has various answers embedded within it, including multiple choice, short answers and numerical answers. Questions of this type are very flexible, but can only be created by entering text containing special codes that create embedded multiple-choice, short answers and numerical questions.
To create the embedded answers type question using a graphical editor you can ask your site administrator to install the TinyMCE Cloze editor plugin or else you can directly create the embedded answers type questions using the link: http://projects.ael.uni-tuebingen.de/quiz/htmlarea/index.php
To setup an Embedded Answers (Cloze) type question:
- Select the question category
- Give the question a descriptive name - this allows you to identify it in the question bank.
- Enter the passage of text (in Moodle format) into the ‘question text’ field.
- Set the ‘default question grade’ (i.e. the maximum number of marks for this question).
- Set the ‘Penalty factor’.
- If you wish, add general feedback. This is text that appears to the student after he/she has answered the question.
- The editor has been modified and allows you to test if your syntax is good. The different questions elements decoded will be displayed and syntax errors pinpoint. However, it cannot check if the question decoded is two questions in one because of error syntax.
- Click Save changes to add the question to the category.
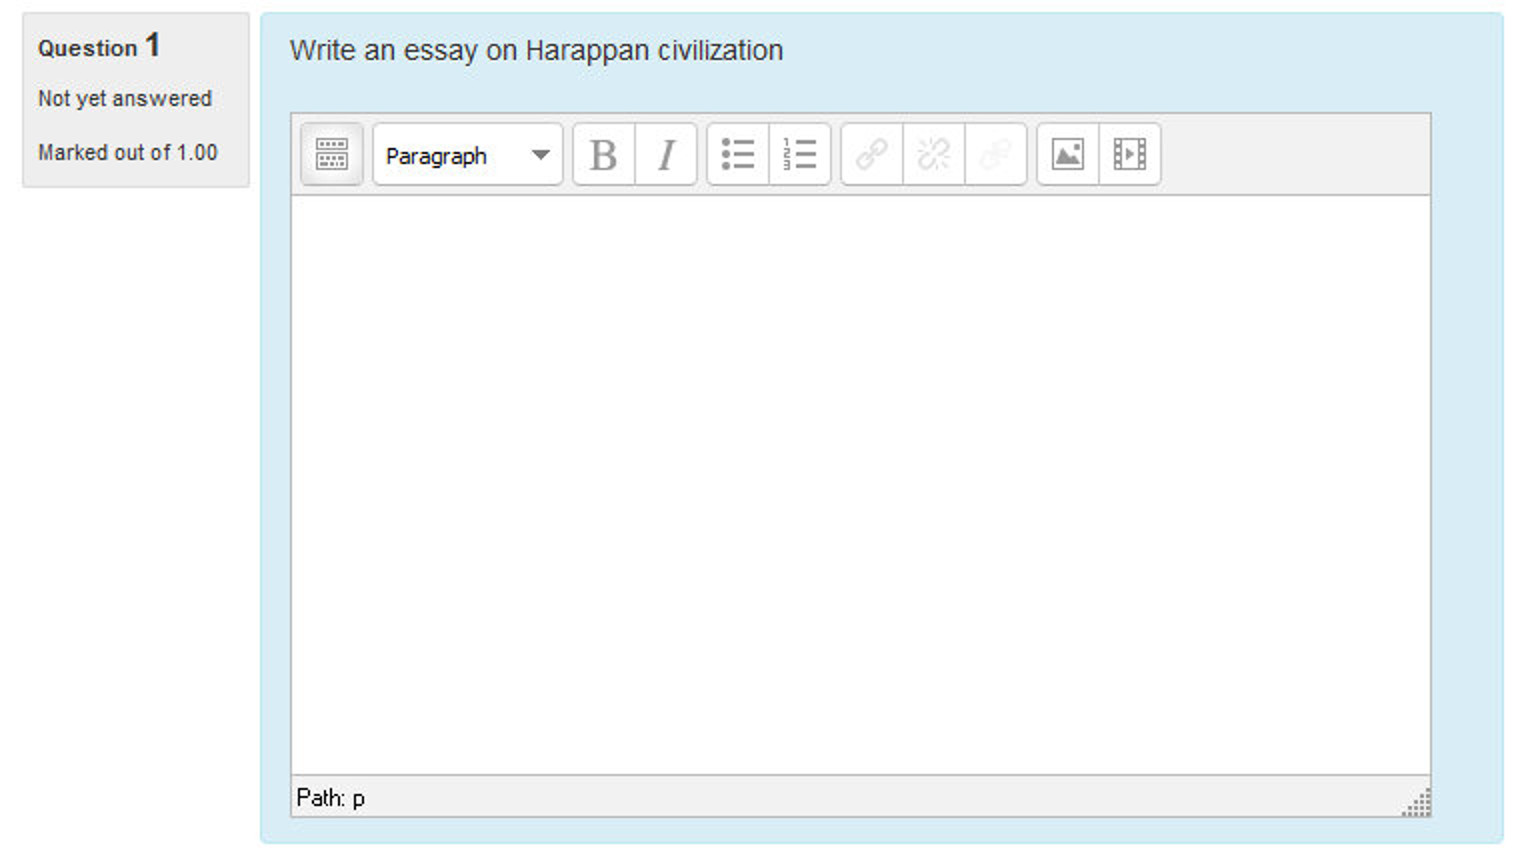
Essay
An essay question is a free-response text area where students can enter larger blocks of text in response to your question, as shown in Figure 8-7. These questions are not scored by the computer, and you will need to grade each answer manually.
It is possible for a teacher to create a template to scaffold the student’s answer in order to give them extra support in the “Response Template” field. The template is then reproduced in the text editor when the student starts to answer the question.
To create an essay question:
- Select Essay from the “Create new question” drop-down menu.
- Give the question a descriptive name.
- Enter the question text.
- Enter the default mark for the question.
- If you wish, add general feedback and/or specific feedback.
- You can also specify the options for the response submission like the editor, input box size and even you can allow the students to upload the attachments.
- To provide the extra support to the students, enter it in the “Response template” section.
- To provide information to the other teachers about the grading criteria for the essay mention it inside the “Information for graders” section.
- Click the “Save changes” button to add the question to the category.
Matching
Matching questions ask students to match multiple question stems to multiple possible answers (see Figure 8-8). They are useful for testing students’ understanding of vocabulary and their ability to match examples to concepts.
Matching questions have a content area and a list of names or statements which must be correctly matched against another list of names or statements. For example “Match the Capital with the Country” with the two lists “Canada, Italy, Japan” and “Ottawa, Rome, Tokyo”.
Setting up a matching question in Moodle is a bit different from setting up other types of questions.
To create a matching question:
- Select the question category
- Give the question a descriptive name - this allows you to identify it in the question bank.
- Enter some instructions in the ‘Question text’ field to tell the students what they are matching.
- Set the ‘Default mark’ (i.e. the maximum number of points for this question).
- If you wish, add general feedback. This is text that appears to the student after he/she has answered the question.
- Check the ‘shuffle’ box if you want the answers in the drop-down menus to be shuffled. Note: The Quiz display setting must also be set to shuffle within questions for this to work.
- For the first matching item, enter the question and a matching answer.
- Fill in at least two questions and three answers. Click ‘Blanks for 3 more questions’ to add more. You can enter as many as 10 items. You can provide extra wrong answers by giving an answer with a blank question.
- Set the ‘Penalty for each incorrect try’.
- Click Save changes to add the question to the category.

Moodle will display the question in two columns. The first will contain the questions. The second will display a drop-down menu for each question with all possible matching answers as options.
T> Matching questions look better on screen if you put the longer piece of text in the question and not the match. For example, when creating a matching vocabulary question, put the single word in the match and the definition sentence in the question. Otherwise the drop down for long questions will be awkward to use and difficult to read.
Multiple Choice
Moodle provides teachers with a lot of flexibility when creating this common question type. You can create single-answer and multiple-answer questions, include pictures, sound or other media in the question and/or answer options (by inserting HTML) and weight individual answers.
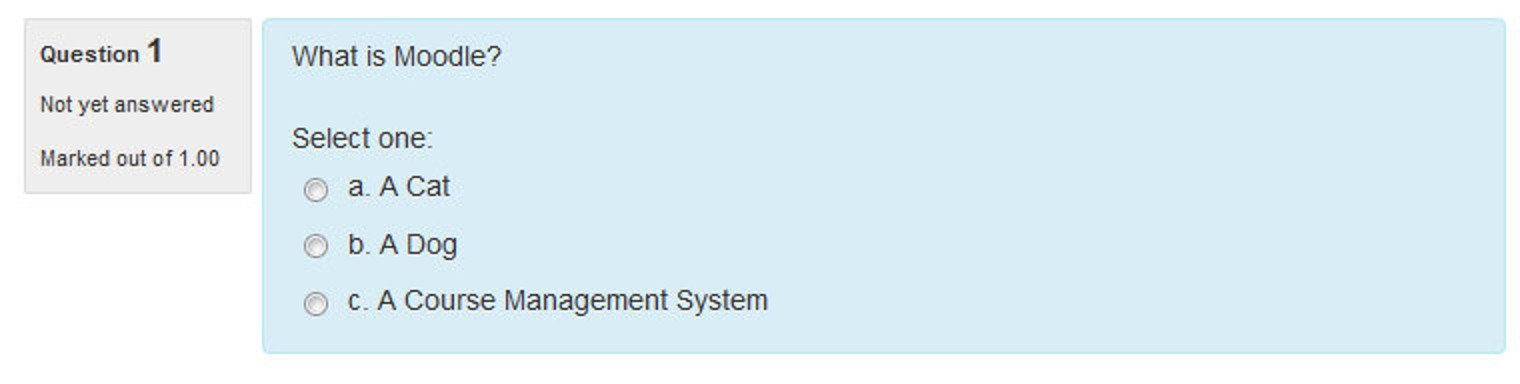
There are two types of multiple choice questions - single answer and multiple answer.
Single Answer Questions-
These questions allow one and only one answer to be chosen by providing radio buttons next to the answers. You will specify non-negative marks for each answer; usually zero marks for wrong answers, maximum marks for correct answers and partial marks for partially correct answers.
Multiple Answer Questions-
You can select “multiple answers are allowed” in a Multiple Choice question type. “Multiple answers” questions types in a quiz allow one or more answers to be chosen by providing check boxes next to the answers. Each answer may carry a positive or negative grade, so that choosing ALL the options will not necessarily result in good grade. If the total grade is negative then the total grade for this question will be zero.
Feedback can be associated either with specific answers, or with the question as a whole.
To create a multiple-choice question:
- Select the question category
- Give the question a descriptive name. The name will be used in the question lists on the quiz editing page.
- Create the question text. If you’re using the HTML Editor, you can format the question just like a word processing document.
- Set the ‘default question grade’ (i.e. the maximum number of marks for this question).
- If you wish, add general feedback. This is text that appears to the student after he/she has answered the question.
- Choose whether students can only select one answer or multiple answers.
- Choose whether to shuffle the answer options and the numbering list to be displayed for the answers.
- Write your first answer in the Choice 1 text field. Inserting HTML into this area also makes it possible to add an image or a sound file.
- Select a grade percentage for the answer. This is the percentage of the total points for the question that selecting this response is worth. You can select negative percentages as well as positive percentages. So, selecting a correct response in a multiple answer question may give you 50% of the possible points, while selecting a wrong answer may take away 10%. Note that in a multiple-answer question, the grades must add up to 100%.
- If you wish, you can add feedback for each response. It may be a bit more work, but its good practice to tell the students why each answer is right or wrong using the feedback area. If students know why an answer is right or wrong, they can analyze their own thinking and begin to understand why an answer is correct. Your feedback will only be displayed if you select Show Feedback in the quiz body options.
- Fill in the rest of the response choices in the rest of the form. Any unused areas will be ignored.
- The option combined feedback for correct/partially correct/incorrect responses is particularly useful for multiple-response questions, where it is difficult to control what feedback students see just using the answer-specific feedback.
- Set the ‘Penalty factor’ for each incorrect try. Make note that the ‘penalty factor’ only applies when the question is used in a quiz using adaptive mode - i.e. where the student is allowed multiple attempts at a question even within the same attempt at the quiz.
- Click the “Save Changes” button at the bottom of the screen.
Numerical
Numerical questions are a lot like short-answer questions for equations, such as the one shown in Figure 8-10. You can create a question with an equation, and your student’s type in a numerical answer. Students will get credit for answers within the range of answers you specify.
T> Text answers are no longer allowed in Numerical questions.
To create a numerical question:
- Select the question category
- Give the question a descriptive name - this allows you to identify it in the question bank.
- Enter a question in the ‘question text’ field. This can include an equation - Moodle has a couple of text filters that allow you to type an equation and have it properly typeset when displayed. The Algebra filter is very good for writing common mathematical expressions in a simple way. You can also use the Equation editor provided in the Atto Text editor.
- Set the ‘default question grade’ (i.e. the maximum number of marks for this question).
- Add general feedback. This is text that appears to the student after he/she has answered the question.
- Now enter the first accepted answer(s) in the Answer field.
- Enter an accepted error for this answer. This is the range above or below the answer that Moodle will accept as a match. For example, if the correct answer is 5, but you will accept 4 or 6 as answers, your accepted error is 1.
- Enter a grade for this answer option.
- Enter feedback for the accepted answer. This is the text that the student will see if they enter a number within the accepted error of the answer.
- Repeat for each of the answers you want to accept. You can provide feedback for all wrong answers by using a wildcard, i.e. the asterisk character (*), as an answer with grade ‘None’.

- You can also specify the Units in the Unit Handling Section. For example, if you enter a unit of ‘cm’ here, and the accepted answer is 15, then the answers ‘15cm’ and ‘15’ are both accepted as correct. You can also specify a multiplier. So, if your main answer was 5500 with unit W, you can also add the unit kW with a multiplier of 0.001. This means that the answers ‘5500’, ‘5500W’ or ‘5.5kW’ would all be marked correct. Note that the accepted error is also multiplied, so an allowed error of 100W would become an error of 0.1kW.
- Set the ‘Penalty factor’ for multiple tries.
- Click ‘Save changes’ to add the question to the category.
Random short-answer matching
This is an interesting question type. You take random multiple short-answer questions and their correct answers and create a matching question out of them. It’s an interesting way to reuse your short-answer questions in a new format. The Random Short-Answer Matching question looks just like a Matching question. The difference is that the sub-questions are drawn randomly from the Short Answer questions in the current category.
To create a random short-answer matching question:
- Select “Random short-answer matching” from the “Create new question” dropdown menu
- Give the question a descriptive name - this allows you to identify it in the question bank.
- Enter the question text to tell the students what they are matching, or use the default text
- Enter the default marks for the questions.
- Provide the General Feedback which will be shown to the students after they have completed the question.
- Select the number of questions you want to add to the matching question - make sure this is less than or equal to the number of short-answer questions available in this category (a verification will be done when the question is saved).
- Check Include Subcategories if you wish to choose questions from subcategories also.
- If you wish, you can add feedback for each response in the Combined Feedback Section.
- Set the ‘Penalty factor’ in the Multiple Tries Section.
- Click Save changes.
Short Answer
In a short answer question, the student types in a word or phrase in response to a question (that may include an image). Answers may or may not be case sensitive. The answer could be a word or a phrase, but it must match one of your acceptable answers exactly. It’s a good idea to keep the required answer as short as possible to avoid missing a correct answer that’s phrased differently.
T> You may find it helpful to prototype your short-answer questions to catch common acceptable answers you hadn’t thought of. To do this, start by creating a few acceptable answers and include the question in a quiz for no points. Be sure to tell students you are testing a new question.

Once the quiz is over, review student’s answers and add their acceptable answers to the list.
To create a short-answer question:
- Select “Short answer” from the “Create new question” drop-down menu.
- Give your question a descriptive name.
- Create the question text. If you want students to fill in a blank, use the underscore to indicate where the blank is.
- Set the ‘default question grade’ (i.e. the maximum number of marks for this question).
- If you wish, add general feedback.
- Choose whether the answers are case-sensitive. Case sensitivity can be tricky where capitalization is important. Will you accept “george Washington” as well as “George Washington” as an answer?
- Fill in the answers you will accept. Give each answer a percentage of the grade if required. You could give common misspellings partial credit with this option. You can use wildcards to allow for variants on a word per phrase.
- Add grade for each answer.
- Create feedback for any and all answers. This will appear if the student enters that answer.
- Set the ‘Penalty factor’ in the Multiple Tries Section.
- Click Save Changes to add the question to the category.
True/False Question
In a true/false question a student is given only two choices for an answer in this kind of question: True or False. The question content can include an image or html code.
When feedback is enabled, the appropriate feedback message is shown to the student after the answer. For example, if the correct answer is “False”, but they answer “True” (getting it wrong) then the “True” feedback is shown.
To create a True/false type question:
- Select the question category
- Give the question a descriptive name - this allows you to identify it in the question bank.
- Enter a question in the ‘question text’ field.
- Set the ‘default question grade’ (i.e. the maximum number of marks for this question).
- If you wish, add general feedback.
- Select the correct answer - true or false.
- Finally, provide feedback for each of the answers ‘true’ and ‘false’.
- Set Penalty Factor for Multiple Tries.
- Click ‘Save changes’ to add the question to the category.
Importing Questions
If you have questions from a textbook question bank, or if you don’t want to use the web interface to create your questions, you can import them from a text file. Moodle supports a range of formats including some proprietary quiz software formats, as well as text files and provides an easy way to create new importers if you know a little PHP.
Once you get to know a format, it may be easier to type the questions into a text file than to use the web interface. You can just keep typing instead of waiting for new web pages to load for each question.
The default formats include:
- Aiken Format: The Aiken format is a very simple way of creating multiple choice questions using a clear human-readable format. The question must be all on one line. Each answer must start with a single uppercase letter, followed by a period ‘.’ or a bracket ‘)’, then a space. The answer line must immediately follow, starting with “ANSWER: “ (NOTE the space after the colon) and then giving the appropriate letter.
- Blackboard: If you’re converting from Blackboard to Moodle, you can export your course and import the question pools into Moodle using the Blackboard format. Blackboard format enables questions saved in all Blackboard export formats to be imported via a .dat or .zip file. For zip files, images import is supported.
- Embedded Answers (Cloze): The Cloze format is a multiple-answer question with embedded answers. These questions can be a bit tricky to develop, but they provide a unique approach. Embedded answers (Cloze) format enables the import of a passage of text with questions such as multiple-choice and short answer embedded within it.
- Examview: Examview format enables the import of questions from Examview 4 XML files. For newer versions of Examview, Blackboard format may be used.
- Gift Format: Gift format enables multiple-choice, true-false, short answer, matching, missing word, numerical and essay questions to be imported or exported via text file.
- Learnwise Format: This format enables the import of multiple choice questions saved in Learnwise’s XML format.
- Missing Word format: Missing word format enables questions to be imported via text file.
- Moodle XML format: This is a Moodle-specific format for importing and exporting questions. It allows you to import image files used in the questions.
- WebCT format: WebCT format enables multiple-choice and short answer questions saved in WebCT’s text-based format to be imported.
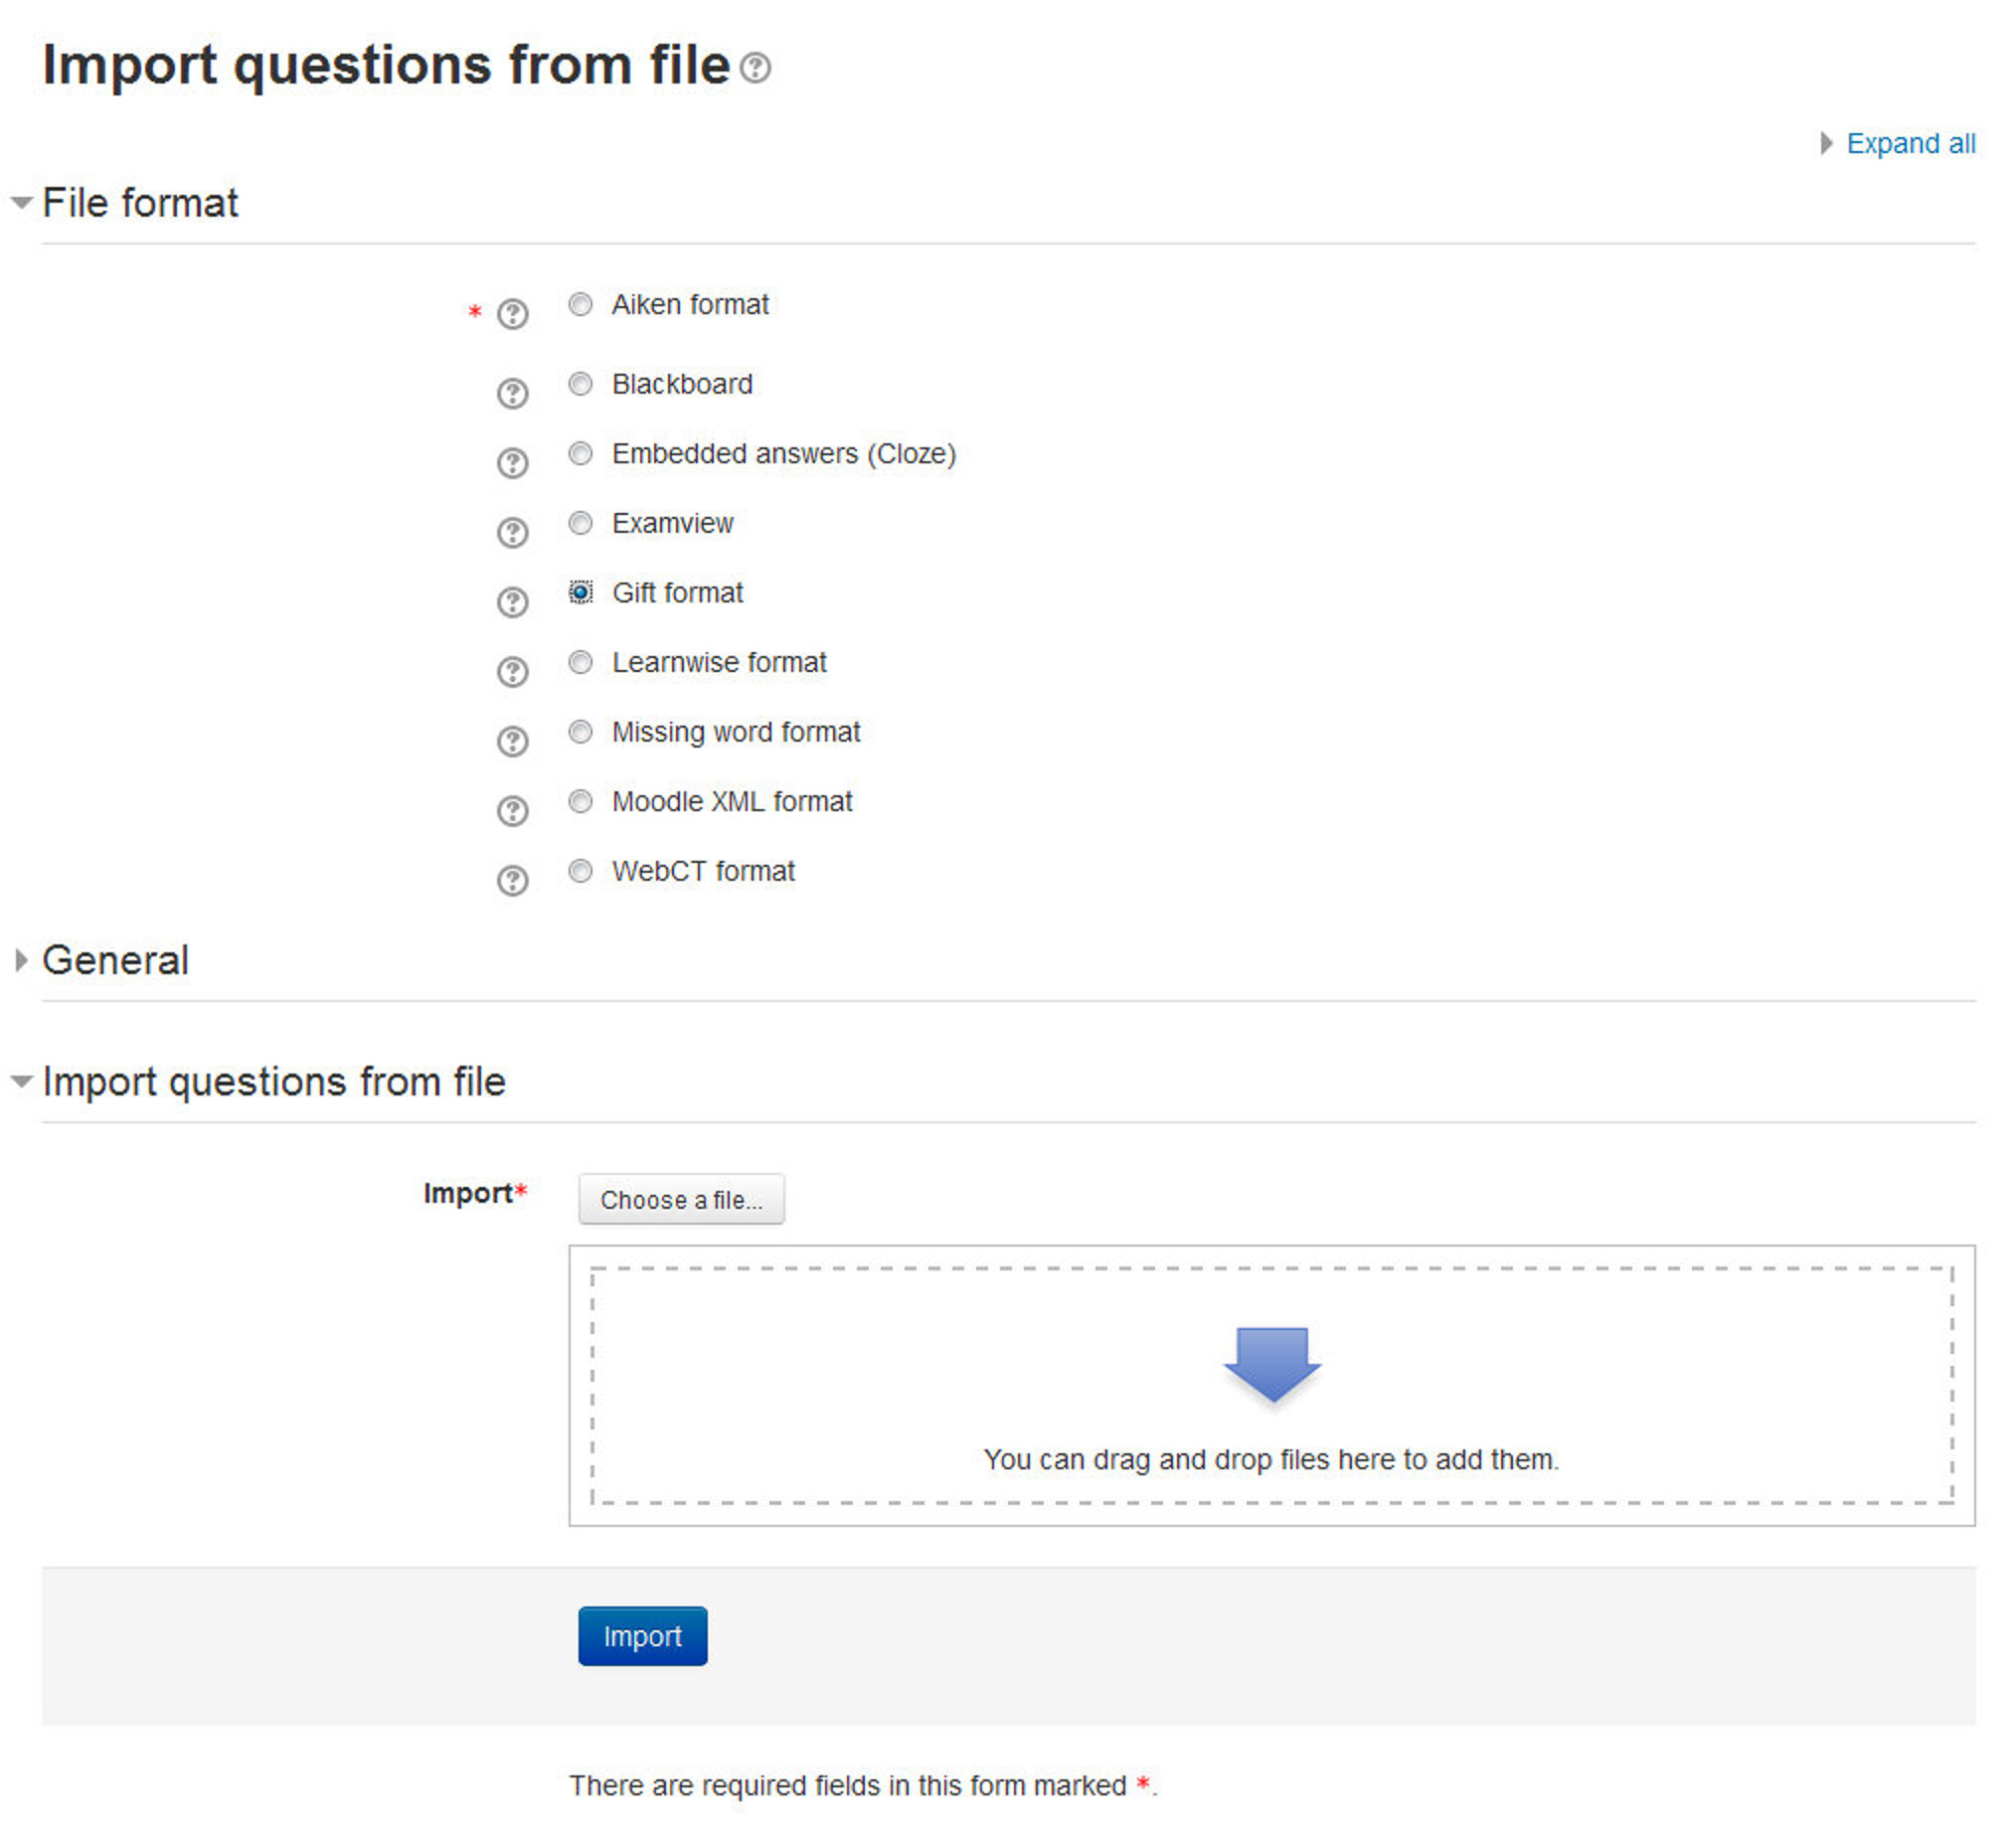
To start importing questions:
- Click Course Administration > Question Bank > Import to go to the Import questions page.
- Select a file format. The help pop up next to the file format drop-down menu contains further details of each format.
- Under the General Section: Select the category into which the imported questions will go. Certain import formats, such as GIFT and Moodle XML, may include category and context data in the import file.
- Choose “Nearest grade if not listed” from the “Match grades” drop-down menu. Otherwise, a question will not be imported if its grade is not included in the list of accepted grades found in the help pop up.
- Select what should happen if there are no grades or an error is detected in the import process.
- Upload the file to import in the Import questions from file section and click Import.
Exporting Questions
You can share questions you have created by exporting them to a text file. Possible export formats are to GIFT, Moodle XML, and XHTML. In addition, questions may be exported into Word format using a contributed plugin, Word table format. These can then be easily used to create paper tests.
To export questions:
- Click Course Administration > Question Bank > Export to go to the Export questions page.
- Select a file format. The export questions page in the Moodle documentation contains links to further information on each export format.
- Select a category from which the exported questions will be taken. in the General Section.
- Check if you want the category name to exported and/or the context to be included. This only applies to some formats and is used to restore this information on import.
- Click on the export questions to file button.
- You will be asked to download/save the file to your computer.
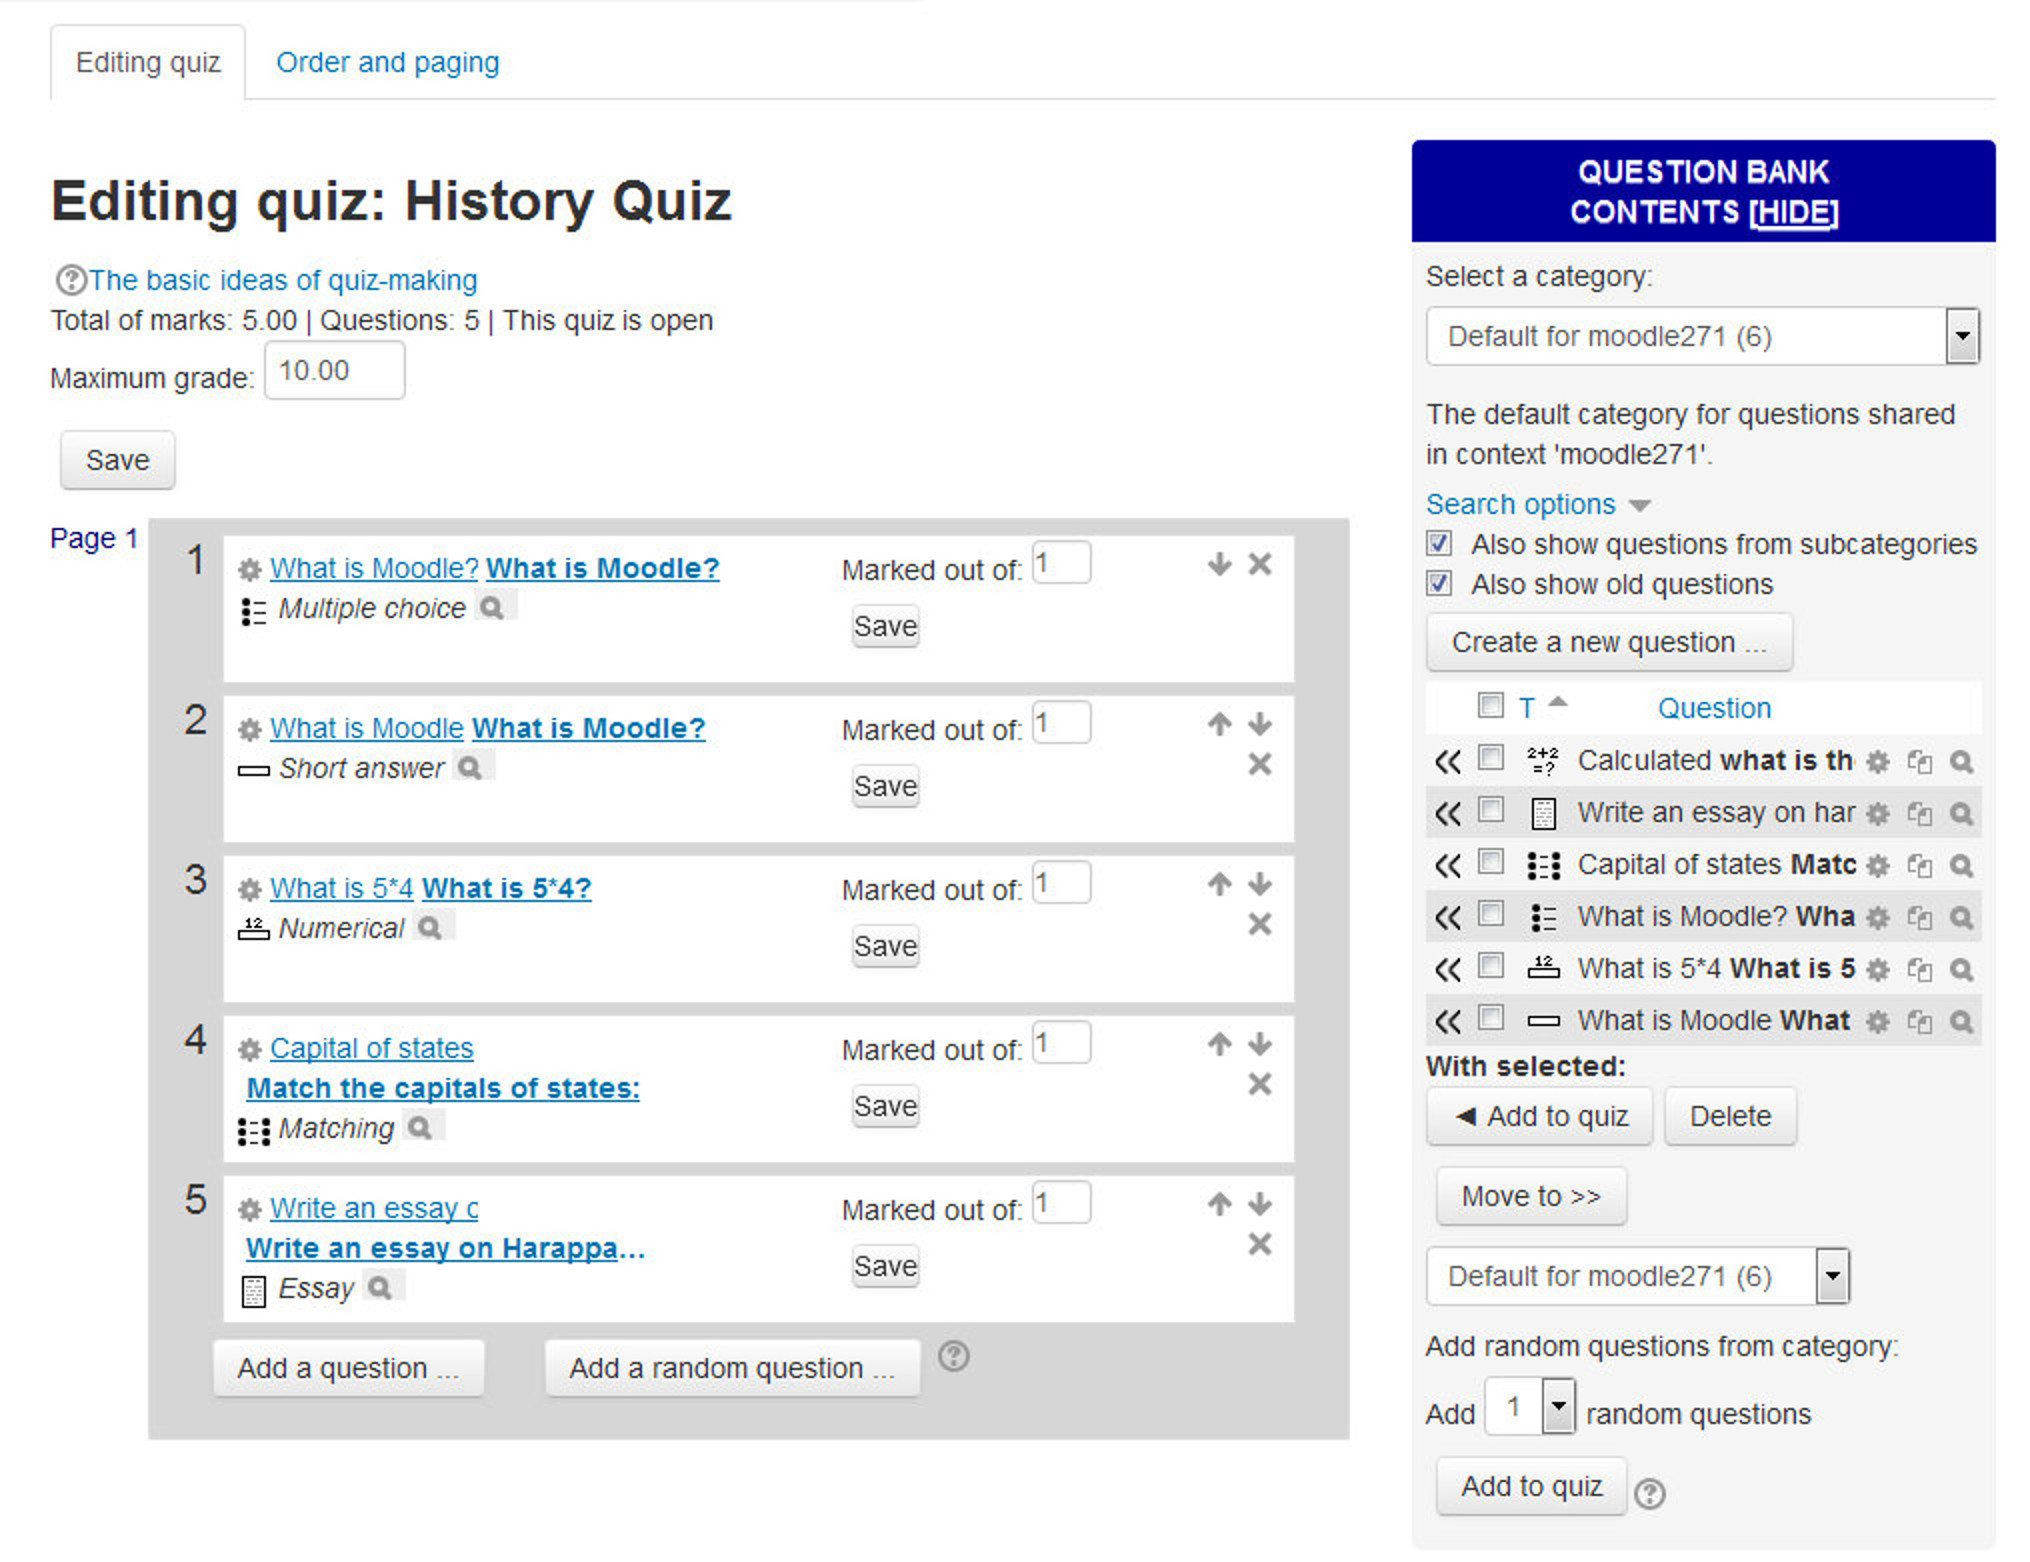
Adding Questions to a Quiz
Once you’ve created your questions, you need to add them to the quiz. On the editing quiz page, as shown in the figure 8-13, select a number of questions using the checkboxes and then click the “Add to quiz” button below the question list.
To add the individual questions to the quiz, just click the arrow ( « ) icon besides the question.
If you want to add all of the questions you created to the quiz, click the “Select all” checkbox in the top and then click the “Add to quiz” button.
T> To ensure all previously made questions are available, make sure to tick the boxes “also show questions from sub-categories/old questions.
Once you’ve added a question to the quiz, it appears on the left side of the page in the quiz question list. The question is still selectable on the right, but you can add it to the quiz only once. If you select the question in the category list again and add it to the quiz, nothing will happen.
If you have created a lot of questions, you may want to sort the question list by type and name.
Once you’ve added the questions to the quiz, you can change the order of the questions by clicking the arrow buttons on the right side of the list of quiz questions.
You can also delete a question from the quiz by clicking the delete icon.
You will also need to set the grade for each question. You can set the number of points for each question in the “Marked Out of :” field. You may want to make certain questions or question types worth more than others. Remember, the questions will be weighted to match the total points possible for the quiz you set in the quiz body. You should also set the “Maximum grade” for the whole quiz on the top of the page in “Maximum Grade” field. This does not have to be equal to the sum of the grades for the individual questions. The grades achieved by the students will be rescaled to be out of this maximum grade. When you’re done, click the “Save” button.
In the Order and Paging tab you can specify the order in which the questions appear within the quiz. If you have more than just a few questions, it’s a good idea to limit the number of questions displayed per page.
The numbers 10, 20, 30, … opposite each question indicate the order of the questions. The numbers increase in steps of 10 to leave space for additional questions to be inserted. To reorder the questions, change the numbers then click the “Reorder questions” button.
To add page breaks after particular questions, tick the checkboxes next to the questions then click the “Add new pages after selected questions” button.
You can “repaginate” by setting the number of questions per page. After setting the number of questions per page, you can move questions so that there are a different number of questions on each page.
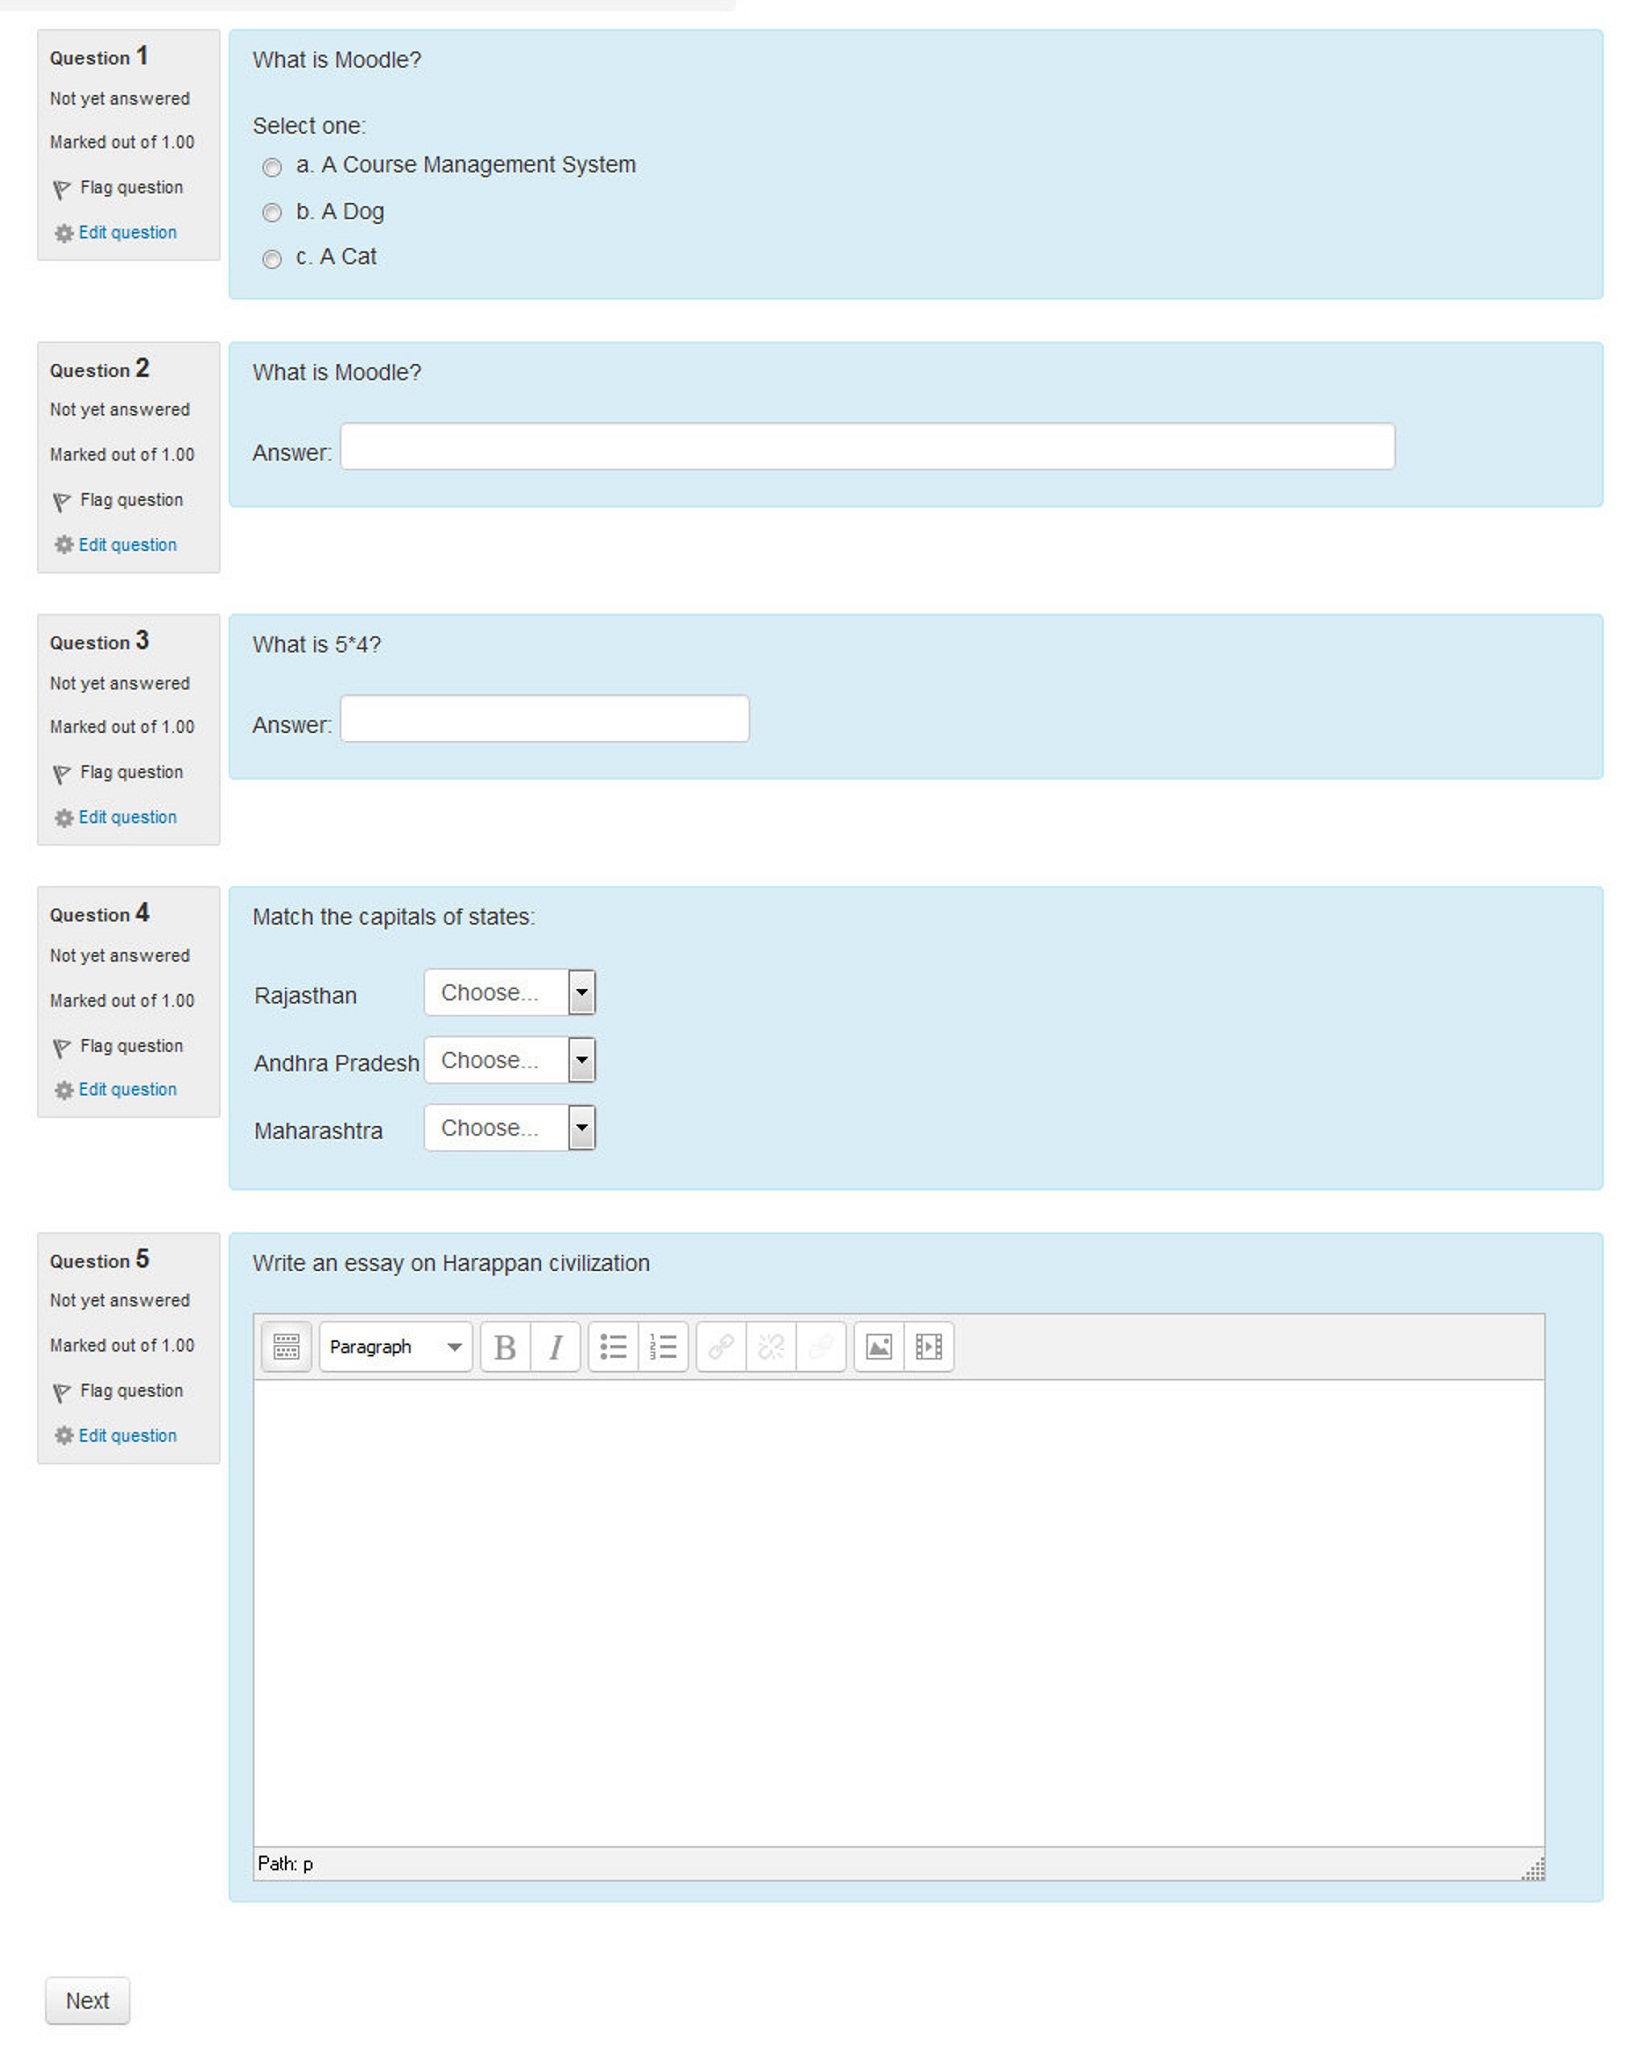
You can preview the quiz by clicking on the Preview tab in the Administration Block as shown in Figure 8-14. If you answer the questions, you can submit the quiz by clicking the “Submit all and finish” button and see the feedback and responses your students will see.
Your students will see two scores on the page. The first is the raw score representing the total points they scored out of the maximum possible points from each question. The second score is the weighted grade representing the number of points achieved out of the maximum possible points for the quiz.
If you’ve enabled feedback after answering, each question will be displayed below the scores with the answers marked correct or incorrect. If you’ve enabled the display of correct answers, they will appear highlighted. In the next section, we’ll discuss how to manage your quizzes.
Random questions
You can also add random questions to your quiz from the question bank directly. A random question is a placeholder for a randomly selected question. One of the advantages of a computer-generated quiz is the ability to generate a quiz from questions randomly selected from a category. Each random question will pull a question randomly from the question category and insert it into the quiz. This means that different students are likely to get a different selection of questions. When a quiz allows multiple attempts for each student then each attempt is likely to contain a new selection of questions. The same question will never appear twice in an attempt.
If you include several random questions then different questions will always appear for each of them. If you mix random questions with nonrandom questions then the random questions will be chosen so that they do not duplicate one of the nonrandom questions. This means that you need to provide enough questions in the category from which the random questions are chosen; otherwise the student will receive a friendly error message. The more questions you provide the more likely it will be that students get different questions on each attempt.
T> Note the die icon to highlight random question selection.
To add random questions to the quiz:
- Select the number of random questions you wish to add from the drop-down menu below the question list.
- Click the Add button.
Managing Quizzes
Once students start to take the quizzes, you’ll have a lot of data available. When attempts have been made on the quiz, the teacher can click the quiz name and access the reports by clicking the link “Attempts - (No. of attempts.) It is then possible to filter the reports according to preference.
You can also access quiz results by clicking on the Administration> Quiz administration > Results. This opens up other links, enabling them to view by grade, by correct response, by statistics and by manually graded responses:
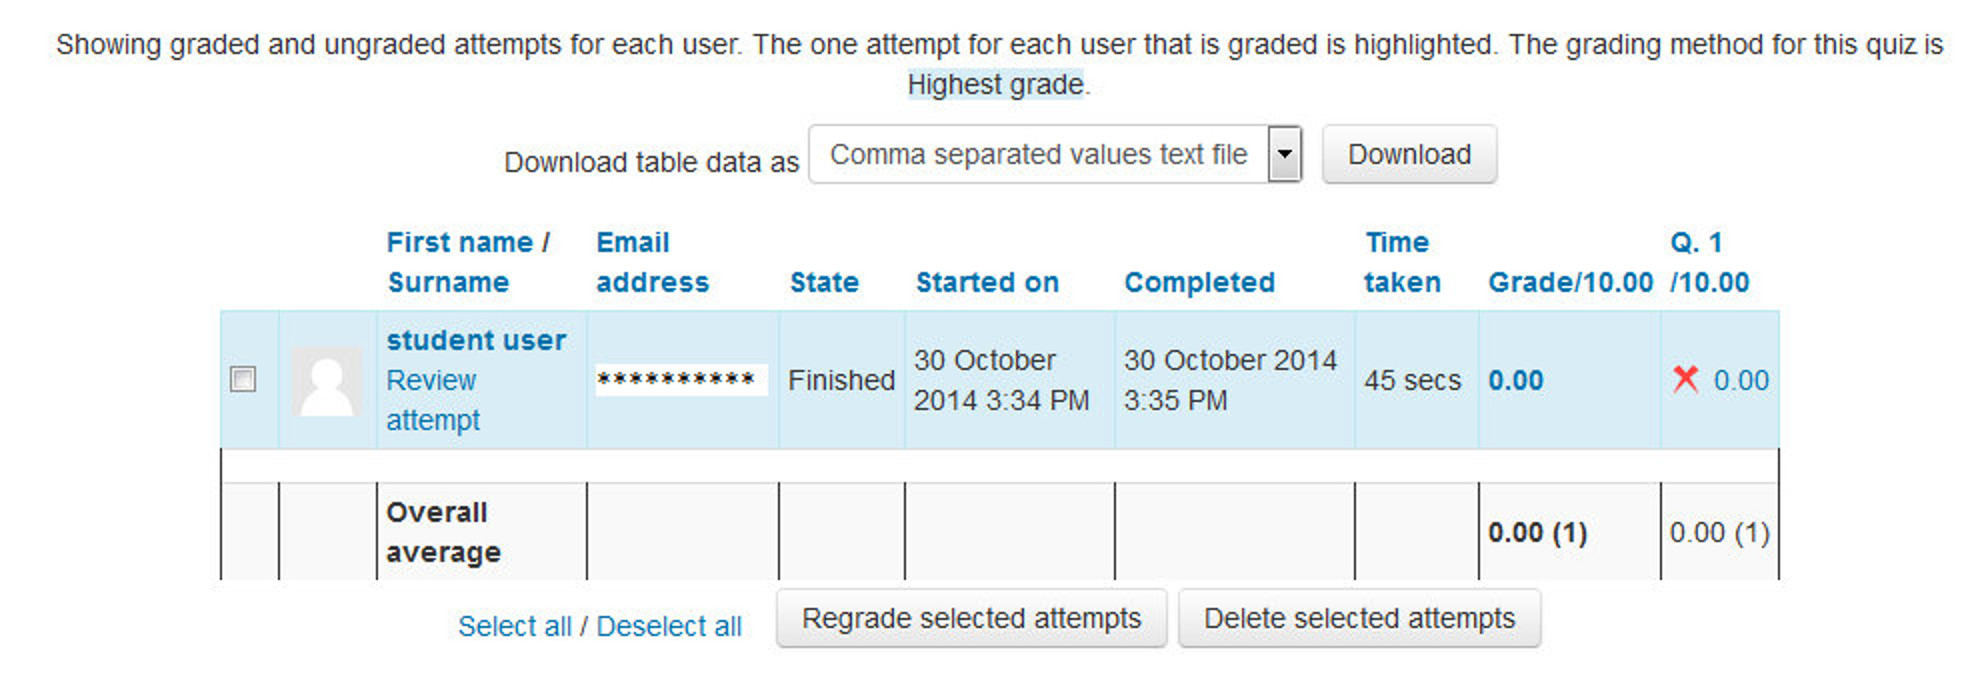
Grades report
Grade reports show all the students’ quiz attempts, with the overall grade, and the grade for each question. There are links to review all the details of a student’s attempt, just as the student would see it.
There is a setting form at the top of the page that can be used to control what is displayed.
The teacher can select from:
- enrolled users who have attempted the quiz;
- enrolled users who have not attempted the quiz;
- enrolled users who have, or have not, attempted the quiz;
- all users who have attempted the quiz
The results can be downloaded in a variety of formats. At the bottom of the page is a graph showing the distribution of scores. There are check boxes to allow you to individually regrade or delete the selected attempts. By clicking on the score link, you are able to look at an individual student exam.
Responses report
This is very similar to the Grades report, except that it shows the responses the students gave, rather than the marks they earned. It is also possible to show the question text or the right answer, to compare with the student’s response. This is helpful when the question is randomized.
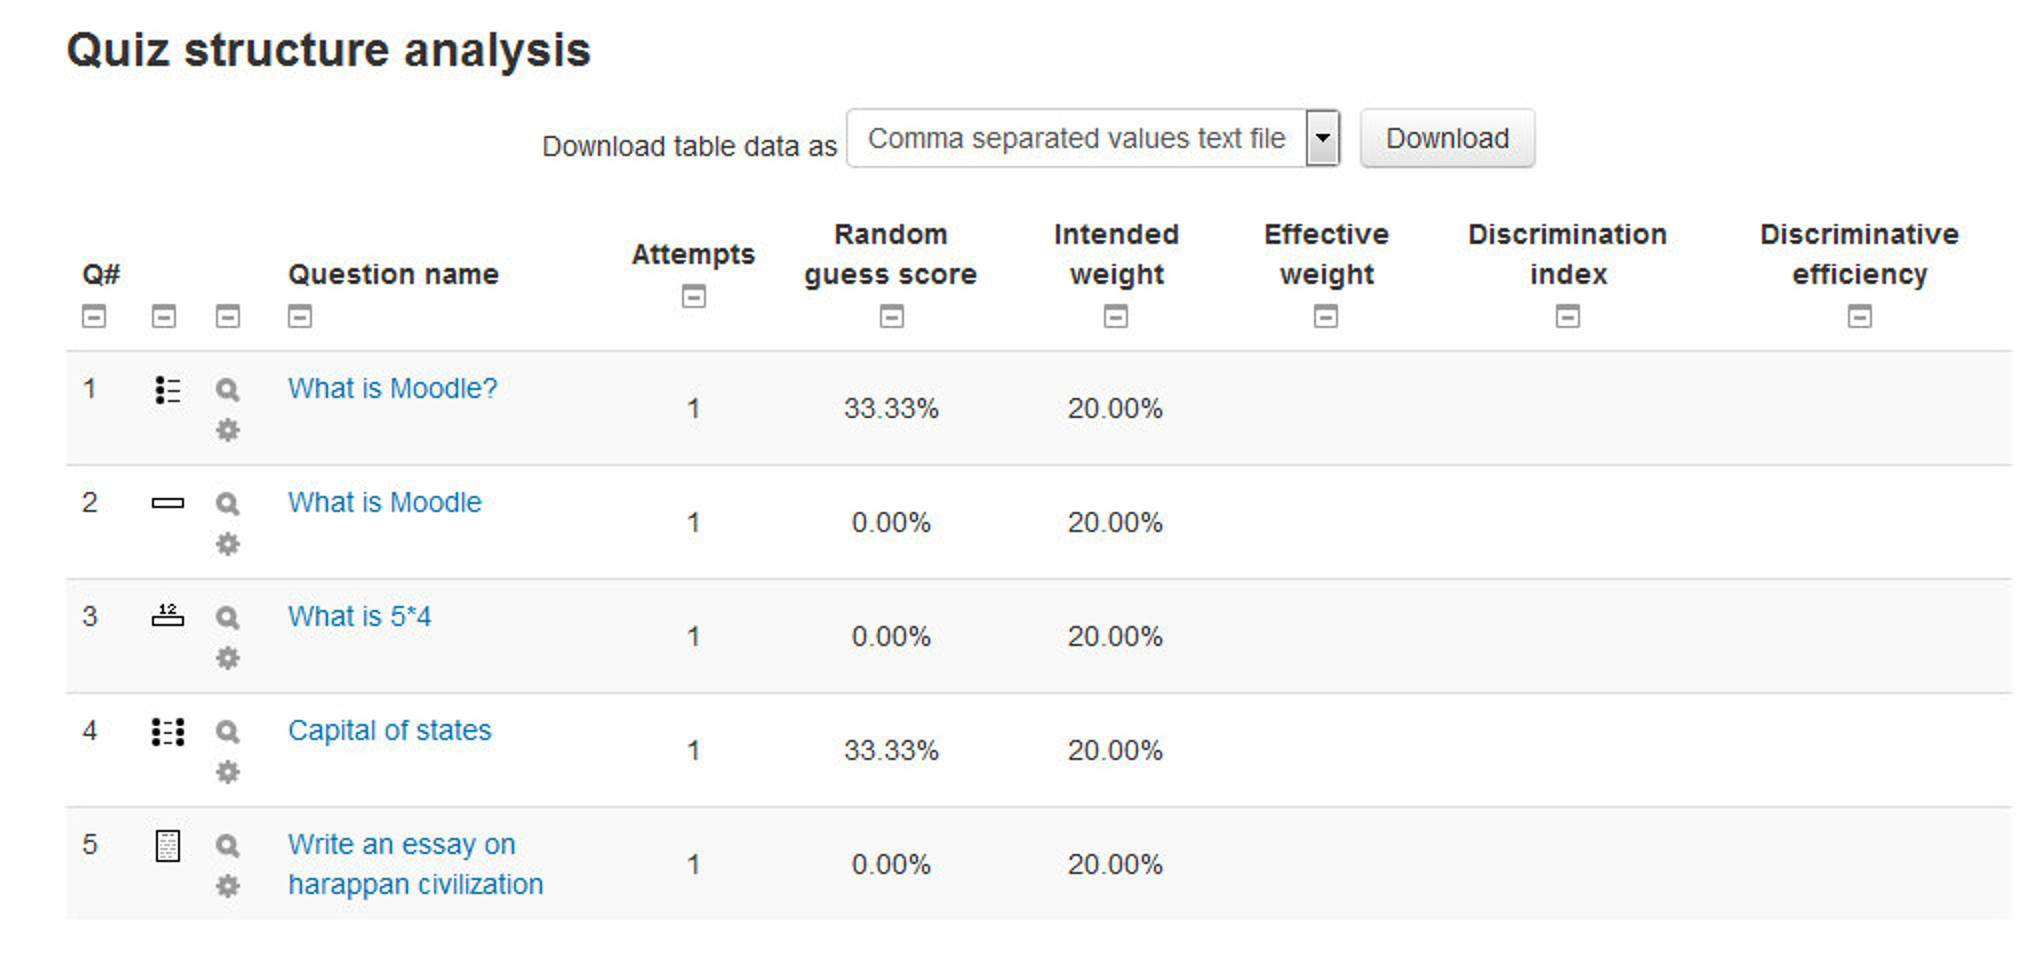
Statistics report
This report gives a statistical (psychometric) analysis of the quiz, and the questions within it. The front page of this report gives a summary of the whole test. There are then links to drill down into a detailed analysis of a particular question.
The full report (overview and detailed analysis of all questions) can be downloaded in a variety of formats, as can the quiz structure analysis table.
Manual grading report
The Quiz manual grading report makes it easy to manually grade questions in the quiz. The first screen of the report lists all the questions in the quiz that need to be, or have been, manually graded (for example essay questions) with the number of attempts. There is an option to also show the questions that have been automatically graded, which if useful if you ever need to edit the grades by hand.
T> If you decide to add additional questions to the quiz, you will need to delete all attempts before being allowed to do so.
Quiz Capabilities
The quiz module has a range of capabilities that allow you to create a number of student roles:
- Attempt quizzes: This allows a user to attempt the quiz. Guest users can never attempt quizzes. This capability is allowed for the student role only.
- Delete quiz attempts: This allows a user to delete quiz attempts. This capability is allowed for the default roles of manager and teacher.
- Get a confirmation message when submitting: This allows a user to receive email confirmation that their quiz attempt has finished successfully. This capability is not set for any of the default roles.
- Get a notification message when an attempt is submitted: This allows a user, usually a teacher, to receive email notification of quiz submissions. This capability is not set for any of the default roles.
- Grade quizzes manually: This allows a user to change the scores on a quiz, and manually grade quiz essay questions.
- Ignores time limit on quizzes: This allows a user unlimited time to attempt a quiz which has a time limit set. This capability is not allowed for any of the default roles.
T> You may wish to allow this capability for those students who are identified as requiring more time during assessment.
- Manage quizzes: This allows a user to manage quizzes. This capability is allowed for Administrator and Teacher Role only.
- Preview quizzes: This allows a user to preview quizzes. This capability is allowed for the default roles of manager, teacher and non-editing teacher.
- Review your own attempts: This allows a user to review their old quiz attempts, separate from the ability to attempt the quiz. This capability is allowed for the default role of student. It is not set for all other default roles.
- View quiz information: This allows a user to view the quiz introduction but not attempt the quiz itself. The default Guest role has this capability set to allow.
- View quiz reports: This allows a user to view quiz reports. This capability is allowed for Administrator, Teacher & Non-Editing teacher roles only.
Effective Quiz Practices
As we’ve seen, the Moodle quiz engine is a powerful, flexible tool for monitoring and diagnosing a student’s understanding of certain types of knowledge. Using this tool effectively can boost your course’s effectiveness and promote student performance. While a computer-scored quiz is a different evaluation than more open-ended assessments, it does give valuable insight into student thinking and can provide formative as well as summative assessment also, especially when you use good strategies and a little creativity.
Creative Quiz Uses
With the Moodle quiz engine, it’s easier to utilize educationally sound assessment strategies that would be too difficult to implement with paper and pencil. Most people think of tests as an infrequent, high-stakes activity, such as midterms and finals. Better strategies involve frequent, low-stakes assessments you and your students can use to guide student performance during the course of the semester.
Creating a series of mini-tests gives teacher a very flexible system for gauging performance and keeping students engaged in the class. Here are a few ideas for quick quizzes which can be used as part of a larger assessment strategy.
Chapter checks
Getting students to complete reading assignments has to be one of the hardest motivational tasks in education. Reading is critical to understanding most material and fundamental to success in many classes. The problem for most students is that there is no immediate punishment for procrastinating on a reading assignment. If they haven’t done the reading for a class discussion, they can either keep quiet or skim-read it in class. There’s almost no need to do the reading for a lecture course, since the lecturer usually covers most of the material in class anyway.
Creating a mini-test for each reading assignment solves a number of problems. First, it encourages students to do the reading so they can do well on the quiz. Secondly, it gives the students feedback on how well they understood the reading assignment. Third, it gives you data about which aspects of the reading students found confusing, and which they have already mastered, so you can refocus your class activities.
For a reading mini-test, setting a limited-time quiz that students can take only once is recommended. Because it’s a low-stakes activity that students should use for self-assessment, you could also display feedback and correct answers. If you’re concerned about students sharing answers after they’ve taken the quiz, randomize the question and answer order. If you have a test bank, make some of the questions random as well.
As an additional assignment, you could ask students to write down one question about a question they got wrong and bring it to class.
Test Practice
The key to effective practice is to have a realistic practice environment. Many students worry about tests, especially high-stakes tests, because they have no idea what to expect. What question format will you use? How detailed will the questions be? What should students study?
You can help alleviate test anxiety by creating a practice test students can take to help answer these questions. These tests are usually based on old questions similar to the upcoming test questions. Using last year’s final as an example test will force you to write new questions every year. This is a good idea anyway; since you can be sure someone has a copy of last year’s test and is sharing it with others.
To set up a practice test, you could create a zero-point test with questions from the year before in random order with random answers. You could also allow students to take the test as many times as they like so they can test themselves as much as they need. Display feedback, but not correct answers, so the test presents more of a challenge.
Data gathering
As an expert, you know a lot about your field. Your challenge as a teacher is to translate your knowledge for a novice who doesn’t share your conceptual understanding or experience. An example or lecture you think is brilliant may leave your students completely confused. It can be hard to tell what students really understand and what’s leaving them baffled.
A data-gathering quiz is similar to a chapter check, but it takes place after a class meeting or lecture. Your goal is to quickly get some feedback on your students’ understanding of a lecture. What did they really understand? What do you need to spend more time on? It can be difficult to gauge what students find difficult and what they find so easy that it bores them.
Setting up a post-class data-gathering quiz is similar to creating a chapter check. Set the quiz for a limited time, such as a day or two before the next meeting. Allow your students to take it once and display feedback and correct answers.
Progressive testing
A very nice example of using the new feedback system with other options is the idea of progressive testing. To implement this, you need to create a series of increasingly difficult quizzes. The first quiz should be open to anyone, with the later quizzes protected by a password. In the feedback for each quiz, decide a cutoff percentage which you feel represents mastery of the skills tested. If the students’ score is greater than the cutoff score, the feedback message includes a link to the next quiz with the appropriate password.
In this way, students gradually have access to increasingly difficult tests, and it allows them to concretely demonstrate their progress. But they don’t become frustrated with questions that are too difficult.
More ways in which Quizzes may be used are:
- as unit or course exams
- as mini-tests for reading assignments or at the end of a topic
- as exam practice using questions from previous years’ exams
- to deliver immediate feedback for printed workbook activities
- to provide feedback about performance
- For self-assessment to allow students to generate their own quiz questions for a practice question bank.
Quiz Security and Cheating
Of course, online testing also presents another chance for the cheaters in your classes to try to game the system. Most online quizzes are meant to be taken at home, or at least outside of class. Students can download the questions and print them out. They can take the tests with other students or while reading their textbooks.
Fortunately, you can counter many of these strategies, making them more trouble than they are worth. Let’s look at a few strategies for countering most cheating schemes:
Printing and sharing questions
If you display feedback and correct answers, students can print the results page and share it with their friends. Or they can simply print the questions themselves directly from the quiz. The key to discouraging this behavior is to randomize the question order and answer order. It makes the printouts a lot less useful. Creating larger question banks and giving tests with random subsets is also an effective strategy. If students can print only a small number of questions at a time, they will need to view the test again and again, and then sort the questions to eliminate duplicates.
Using the textbook
Students will frequently look up the answer to questions in the textbook or a reading. If you are giving a chapter-check quiz, then this is what you want them to do. Otherwise, you need to come up with creative ways to make the textbook less directly useful. Timed quizzes are the single most effective tool for eliminating this strategy. If you include enough questions and make the time to take the quiz short enough, students won’t have time to look up all the answers.
Asking students to apply their knowledge to novel situations can also make a difference. Synthesis and application questions can’t be looked up. Students have to understand the material and apply it creatively to answer the questions. So while they may take the time to review the text, they will still need to understand what they’ve read to successfully answer the question.
Working with friends
If your students are on the same campus, they may meet in a lab and try to take the quiz together. This strategy is easily thwarted with random question order, random answer order, and random questions pulled from a test bank. If my screen doesn’t look like yours, then it’s harder for us to quickly answer all of the questions. A timed quiz also makes it harder for the two of us to cheat if we have different questions and only a short amount of time to answer.
Have someone else take the test
The old adage goes, “On the Internet, no one knows you’re a dog.” And no one knows who is actually taking the test. Students will sometimes pay classmates, or others who have taken the course in the past, to take online quizzes for them. There are two ways to counter this strategy. One, have an occasional proctored exam where students need to show ID. If they haven’t taken the quizzes or done the work until then, they will do poorly on the proctored exam. Second, to eliminate current classmates from taking each other’s quizzes make them available only for a short time. You could require everyone to take the test within a two- to four-hour block. If the test is properly randomized, it will be very difficult to take it more than once during the testing period. The test-taker will worry about her own grade first, then about her employer’s grade.
Obviously, there are many strategies students can use to cheat. While it would be naïve to assume there isn’t cheating, the vast majority of your students want to succeed on their own merits. The anonymity of the online environment may open up new avenues for the cheaters, but it’s not really much different from your face-to-face classes. A few people will go to great lengths to cheat, but most will be honest as long as it’s not too easy to get away with it. A few precautions will eliminate most of the cheaters, and the classic strategies will work for the others.
Summary
Quizzes can be configured to allow multiple attempts. Each attempt at a question is automatically marked, and the teacher can choose whether to give feedback and/or show the correct answers. There are many ways to use a quiz. - Feedback about performance and self-assessment are important parts of a learning environment. There are several ways to give feedback to students: on each question or overall. The quiz module can display feedback and scores at different times during the quiz, using the review options in the Quiz settings. - You can install additional plugins to gamify your Moodle quiz to create a variety of interactive games for participants. - A wide variety of Quiz reports (in addition to Grades) are available for use by the teacher. Quiz reports not only can focus on a single student’s attempt to answer each question, but also can perform a robust item analysis of a question’s validity based upon aggregated student responses. - A single quiz can automatically select random and/or specific questions from different categories of questions. - There are different options for scoring (marks-grades) individual questions in a specific quiz, grading attempts for a quiz and each question type. - The quiz settings allow different display methods. They can randomize the questions for each student and or randomize the answers for each student. - The teacher can determine the number of questions on each page of questions the student sees. The teacher can change the position of any question in the quiz. It is possible to put a label with information any place between questions. - The teacher can choose how questions behave during the quiz. It can be like a classic test, where the student gets no feedback while attempting the test, only later. Alternatively, Moodle can reveal the grades and/or feedback to the student during the quiz, and perhaps even give them another chance to answer the question (for fewer marks) having read the feedback.